
Winbox USDT Withdrawal Tutorial: Step-by-Step
This tutorial follows the USDT withdrawal flow shown in five screenshots, from the Me screen to the order details screen. Red numbers on the screenshots match the 11 steps below. For withdrawals that don't use USDT, see the general withdrawal tutorial.
- 11 steps
- 5 screenshots
- Captured in 2023
Before you start
- Sign in first. The first screenshot is the Me screen of a signed-in account, so sign in to Winbox before you begin.
- Use an account that already exists. If you don't have one yet, you can create a Winbox account first.
- Have the receiving address to hand. The form has a USDT Address field to fill in.
- The screens are in Chinese. Labels in quotation marks are the English wording for each option. The Chinese label visible on the screenshot is shown under every step.
Step-by-step USDT withdrawal
Five screens, eleven steps. Steps 5 to 8 happen on one form and steps 9 to 11 on one order screen, so they share a screenshot.
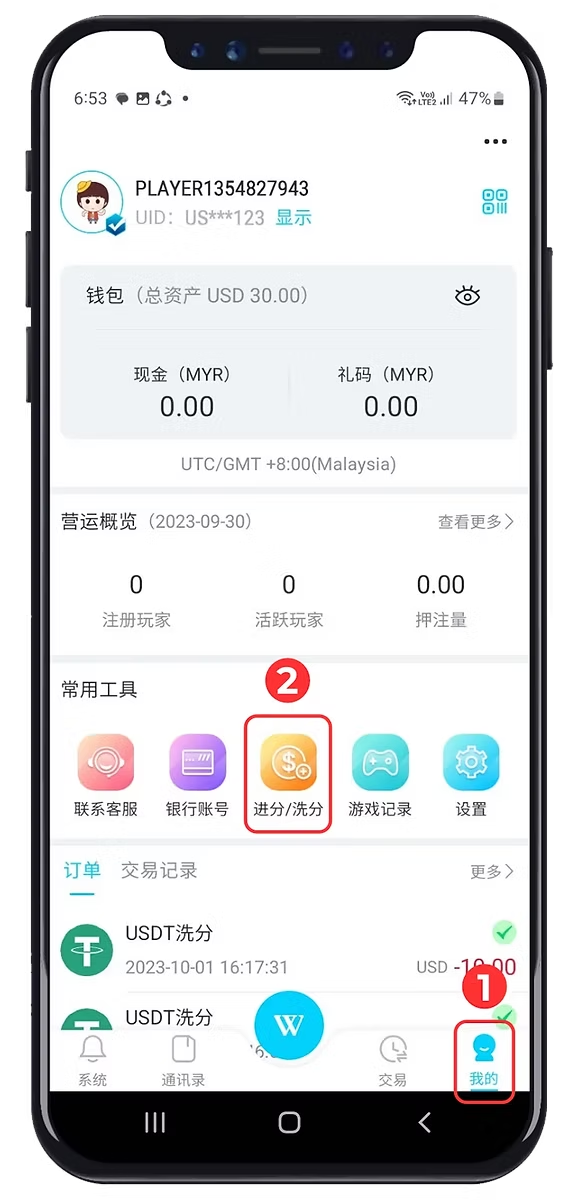
Tap Me
In the bottom bar, tap “Me”. It is the right-most tab and carries marker 1.
On the screenshot: 我的
Open Recharge / Withdraw
In the Tools row, tap “Recharge / Withdraw”. It is the orange coin icon and carries marker 2. The same row holds the helpdesk, bank account, game records and settings tools.
On the screenshot: 进分/洗分
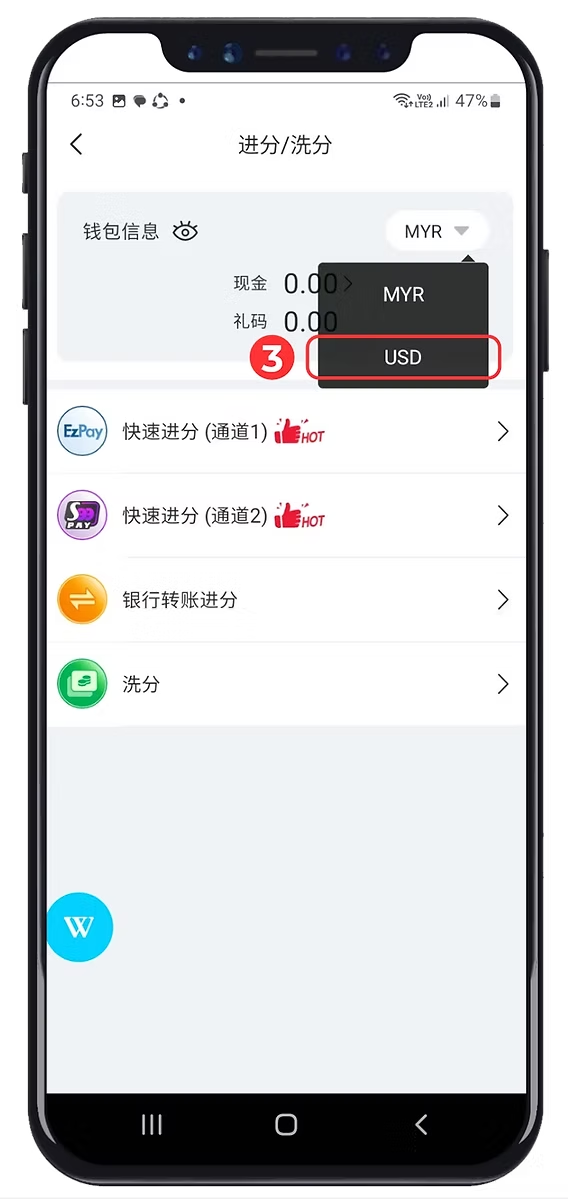
Switch to USD if needed
Open the currency selector at the top right of the wallet panel. In this screenshot it reads MYR and lists MYR and USD. Choose “Switch to USD Currency”, which is the USD option marked 3.
If the selector already reads USD, there is no need to switch again. Go to the next step.
On the screenshot: USD
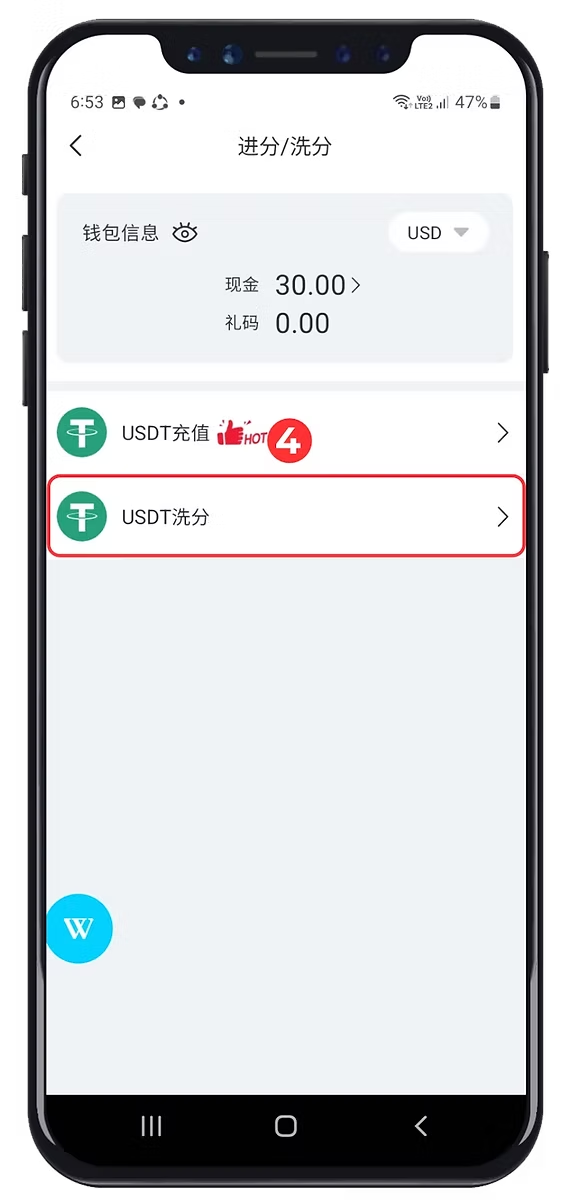
Choose USDT Withdraw
With USD selected, the screen lists two USDT options. Tap “USDT Withdraw”, the second one, outlined in red. The first is for topping up, which has its own tutorial.
On the screenshot: USDT洗分
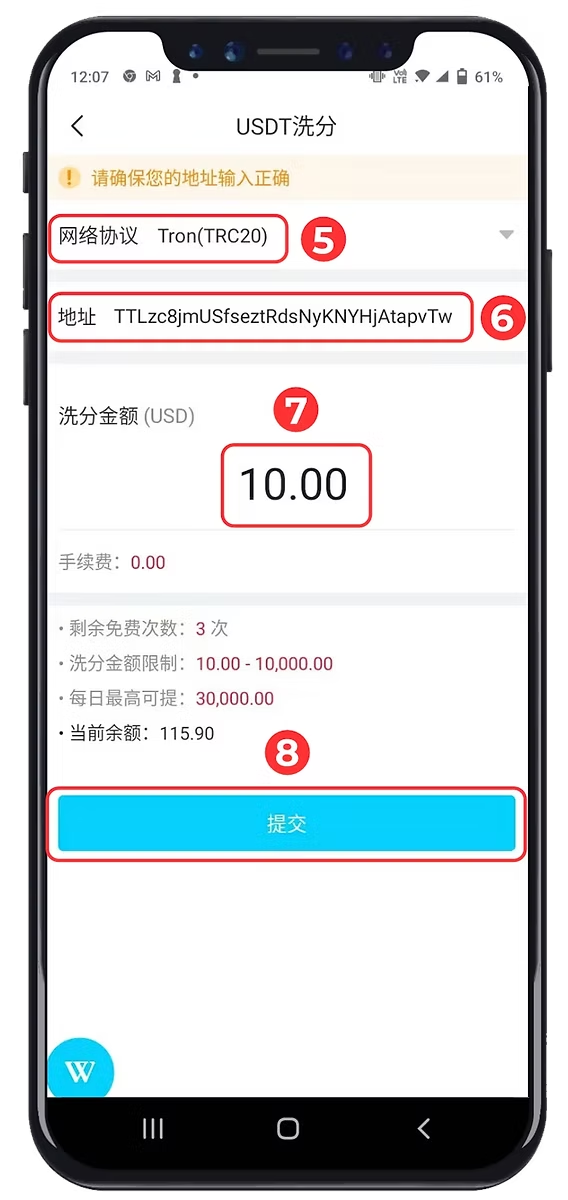
Select Network Protocol
The first field is “Network Protocol”, with a dropdown arrow at the right. This screenshot shows one value, Tron(TRC20), and does not show any other options, so this tutorial can’t list them or say which one to use.
On the screenshot: 网络协议
Enter USDT Address
Fill in the “USDT Address” field. A yellow notice above the form asks you to make sure the address is entered correctly.
Check the address and selected network shown on the current interface before continuing. The address in the screenshot is only an example.
On the screenshot: 地址
Enter Withdrawal Amount
Enter the “Withdrawal Amount”. The field is labelled USD, and the example uses 10.00.
Below it the screen lists a fee line, remaining free times, an amount limit range, a daily maximum and the current balance. Those figures belong to the example account. Read the ones on your own screen instead of relying on these.
On the screenshot: 洗分金额 (USD)
Tap Submit
Tap “Submit”, the blue button at the bottom of the form. Before you do, read the network, address and amount once more.
On the screenshot: 提交
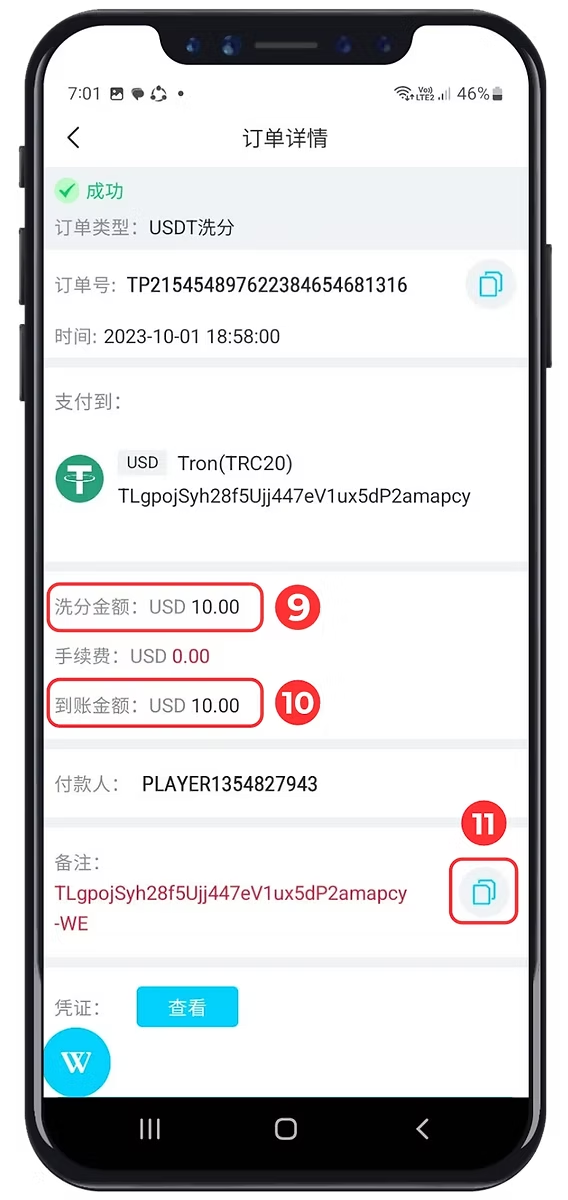
Read the Chip Laundering Amount
The order details show a row labelled “Chip Laundering Amount”, USD 10.00 in the example. This tutorial uses the label as the interface shows it and doesn’t explain the term.
On the screenshot: 洗分金额
Read the Credited Amount
Two rows further down is “Credited Amount”, also USD 10.00 in the example, with a fee row of USD 0.00 between the two. The screenshot doesn’t say how the amounts relate, so this tutorial doesn’t either.
On the screenshot: 到账金额
Copy the Note
The “Note Function” row has a copy button at its right (marker 11). Copy it to find the detailed record on the virtual platform, as the instruction supplied with these screenshots says.
The set has no screenshot of that lookup, so where and how to search there isn’t shown.
On the screenshot: 备注
Before you submit
A short check on the form in front of you:
- The Network Protocol field shows the network you meant to use.
- The USDT Address is the one you meant to send to, and it matches that network.
- The Withdrawal Amount is the amount you meant, in USD.
- The fee, free-times, limit and balance lines on your own screen say what you expect. The example values don’t apply to you.
What the order details screen shows
The last screenshot, row by row. The right-hand column is what it leaves open.
- Status
- A green tick and the word Success at the top of the screen.It doesn’t say how long the request took to reach this state or when the USDT arrives.
- Order type and number
- The type reads USDT withdraw, followed by an order number and the date and time.The number is specific to that order and isn’t reproduced here.
- Pay to
- USD, the network (Tron(TRC20) in the example) and the receiving address.It shows the destination for that order. Compare it with what you meant to send.
- Chip Laundering Amount, fee and Credited Amount
- USD 10.00, a fee row of USD 0.00, then USD 10.00.The screen doesn’t explain the first label or how the three rows relate.
- Note and voucher
- A note with a copy button (marker 11) and a View button beside a voucher label.The View button isn’t part of the supplied steps and isn’t explained.
If your screen looks different
These screenshots carry 2023 dates and show the Chinese-language screens. The USDT top up slides on this site, dated 2024, show a newer English Me screen where Top Up and Withdraw are separate tools, instead of the single Recharge / Withdraw tool used here. There is no screenshot of the newer USDT withdrawal path, so follow the labels your own screen shows.
The form screenshot and the order details screenshot were captured at different times, which is why their addresses and dates differ. If you use the Android app rather than a browser, that may also change what you see; the Winbox APK download page covers installing it.
What this tutorial doesn't establish
- Any network other than the one visible in the example
- A minimum, maximum or daily limit that applies to every account
- A fee rule
- How long a withdrawal takes to process or arrive
- How Chip Laundering Amount and Credited Amount are worked out
- Where and how to look up the record on the virtual platform
Next
Adding funds with USDT is a separate flow with its own steps, in the USDT top up tutorial. Everything else, from the other tutorials to the game categories, starts from the Winbox website.