Winbox Top Up Tutorial: Step-by-Step Deposit Guide
Winbox calls it Top Up; many people search for it as a deposit. Choose the method you are using and follow its own screenshots. There are separate steps for DuitNow, E-Wallet, EZPay and WinPay, and they are not the same. This guide describes what the screenshots show. It doesn't promise that any method is available to you.
The screenshots were captured in 2024, so your screen may look different. See if your screen looks different.
Before you top up
These screenshots all start from an account that already exists. If you don't have one yet, the Winbox registration page explains what to prepare first.
- Sign in first. Every set of screenshots starts from a signed-in Winbox account, on the Me screen. If you need help getting in, see the Winbox login page.
- Pick the tab for the method you will use. The four methods don't share one workflow, so follow the steps for yours.
- Have the app you'll pay with to hand. That is a bank app for DuitNow, a wallet app for E-Wallet, and your online-banking login for EZPay and WinPay. Several screens showed countdowns.
- Only enter payment credentials on the payment page you opened yourself. Never send a password, PIN or approval prompt to anyone.
Choose your top-up method
Each tab has its own steps and screenshots. Nothing is shared between them.
Top up with Instant Scan Top-up (TNG/DuitNow)
On the Top Up screen this option is named Instant Scan Top-up (TNG/DuitNow). In the screenshots you get a QR code from a payment page, save it to your phone, then scan it from the gallery inside a bank app. It is the longest of the four, and it switches between two apps partway through. 13 steps.
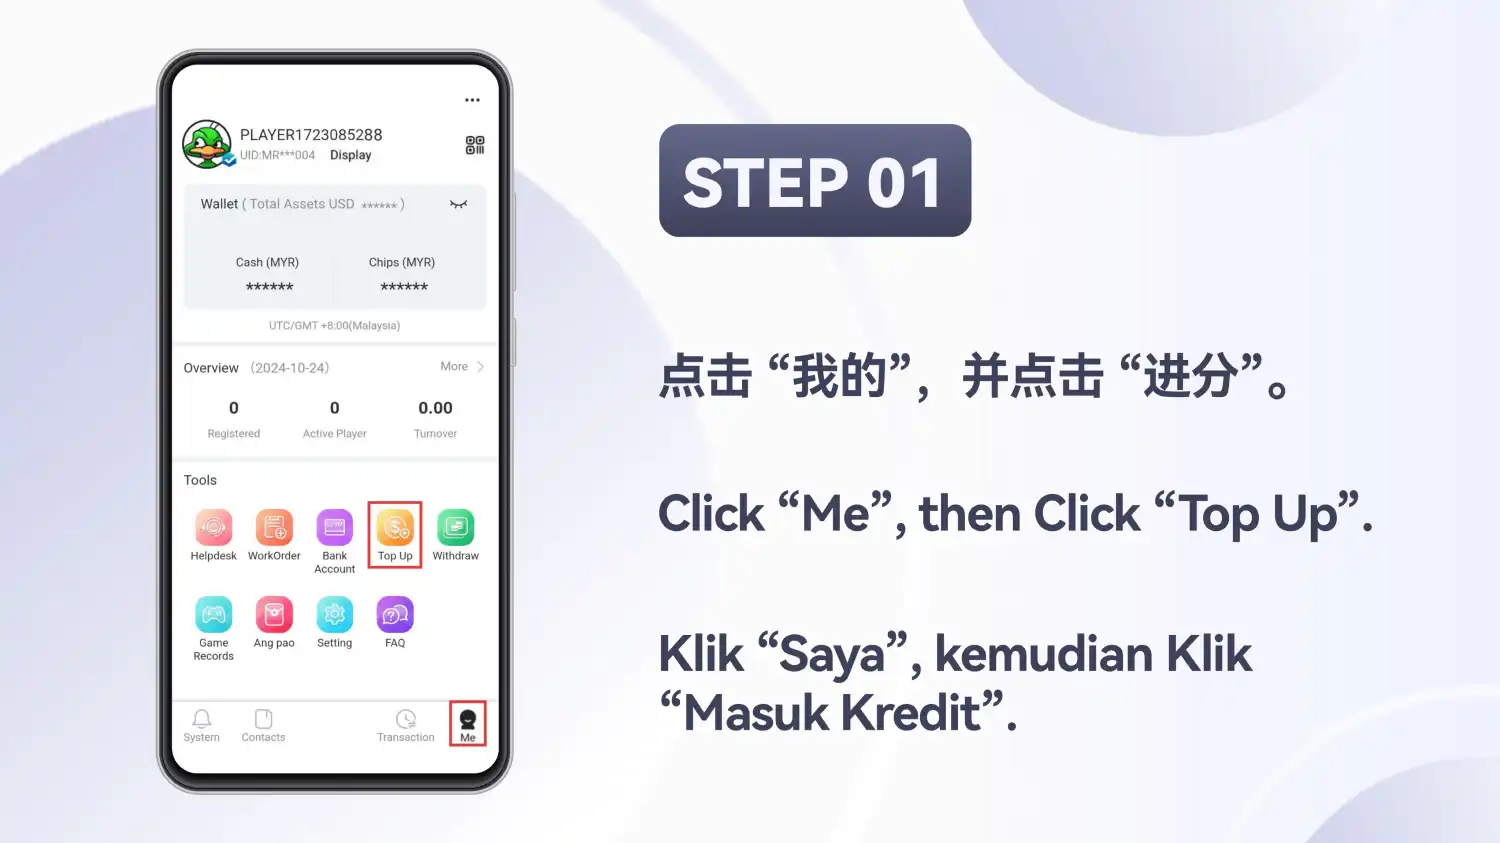
Go to Me, then Top Up
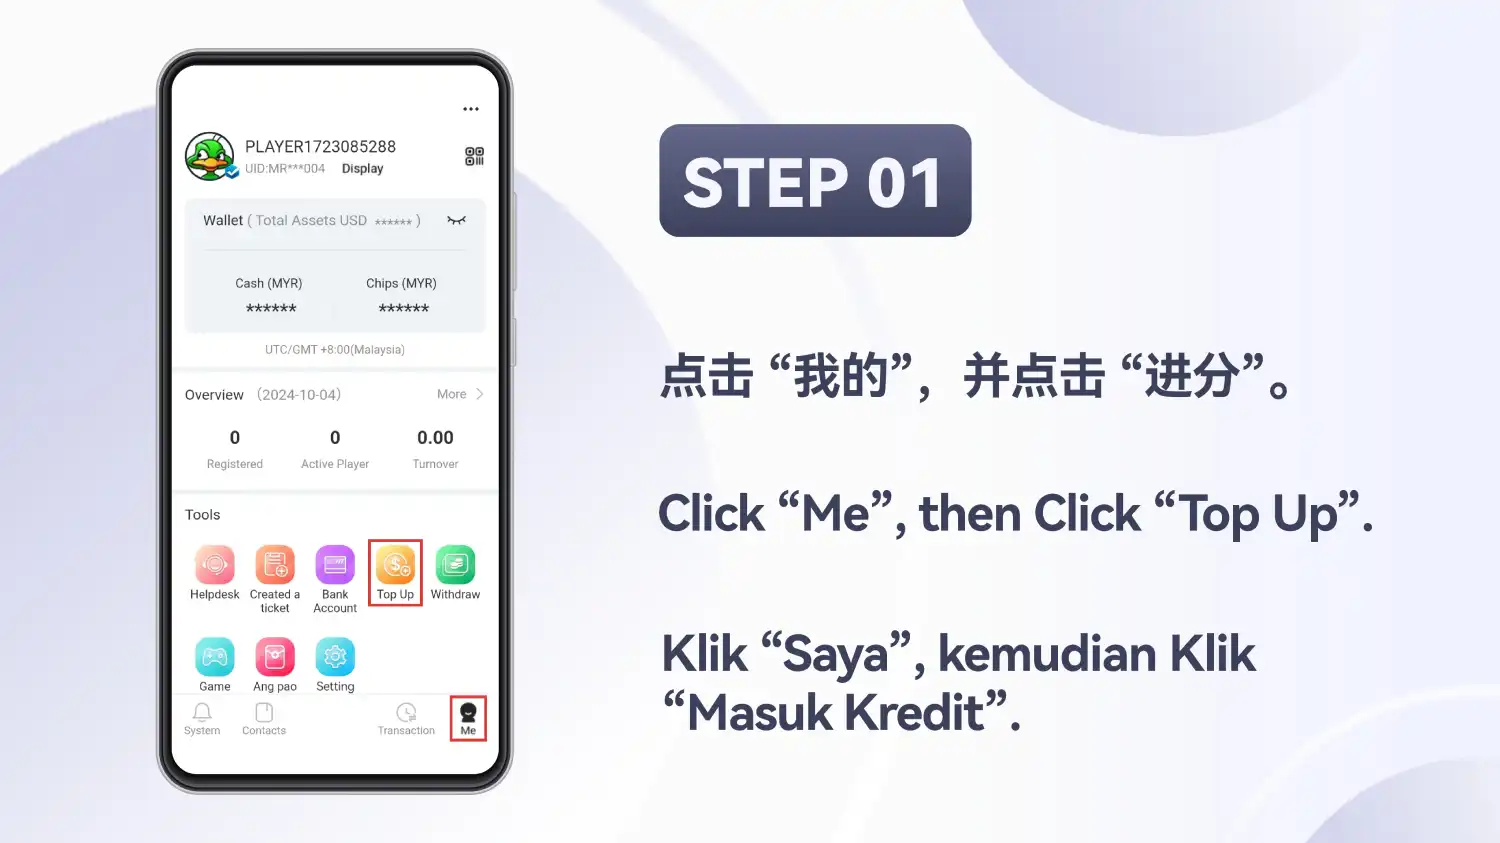
In your Winbox account, tap Me, then Top Up. Both the Me tab and the Top Up tool are highlighted in the screenshot.
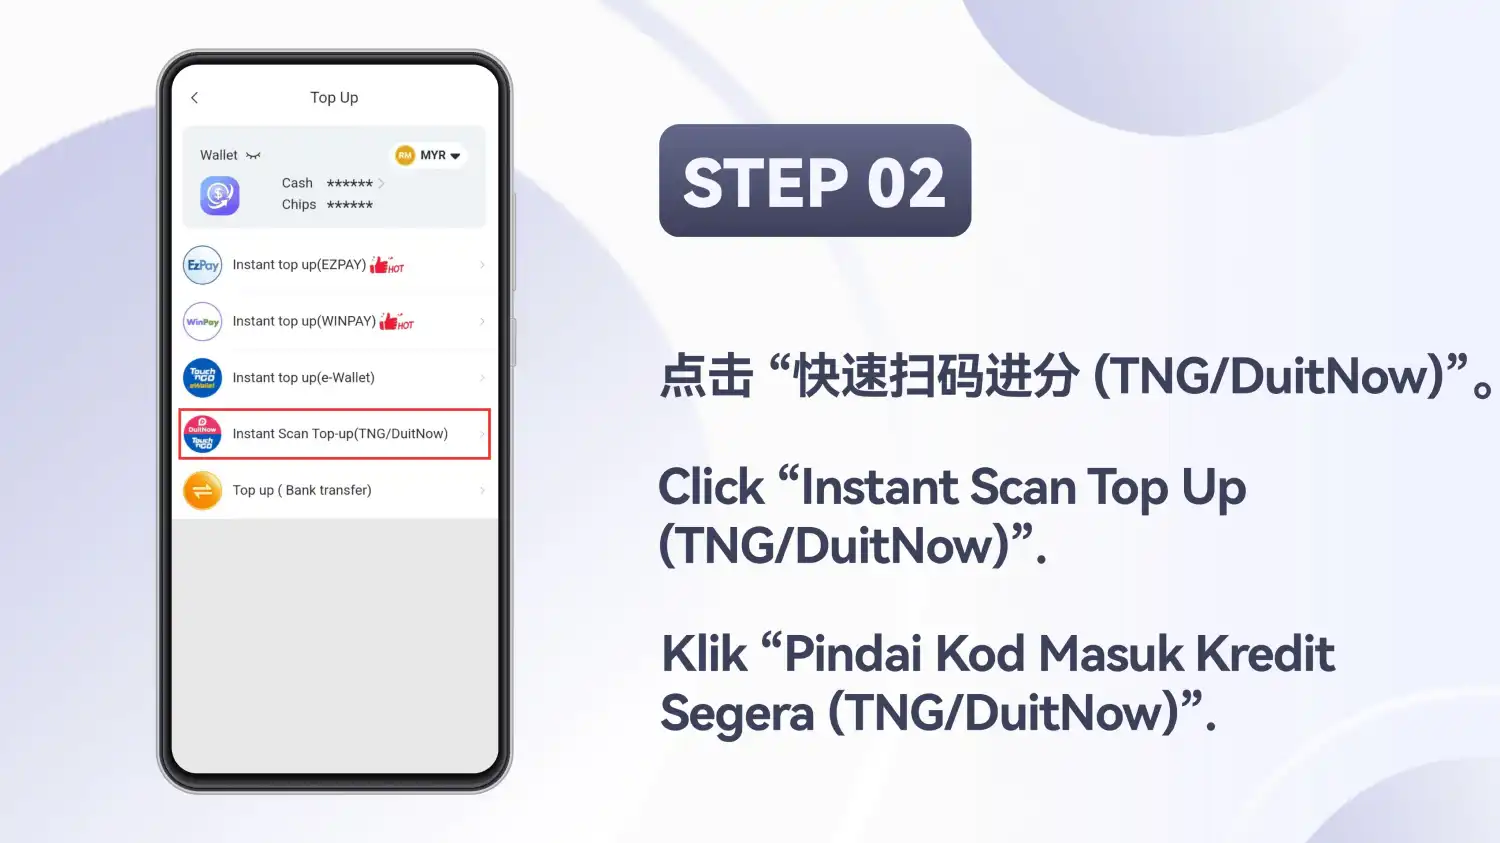
Choose Instant Scan Top-up (TNG/DuitNow)
The Top Up screen lists its options. Pick Instant Scan Top-up (TNG/DuitNow). The list in the screenshot also had other options, which this guide doesn't cover.
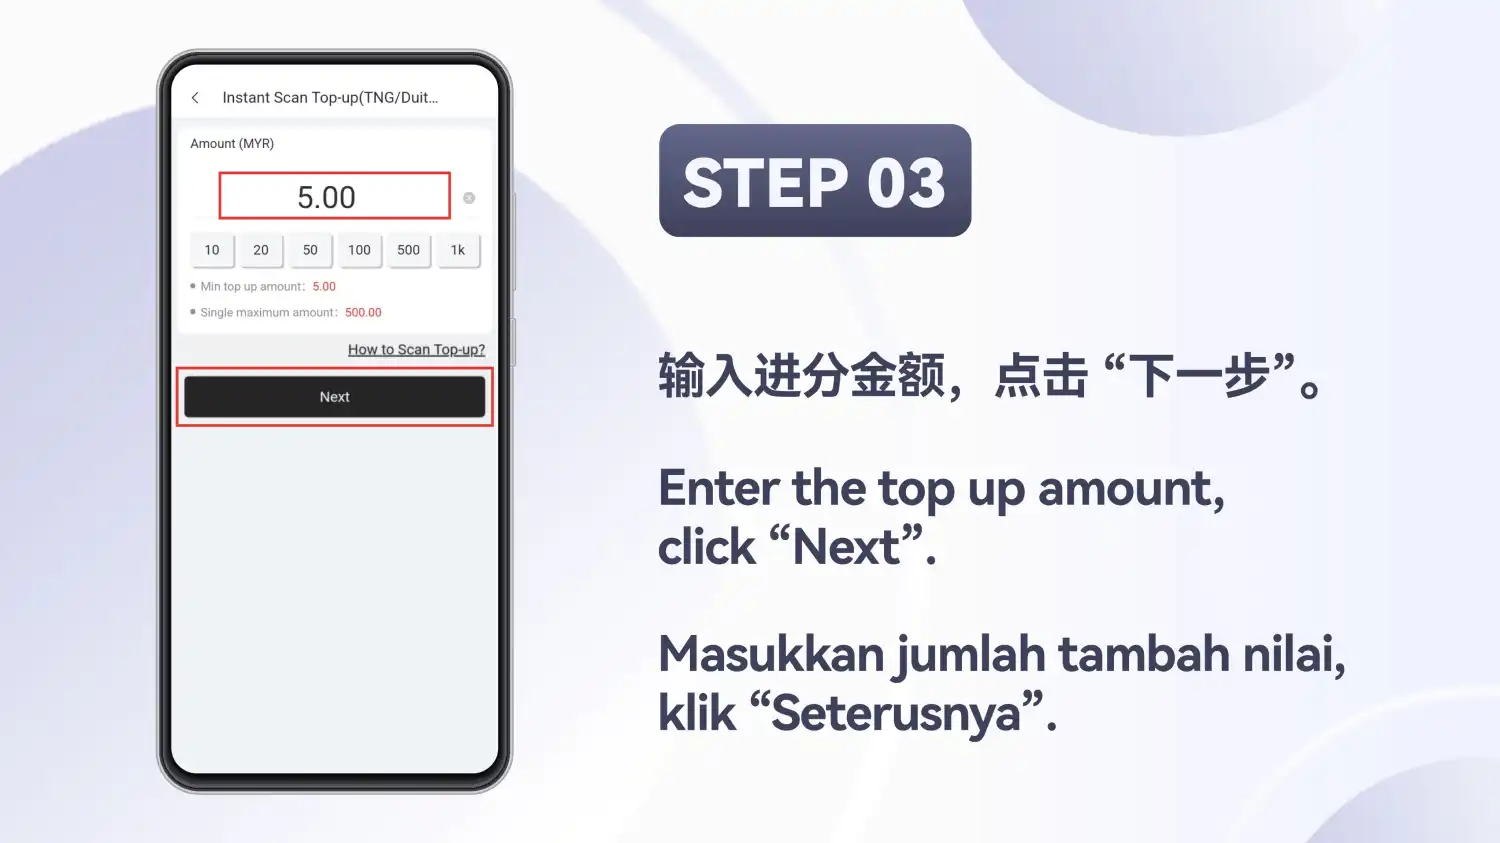
Enter an amount and tap Next
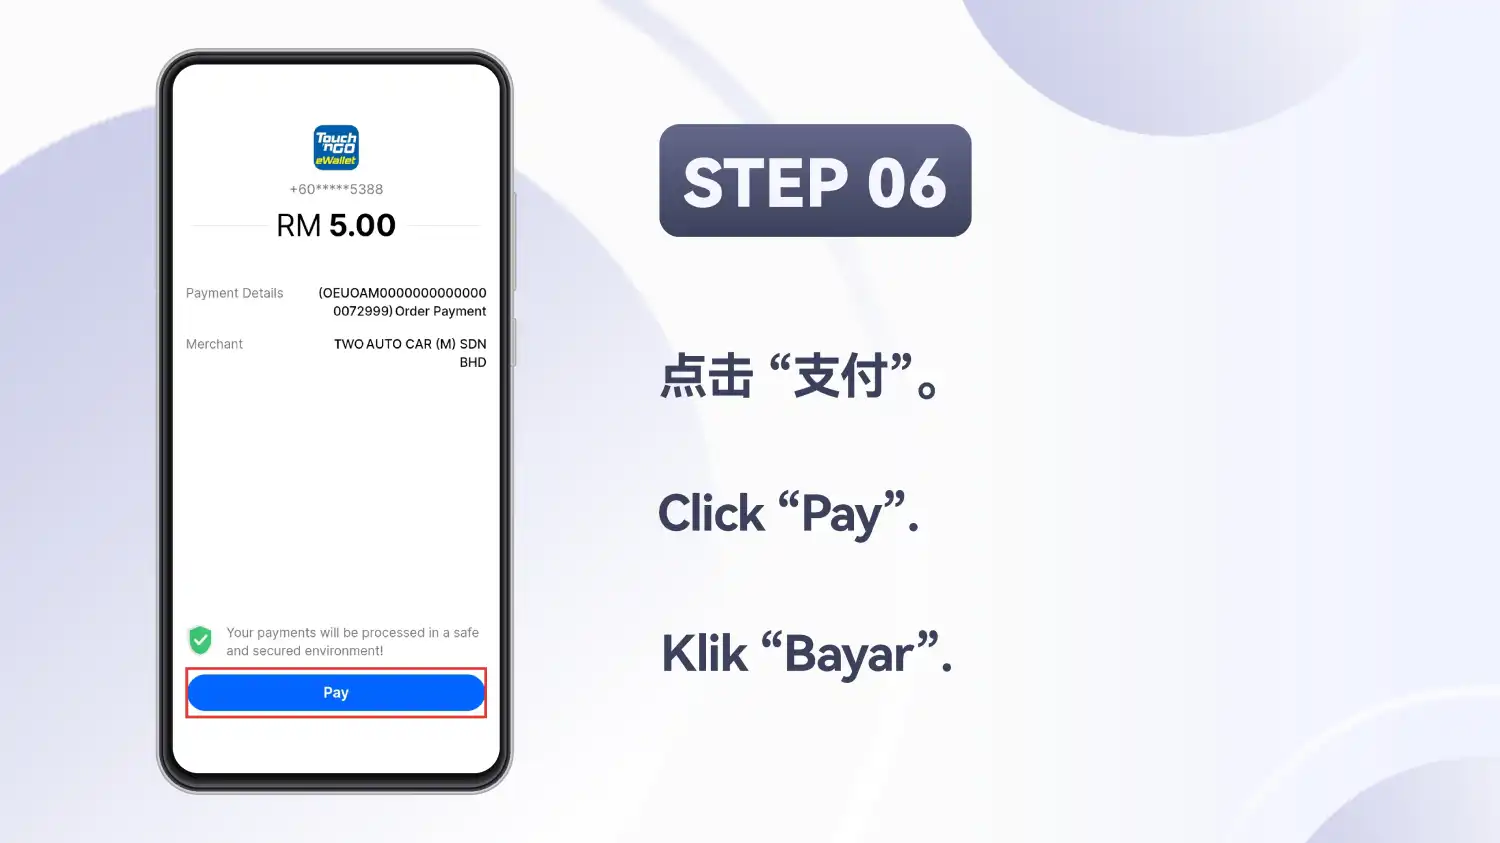
Type an amount in MYR, or use a quick-amount button (10, 20, 50, 100, 500 or 1k), then tap Next. This screen listed a minimum top-up of 5.00 and a single maximum of 500.00. Check the limits on your own screen.
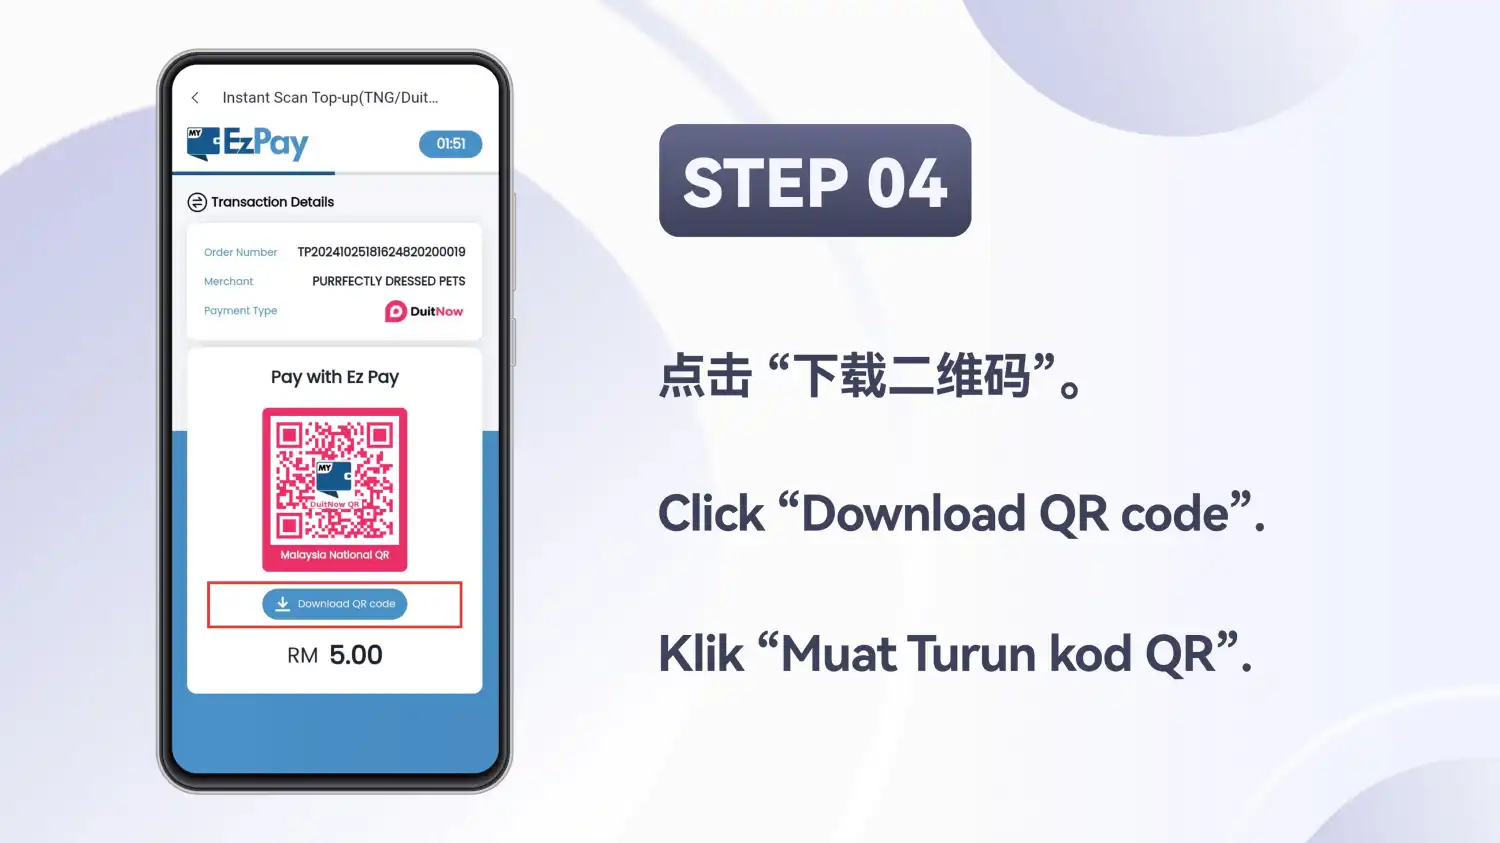
Download the QR code
The payment page shows the amount and a QR code. Tap Download QR code to save it to your phone. The page in the screenshot carried EzPay branding.
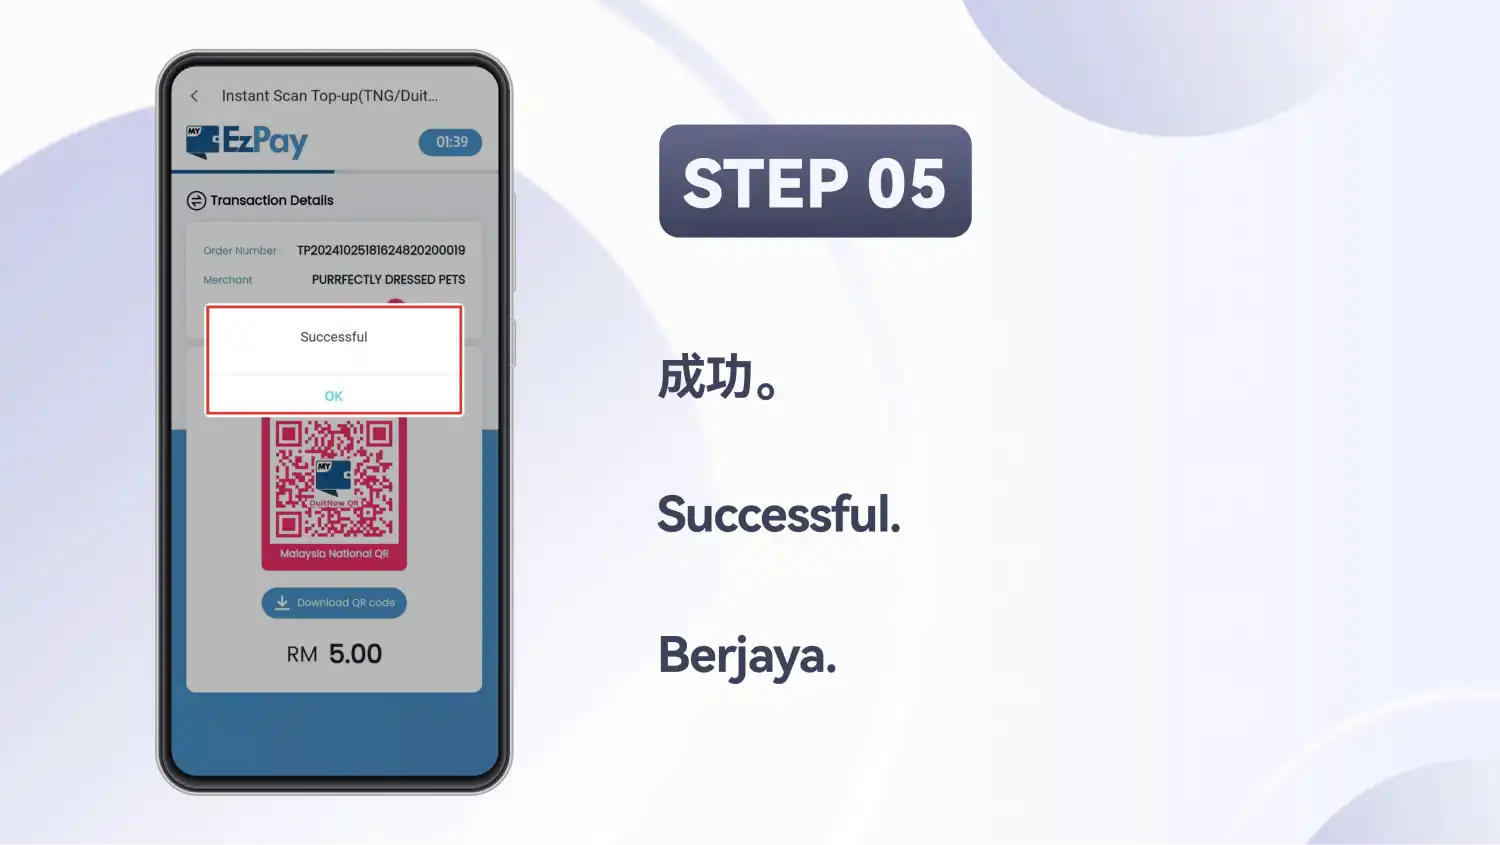
Dismiss the confirmation message
A Successful message appears over the payment page. Tap OK.
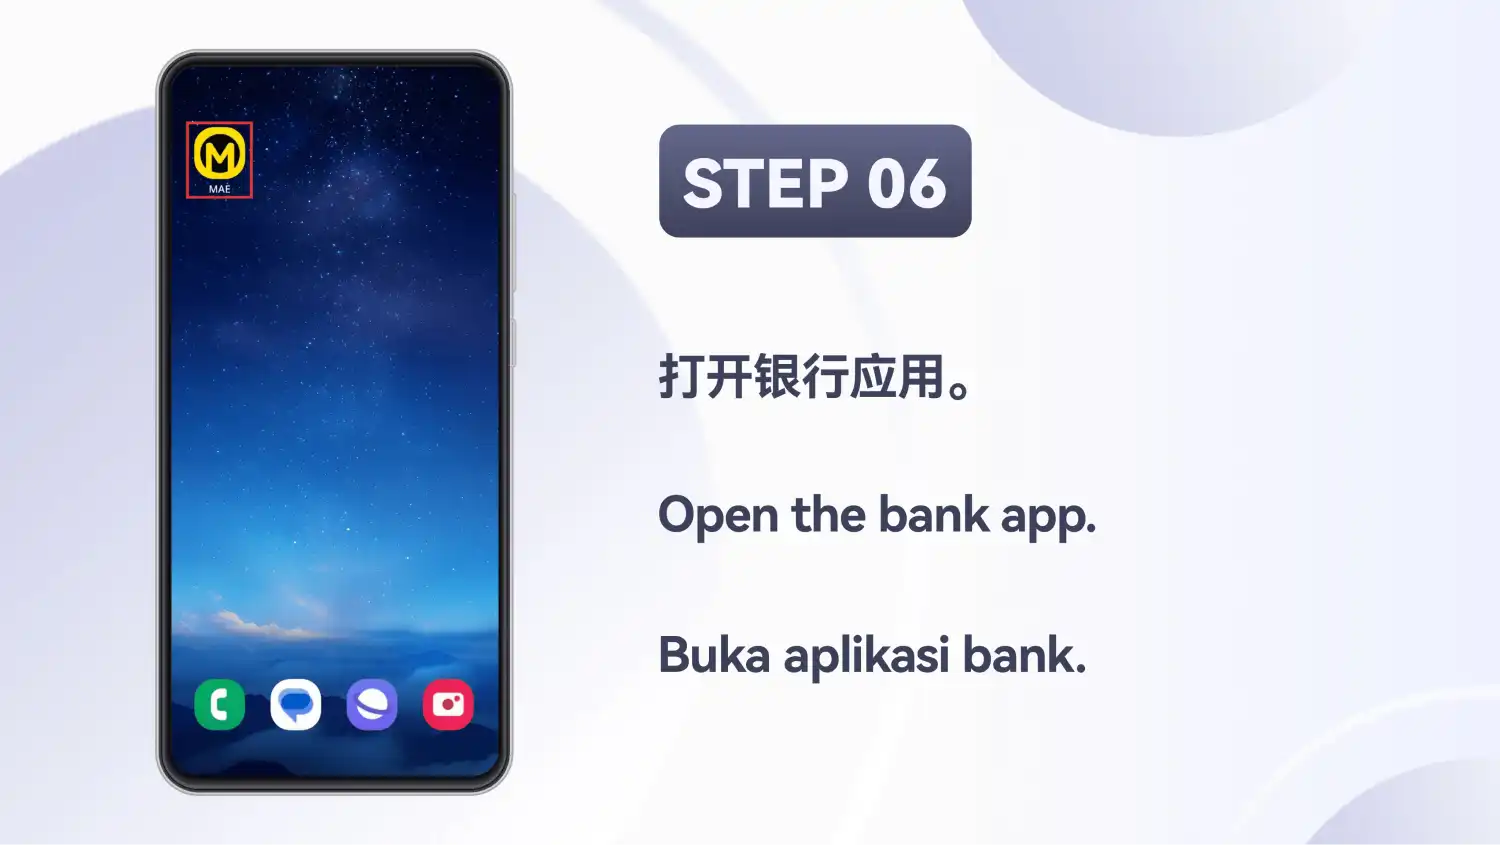
Open your bank app
Leave the payment page and open the bank app you will pay from. The example opens it from the phone's home screen.
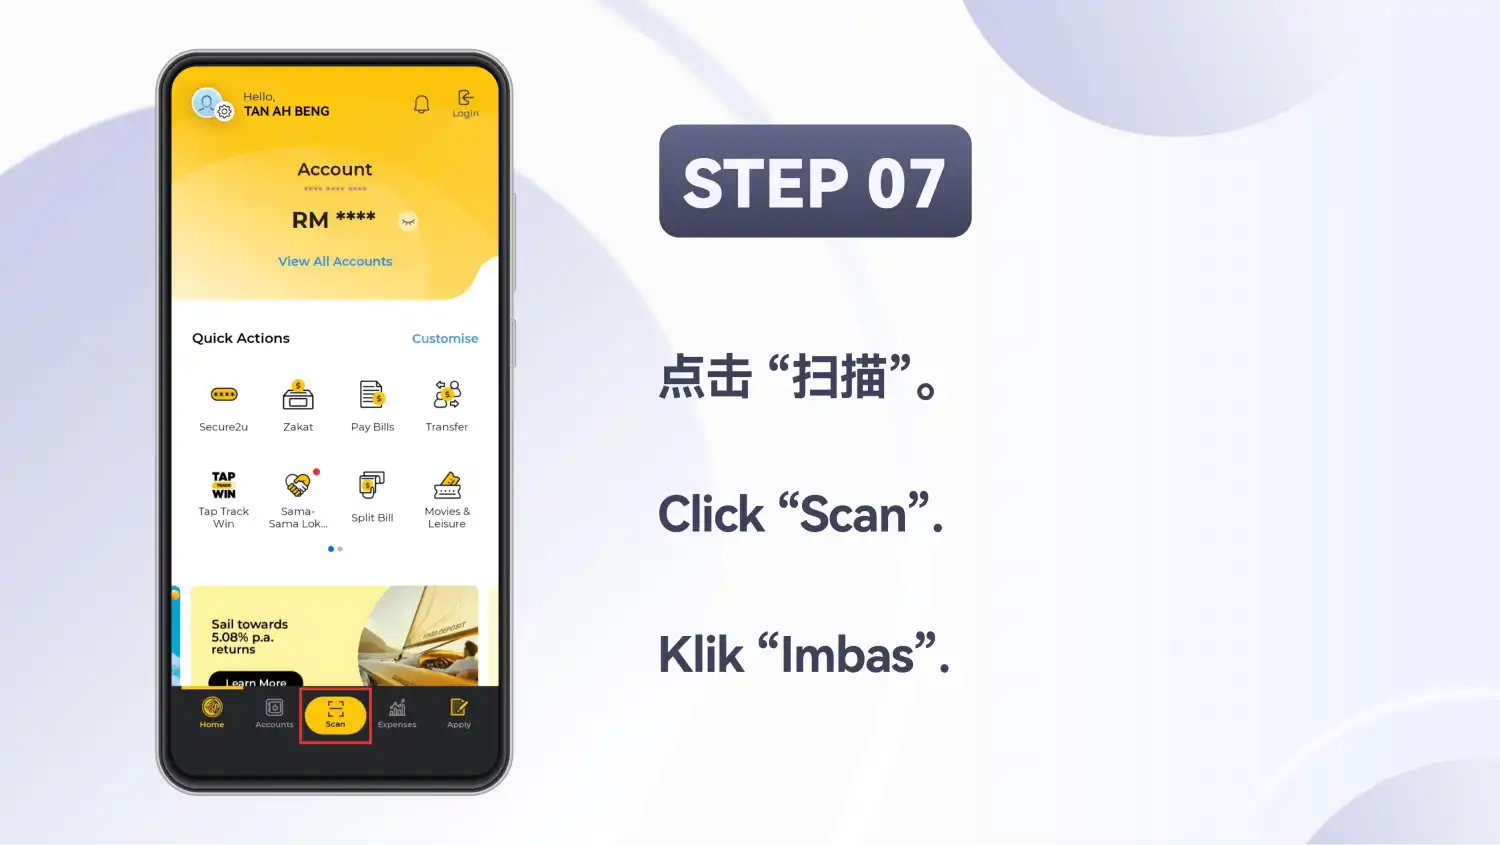
Tap Scan
In the bank app, tap Scan.
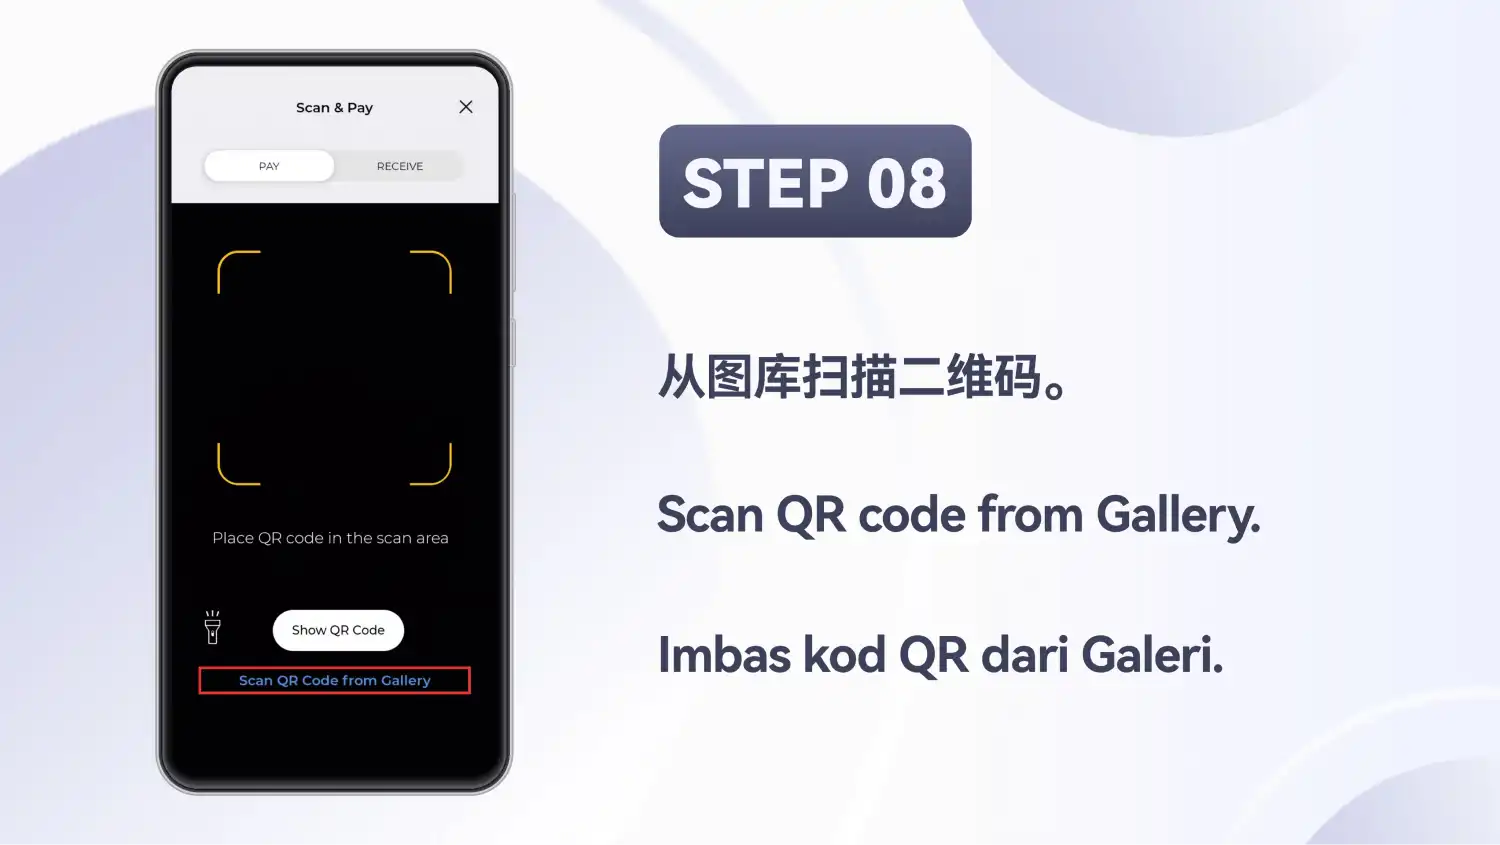
Scan the QR code from the gallery
On the Scan & Pay screen, choose Scan QR Code from Gallery instead of pointing the camera.
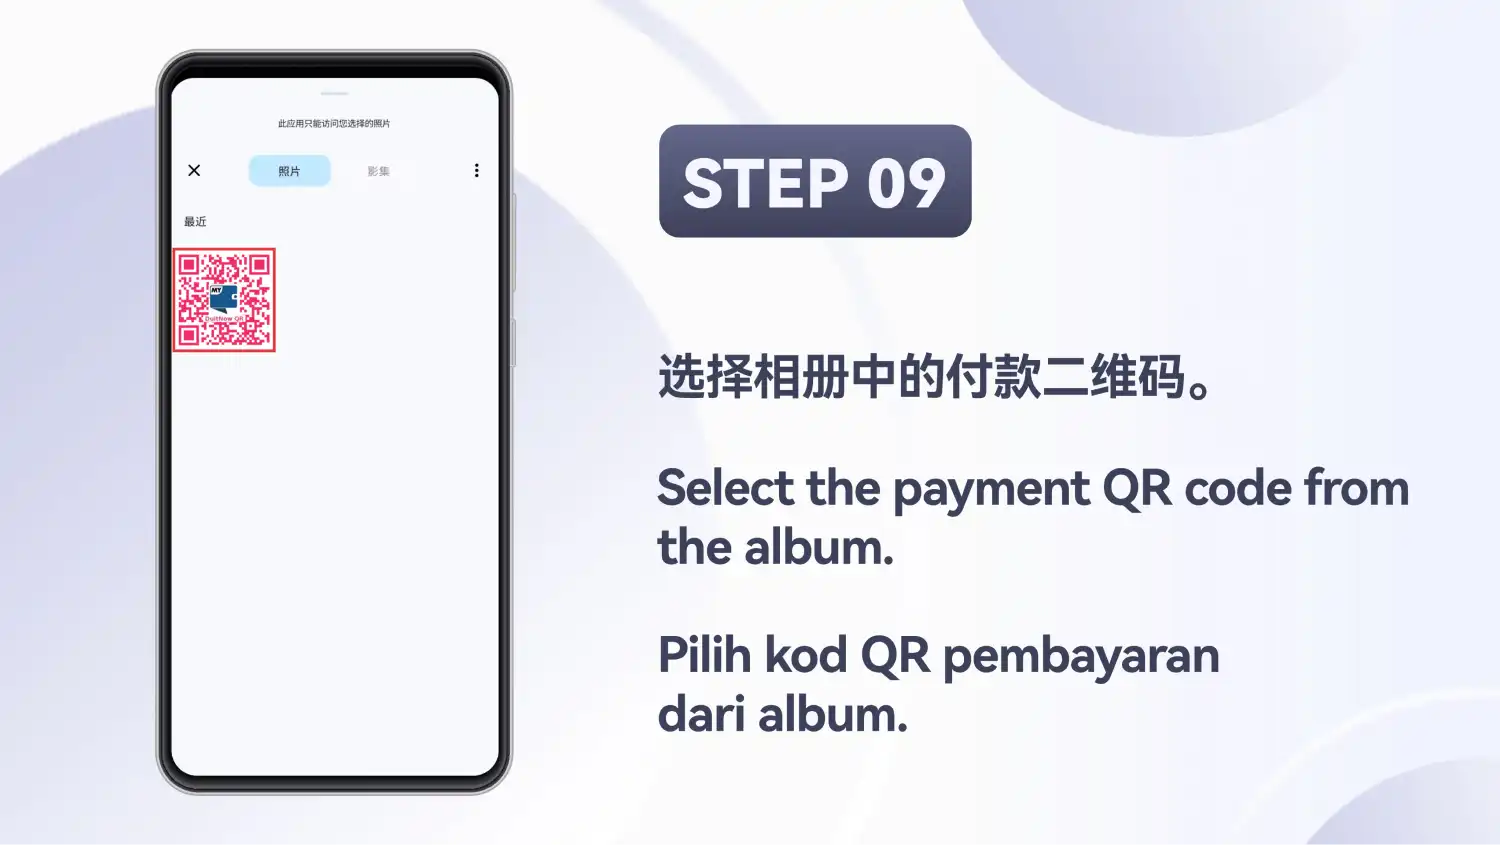
Pick the saved QR code
Select the QR code you saved in step 4 from your photo album.
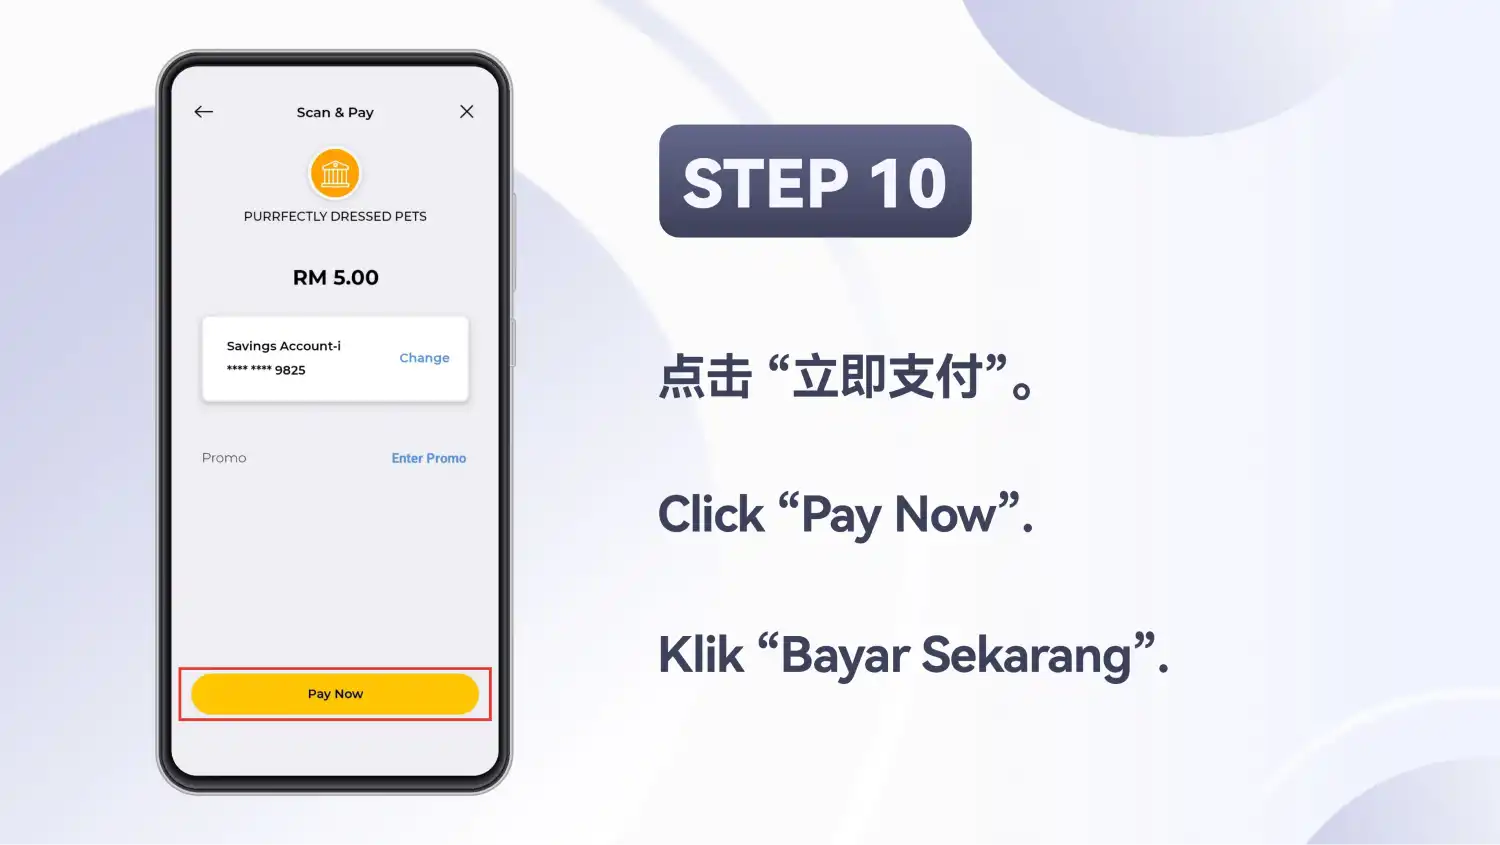
Tap Pay Now
Check the amount shown (RM 5.00 in the example), then tap Pay Now.
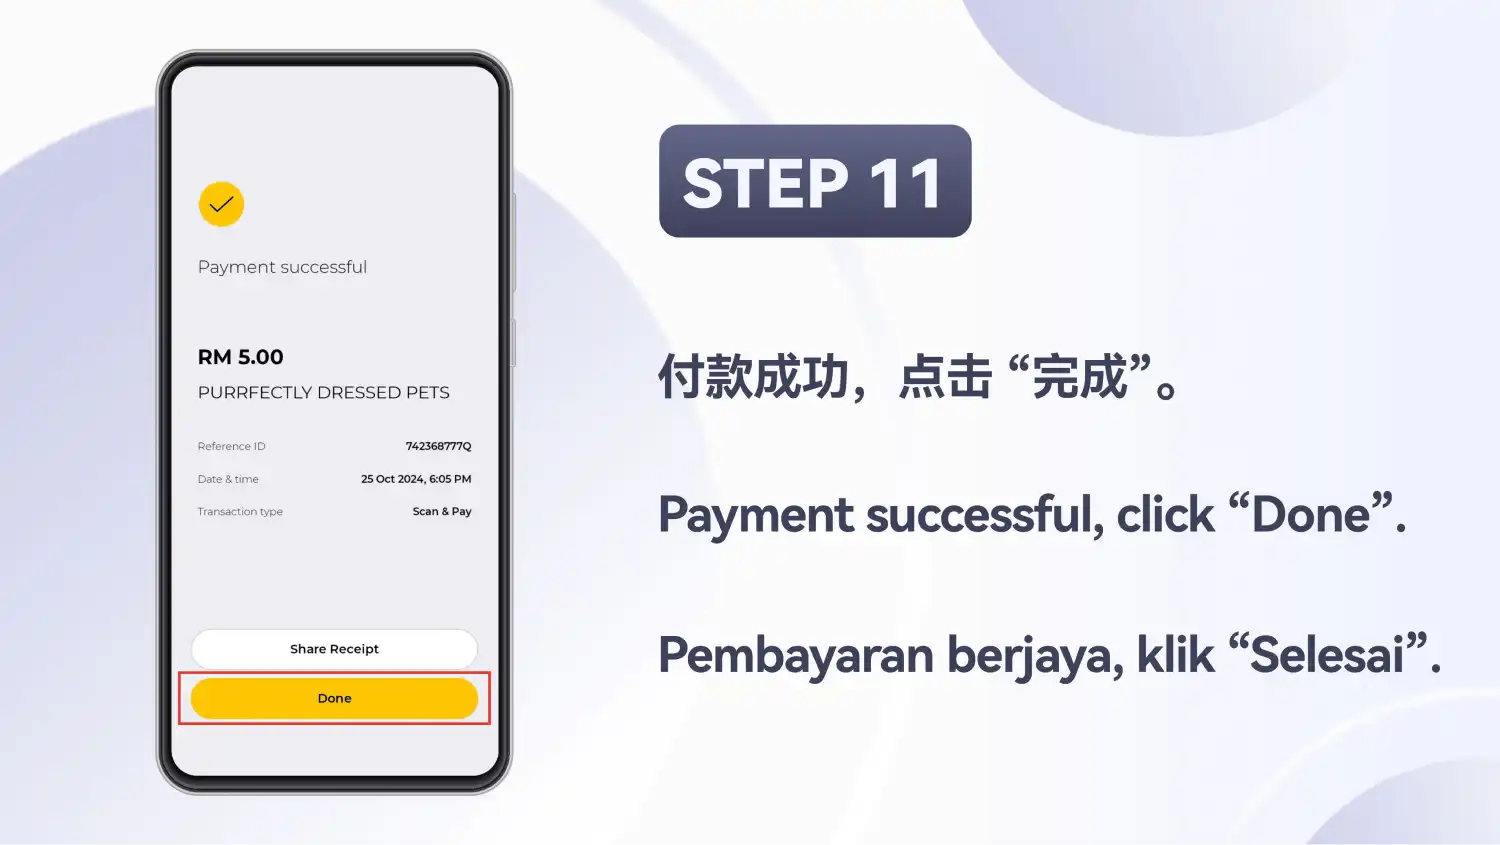
Finish in the bank app
A Payment successful screen appears. Tap Done.
Switch back to the payment page
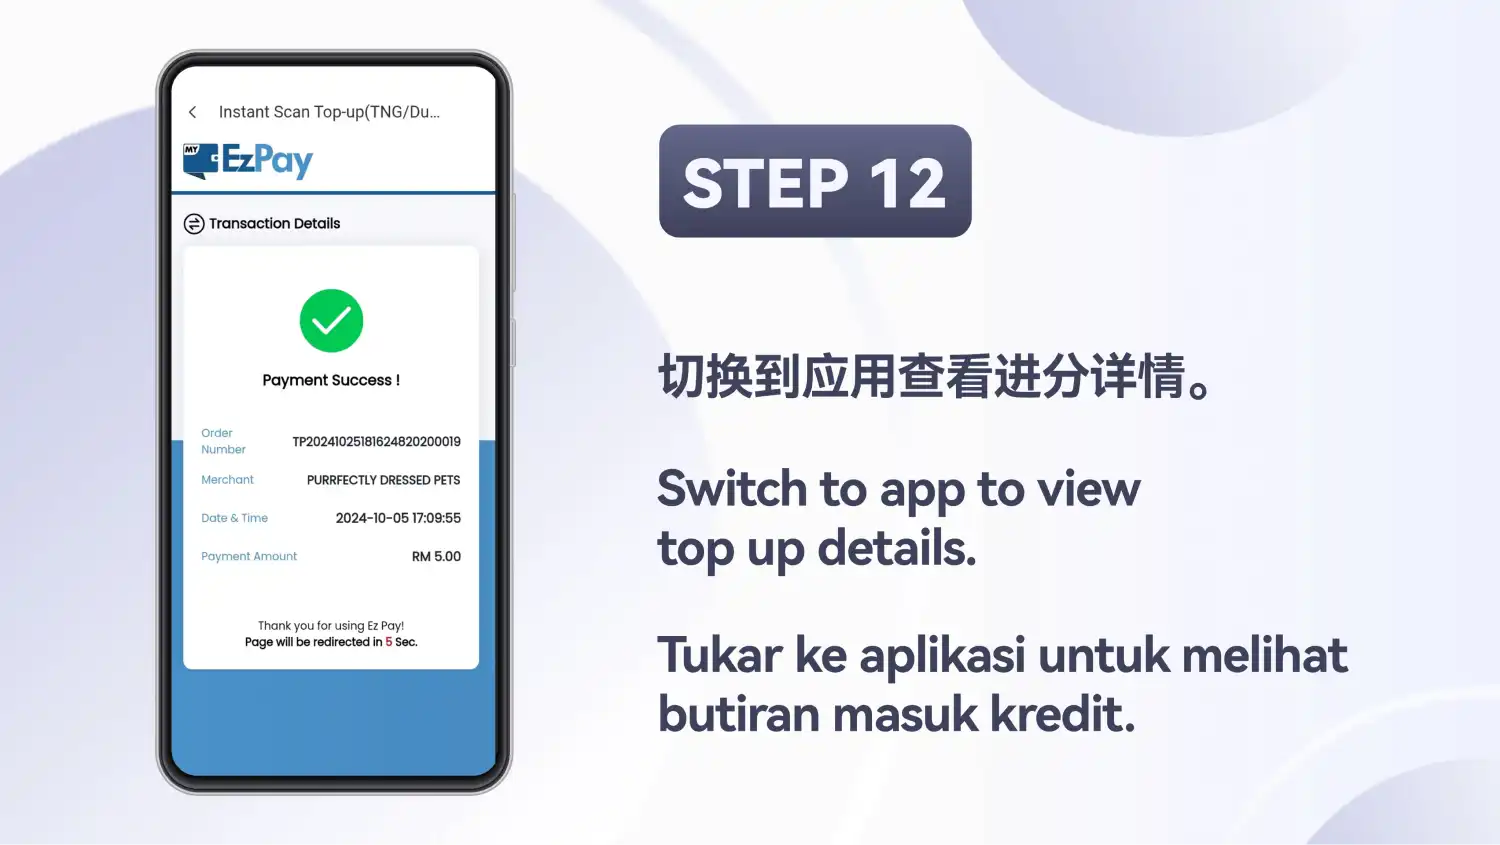
Return to the payment page. It now shows Payment Success! together with the order number, date and amount.
Read the final message
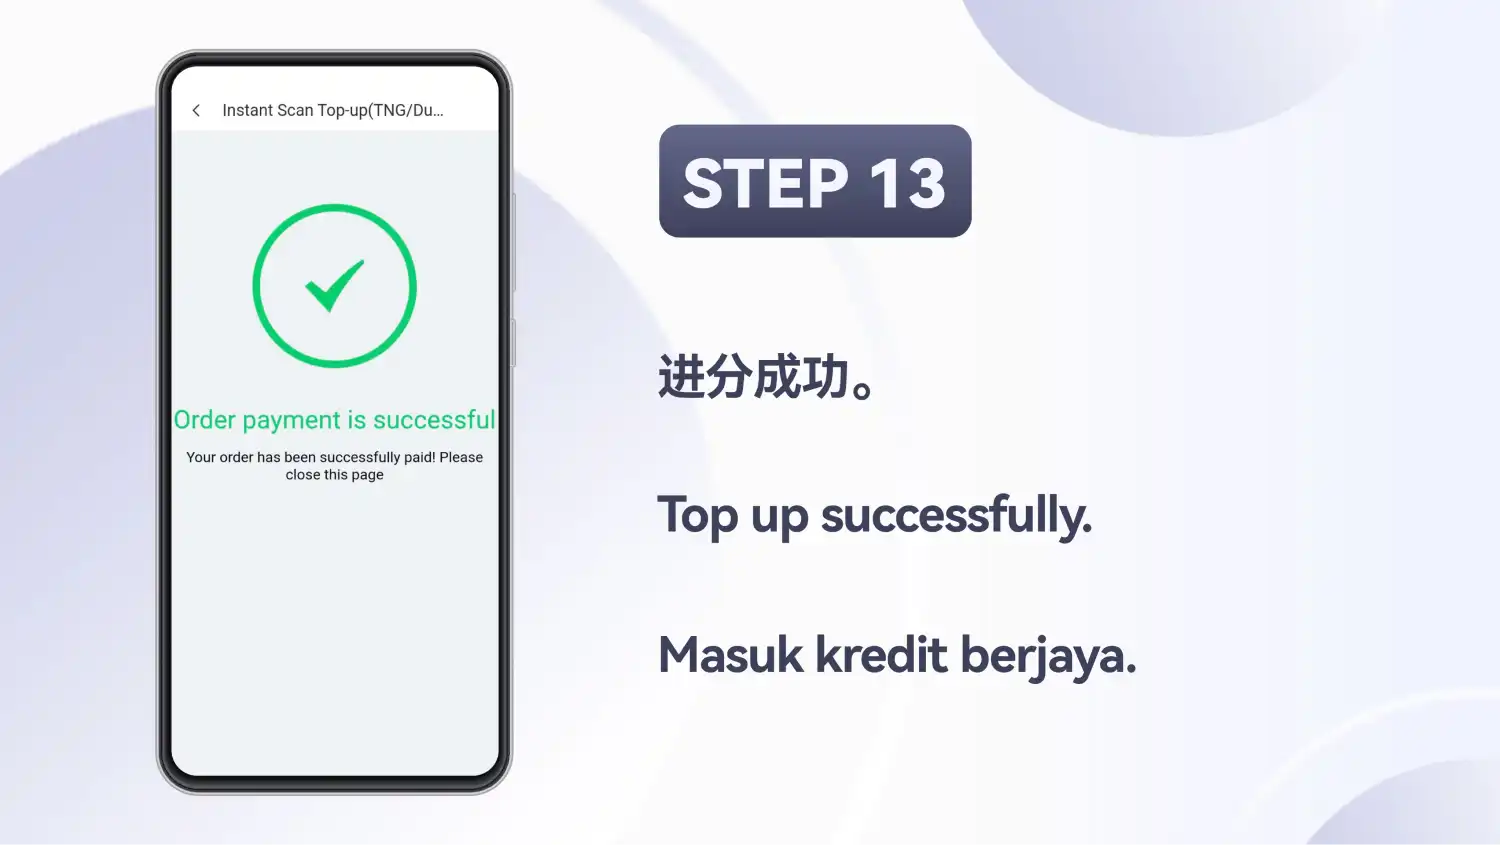
The last screen says the order has been paid and asks you to close the page.
Top up with Instant top up (e-Wallet)
On the Top Up screen this option is named Instant top up (e-Wallet). The screenshots pay with Touch 'n Go: you pick the wallet on a payment page, log in to it, then approve the payment on your phone. 9 steps.
Go to Me, then Top Up
In your Winbox account, tap Me, then Top Up. Both are highlighted in the screenshot.
Choose Instant top up (e-Wallet)
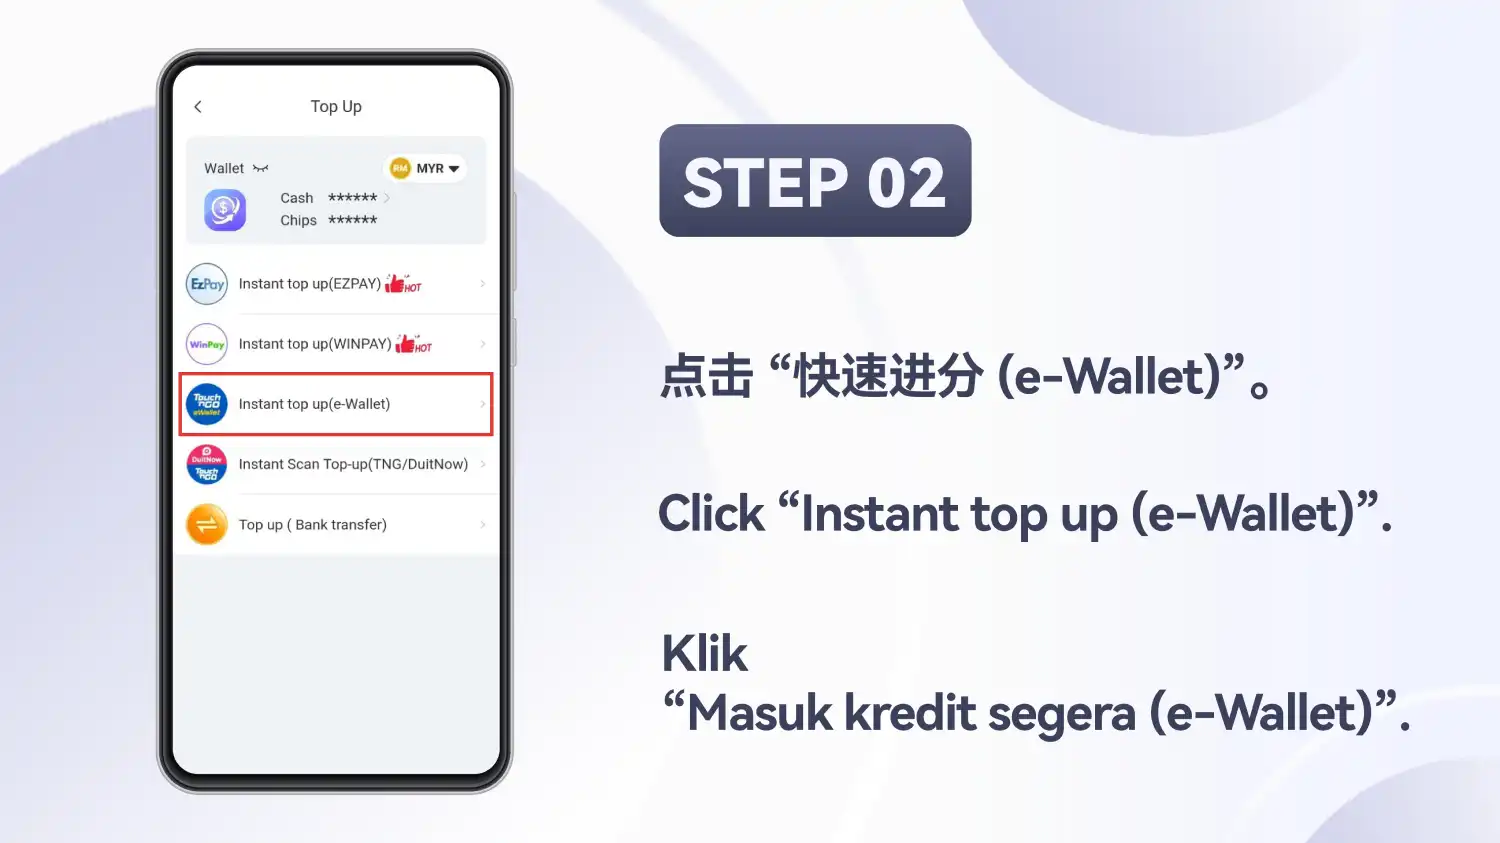
From the Top Up options, pick Instant top up (e-Wallet).
Enter an amount and tap Next
Enter an amount in MYR or use a quick-amount button, then tap Next. A minimum of 5.00 and a single maximum of 500.00 were listed on this screen.
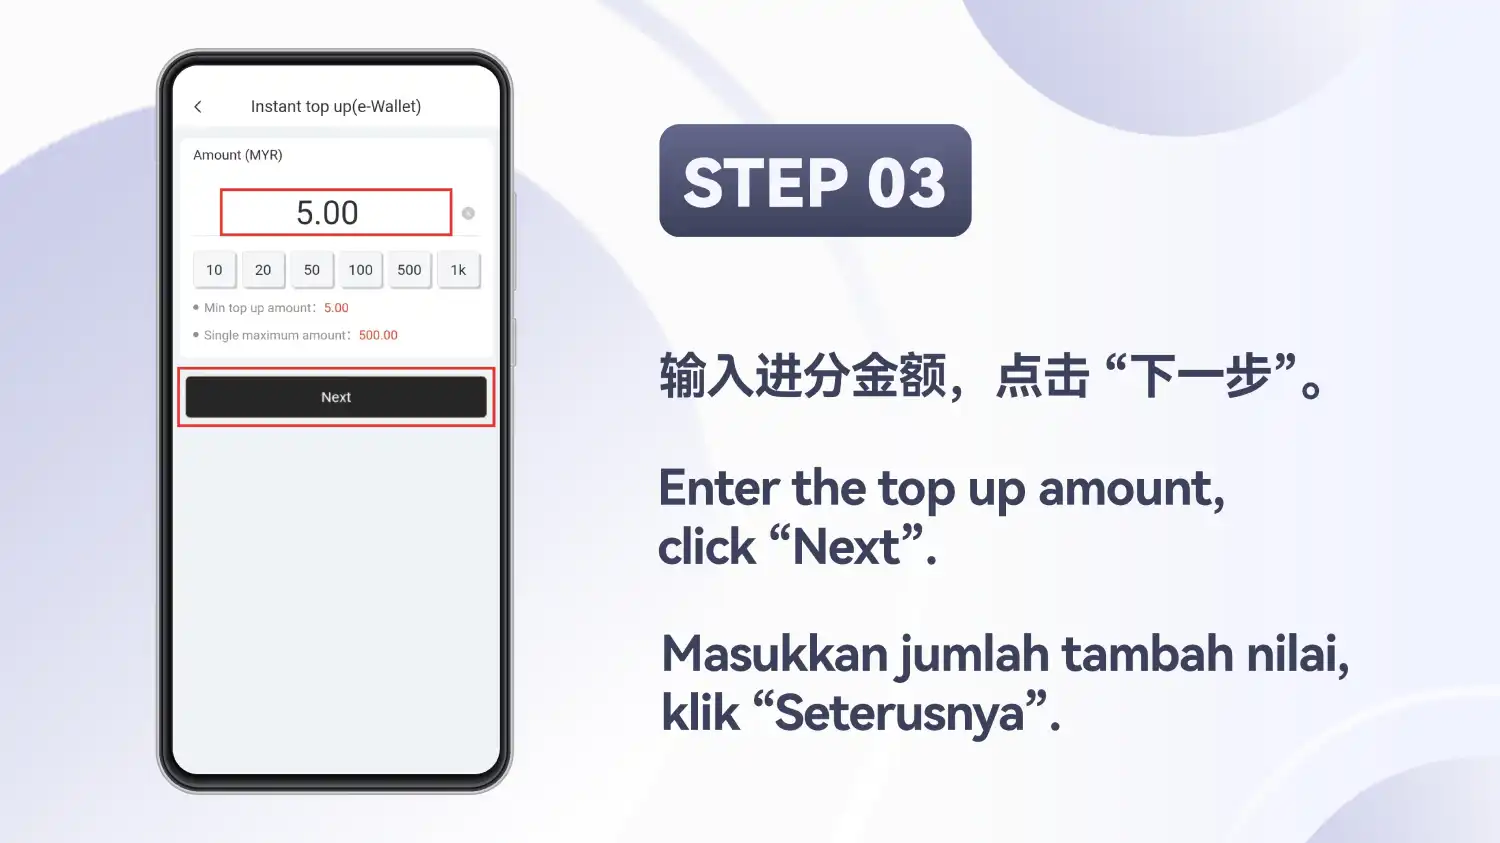
Pick a wallet on the payment page
The payment page shows the payment details and a time-remaining line that was counting down, so have your wallet app ready. Four wallet logos appeared: Boost, MCash, Touch 'n Go and ShopeePay. The example selects Touch 'n Go.
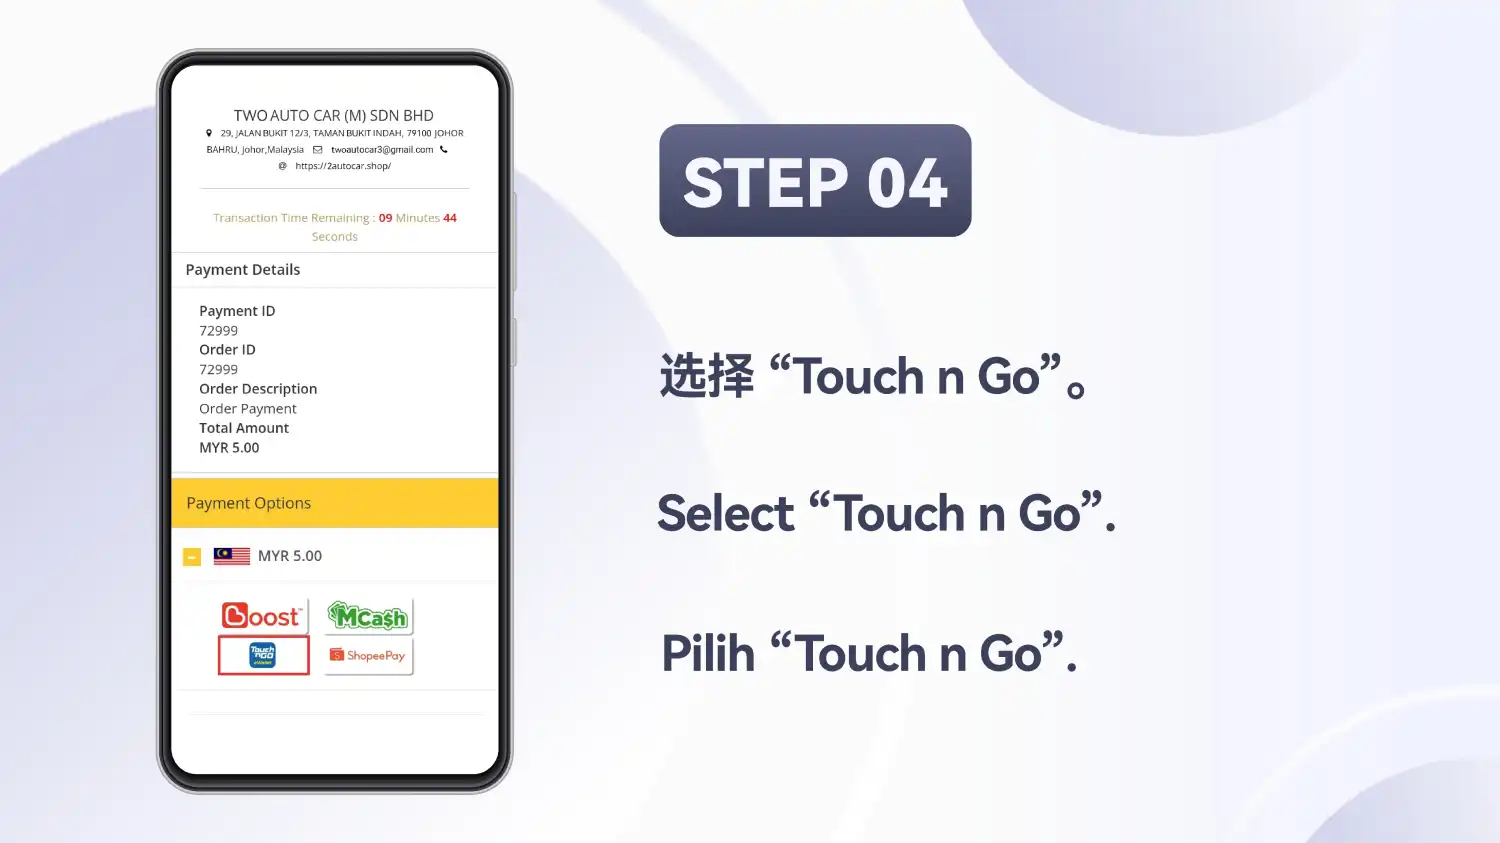
Log in to Touch 'n Go
Enter your mobile number and your 6-digit PIN on the wallet's log-in page, then tap Log In.
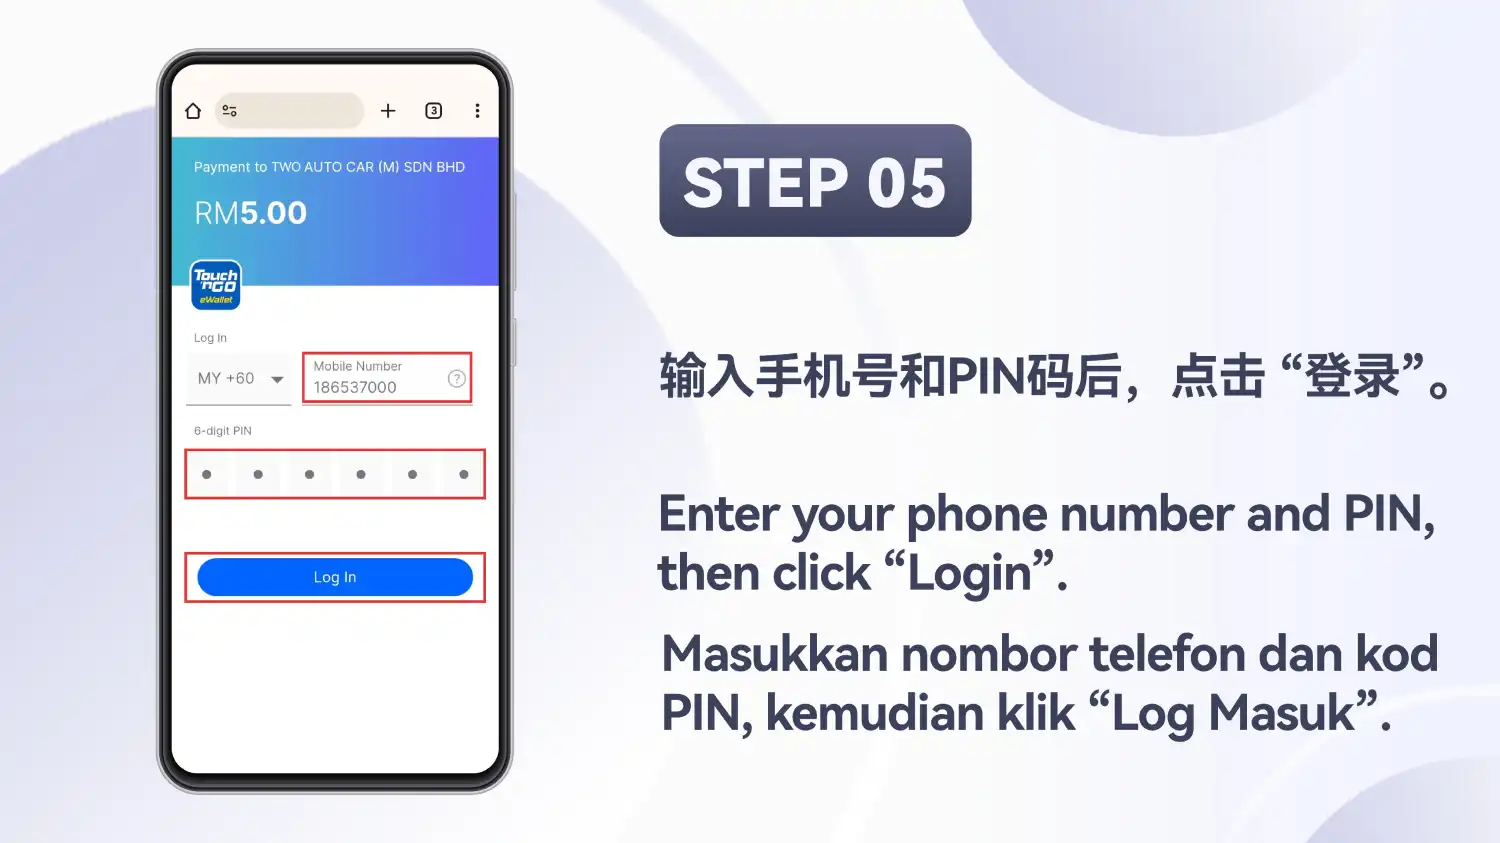
Check the amount and tap Pay
The wallet shows the amount to pay (RM5.00 in the example). Tap Pay.
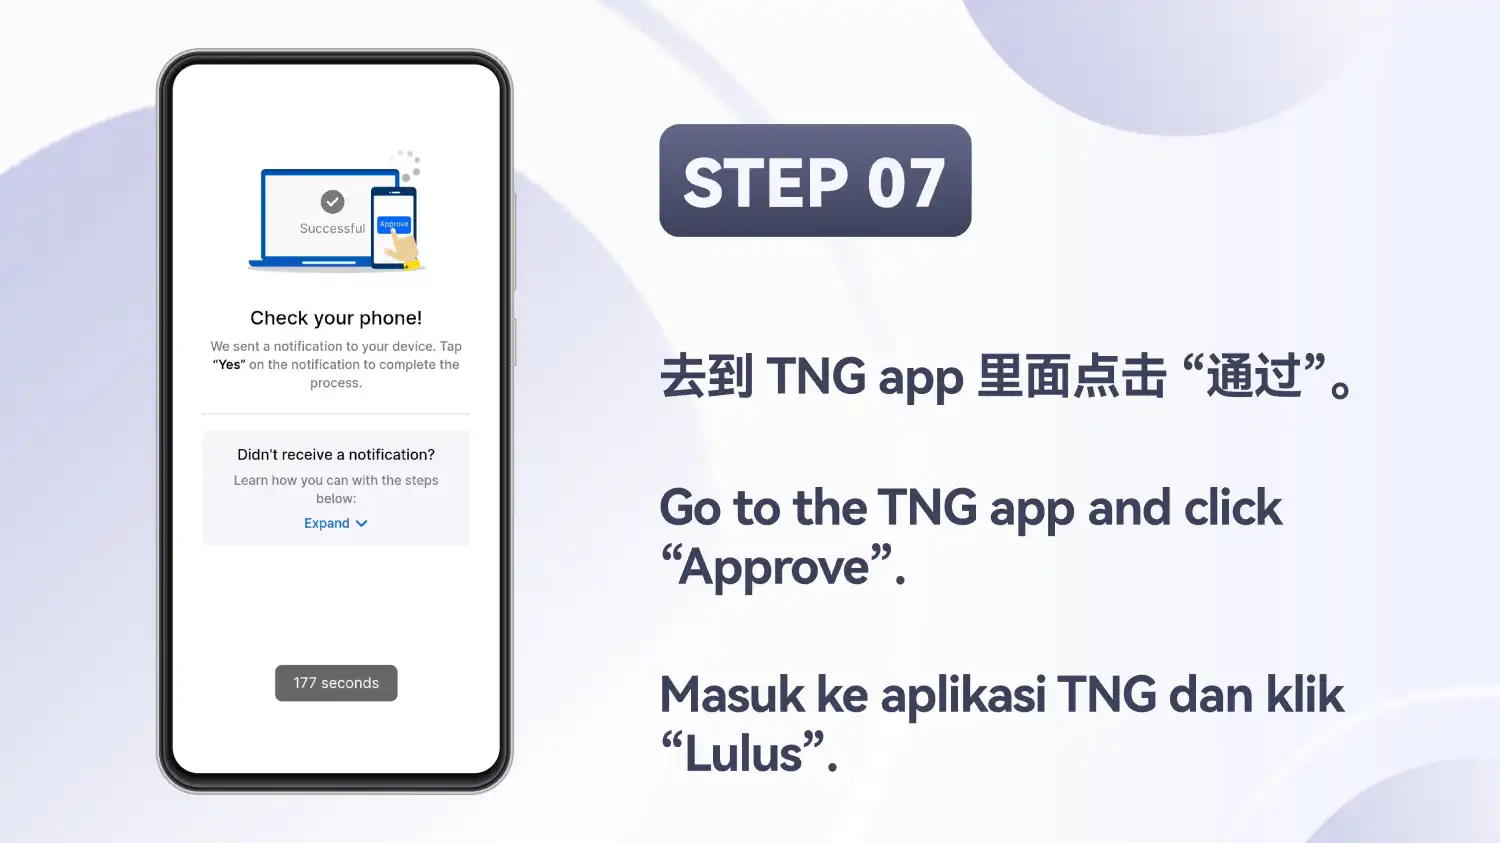
Approve on your phone
The screen says Check your phone! and that a notification was sent to your device. Open the Touch 'n Go notification and approve it. A countdown was running (177 seconds in the screenshot).
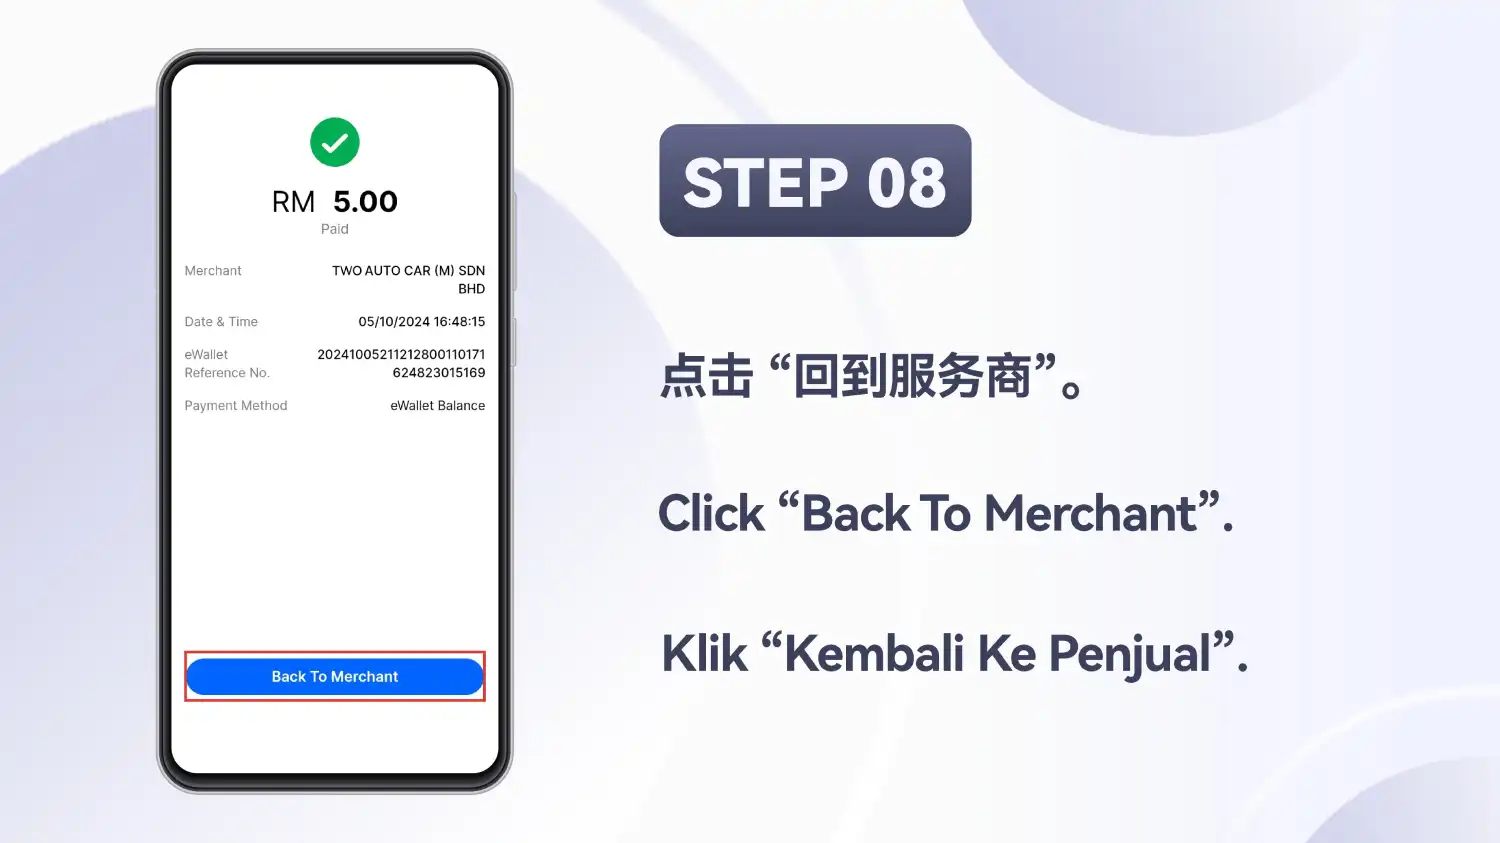
Tap Back To Merchant
The wallet shows the amount as paid. Tap Back To Merchant to return.
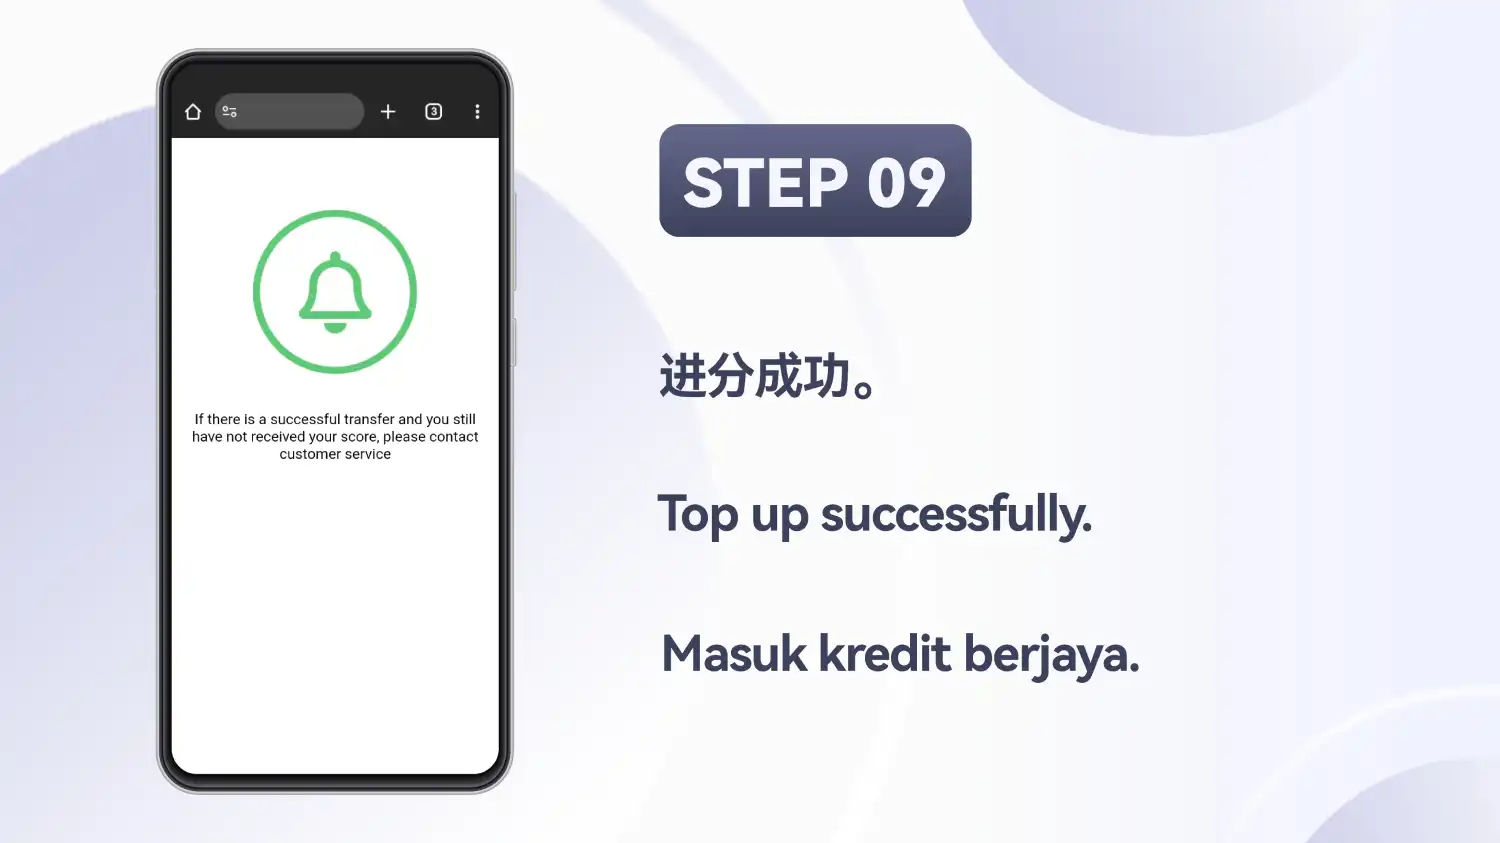
Read the final screen
The last screen has a bell icon and a note: if a transfer succeeded but the credit hasn't arrived, contact customer service. The slide itself is captioned Top up successfully.
Top up with Instant top up (EZPAY)
On the Top Up screen this option is named Instant top up (EZPAY). The screenshots choose a bank from a grid, enter an amount, then sign in to online banking on the payment page and approve the request in a banking app. 10 steps.
Tap Me
On the Winbox home screen, tap Me in the bottom bar.
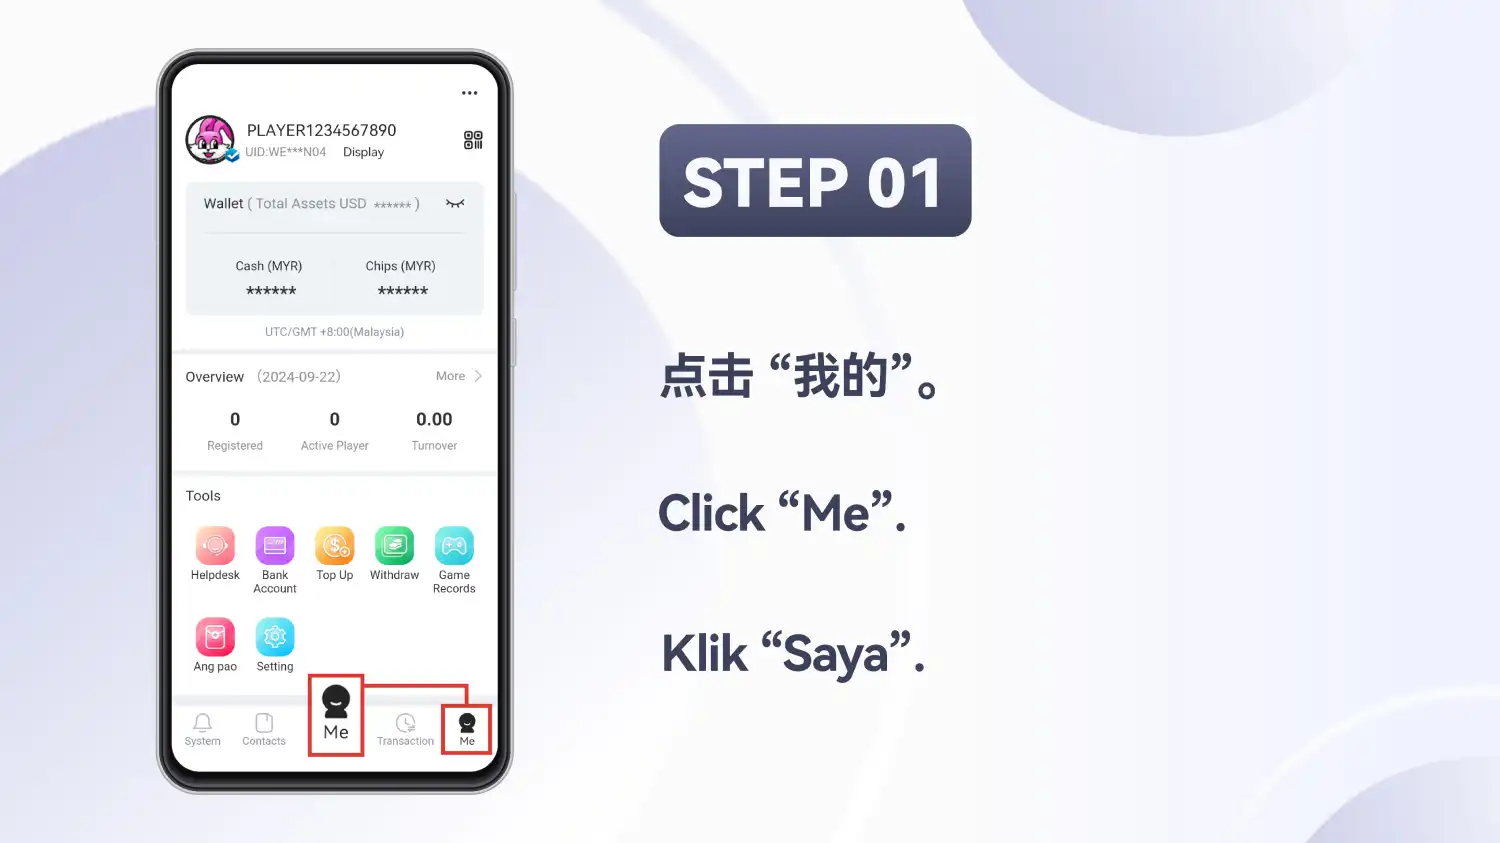
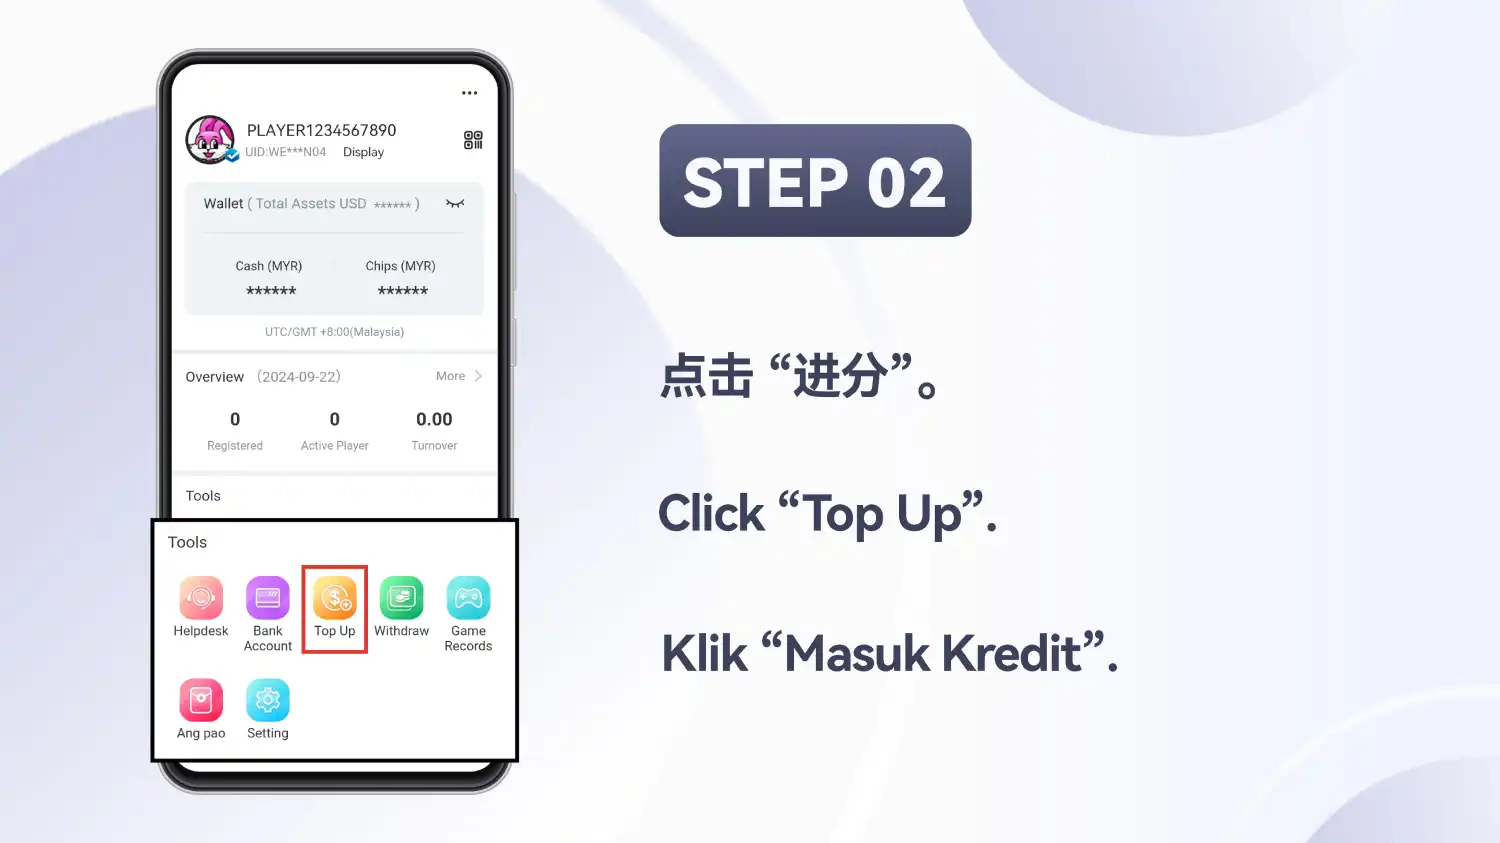
Tap Top Up
On the Me screen, open Top Up from the Tools panel.
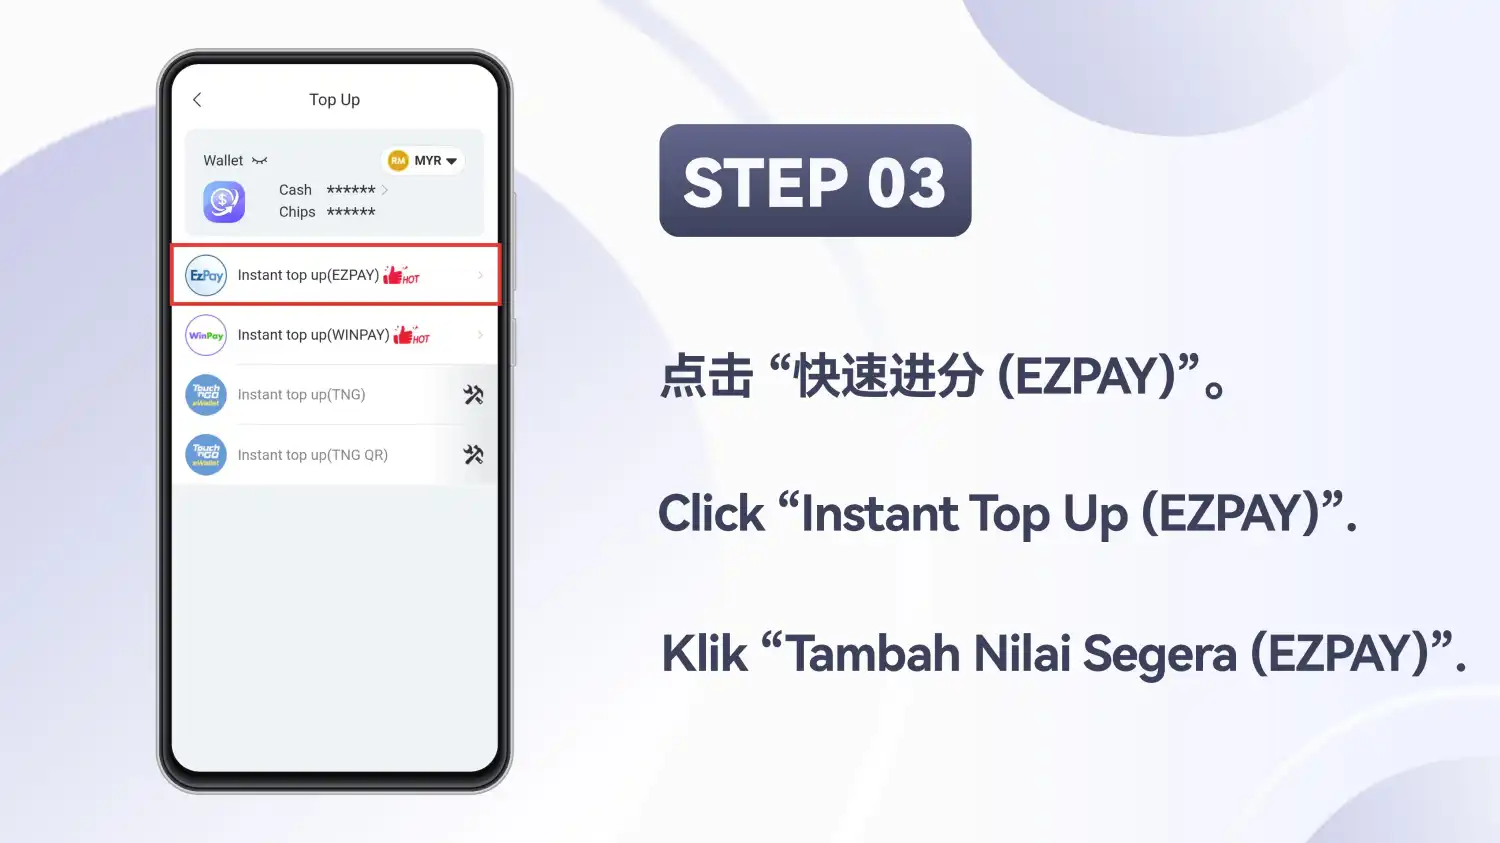
Choose Instant top up (EZPAY)
The options in this screenshot were Instant top up (EZPAY), (WINPAY), (TNG) and (TNG QR). The last two carried a maintenance icon. Pick EZPAY.
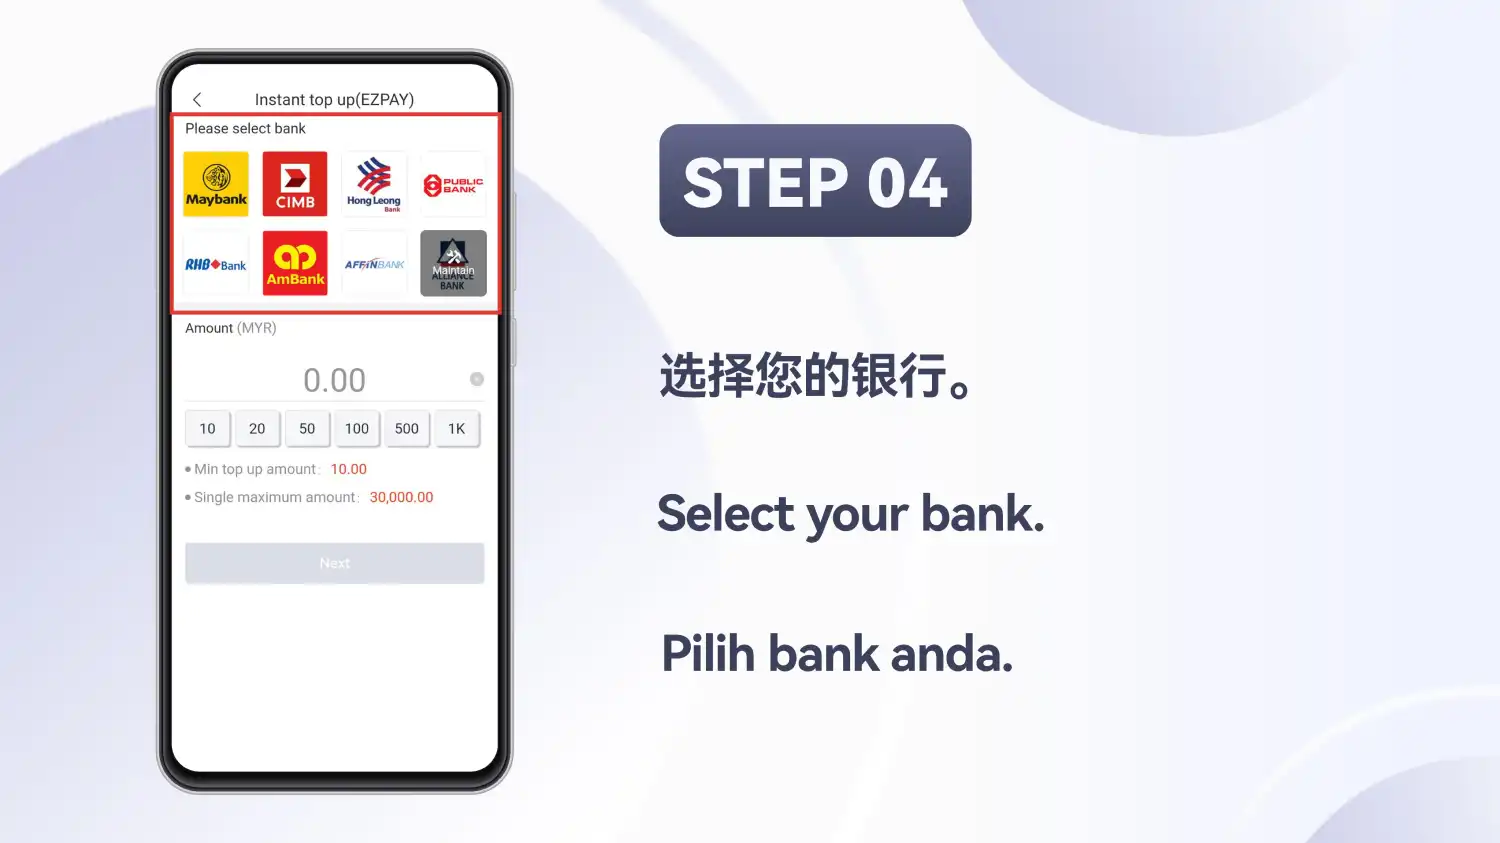
Select your bank
Choose a bank from the grid. It listed Maybank, CIMB, Hong Leong Bank, Public Bank, RHB Bank, AmBank, Affin Bank and Alliance Bank, with Alliance Bank greyed out and marked Maintain. The amount area below showed a minimum of 10.00 and a single maximum of 30,000.00, and Next stayed disabled until an amount was entered.
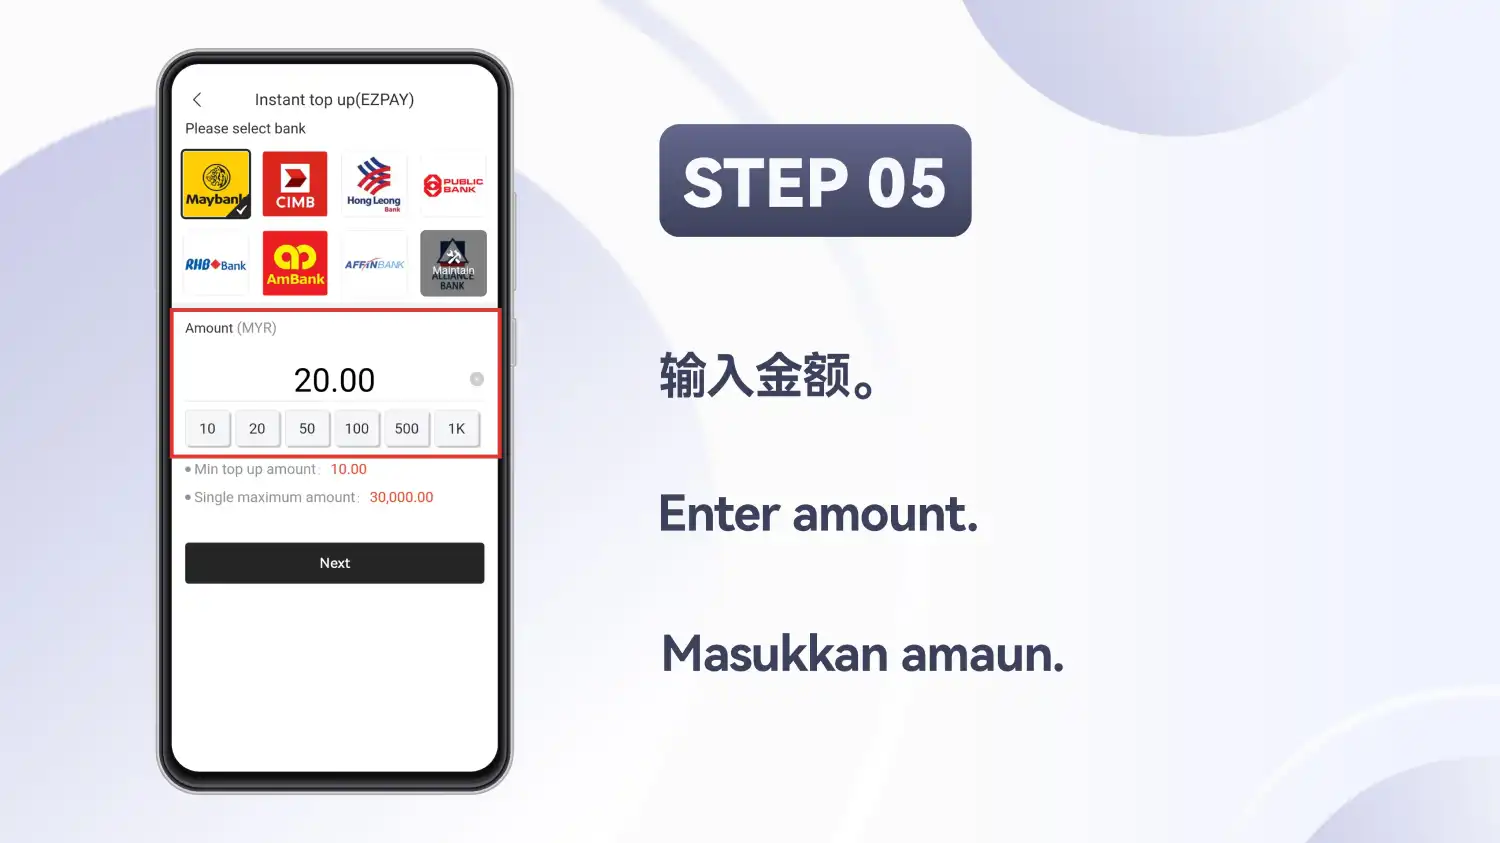
Enter the amount
Type an amount (the example uses 20.00) or use a quick-amount button. Next turns dark and usable once there is an amount.
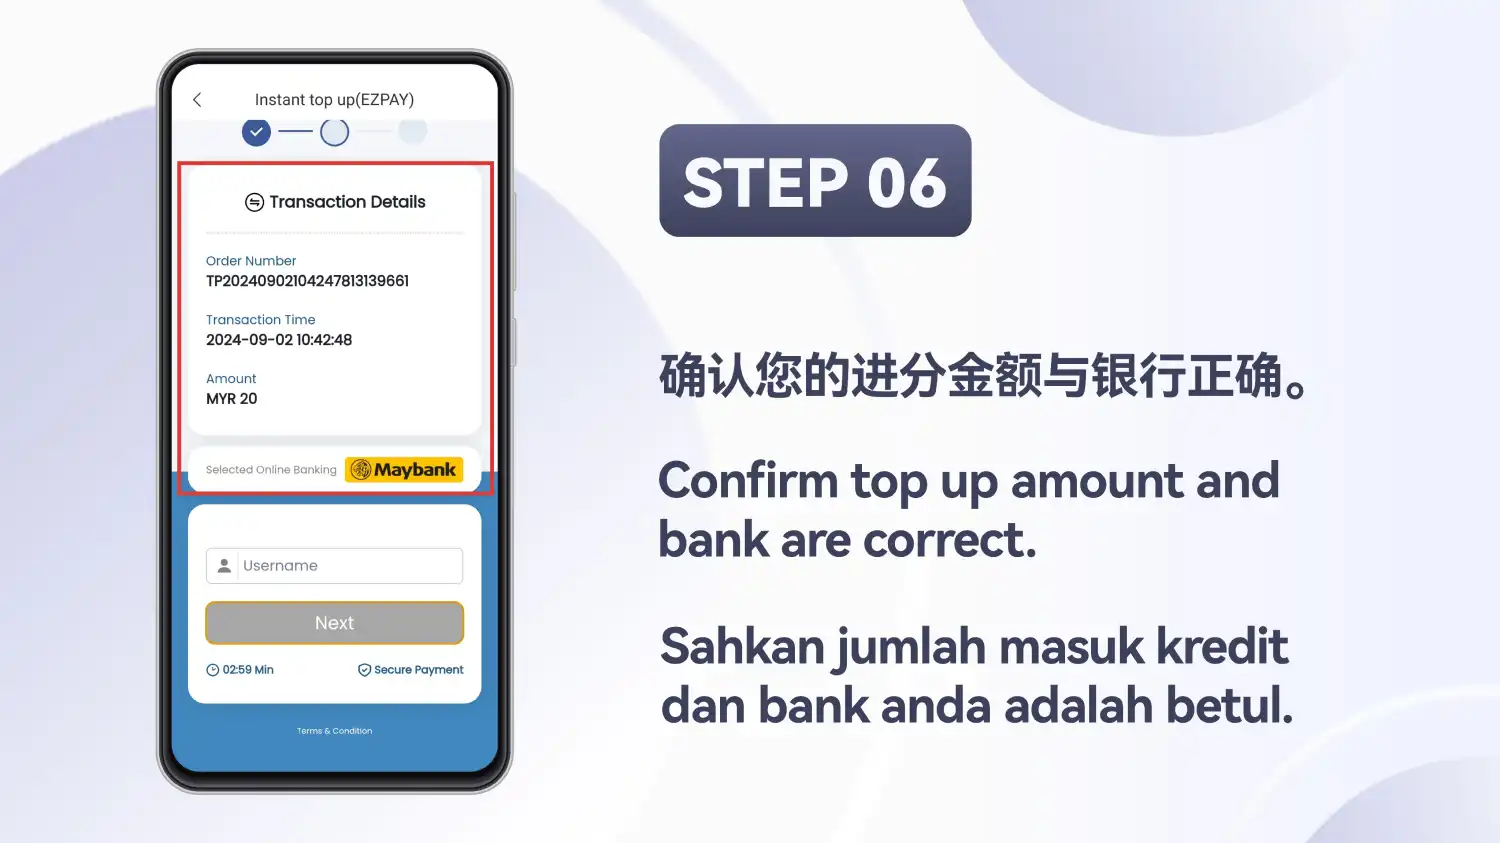
Check the transaction details
The payment page shows an order number, the transaction time, the amount (MYR 20) and the bank you chose. Confirm the amount and bank are right before you go on.
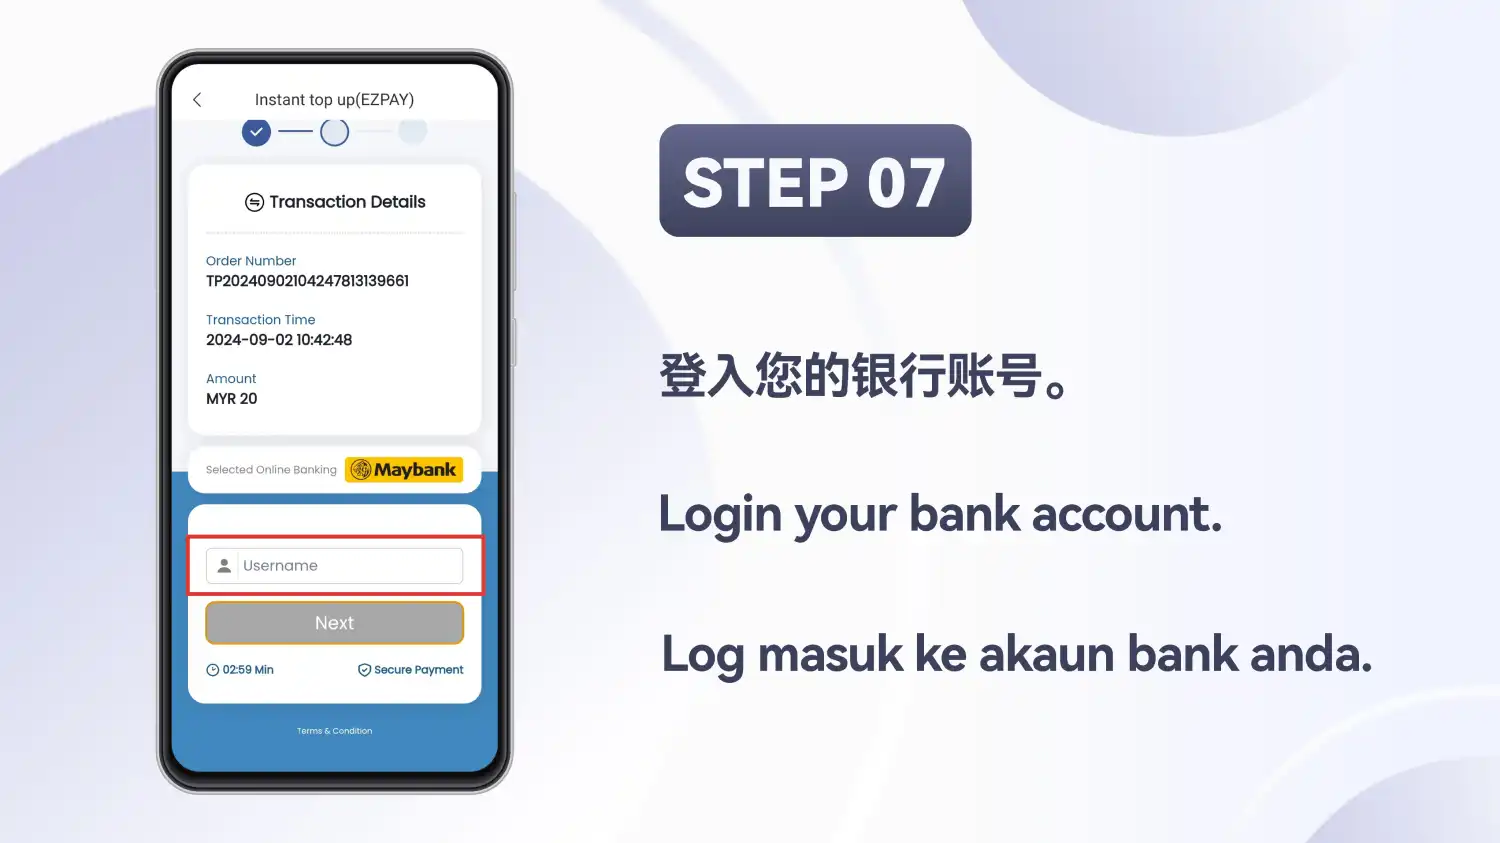
Enter your online-banking username
Type your username for the selected bank in the field and tap Next. A countdown timer sits under the button (02:59 in the screenshot).
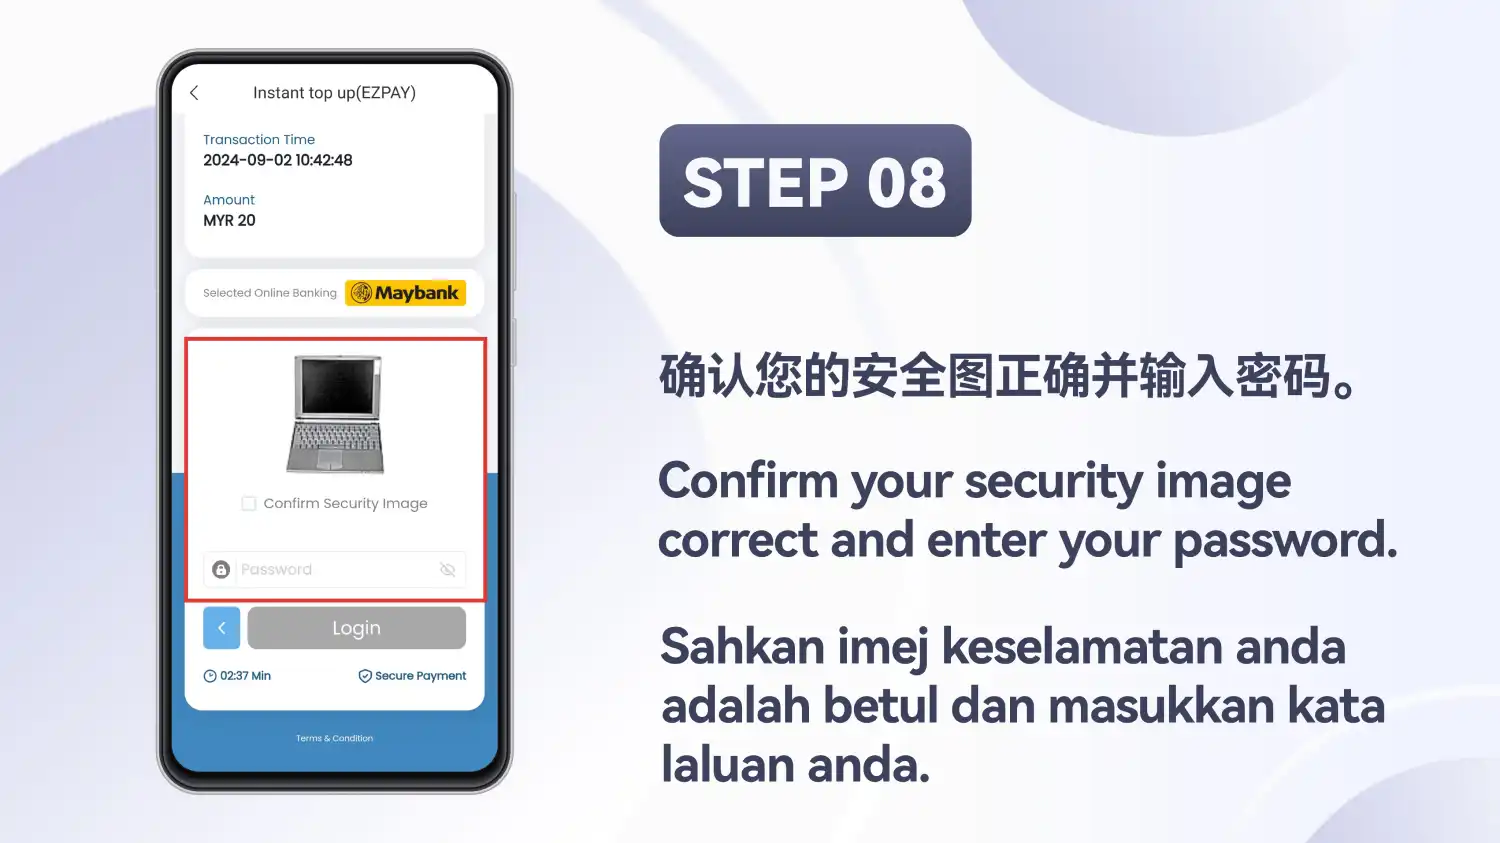
Check the security image and enter your password
Make sure the security image is the one you expect, enter your password and tap Login.
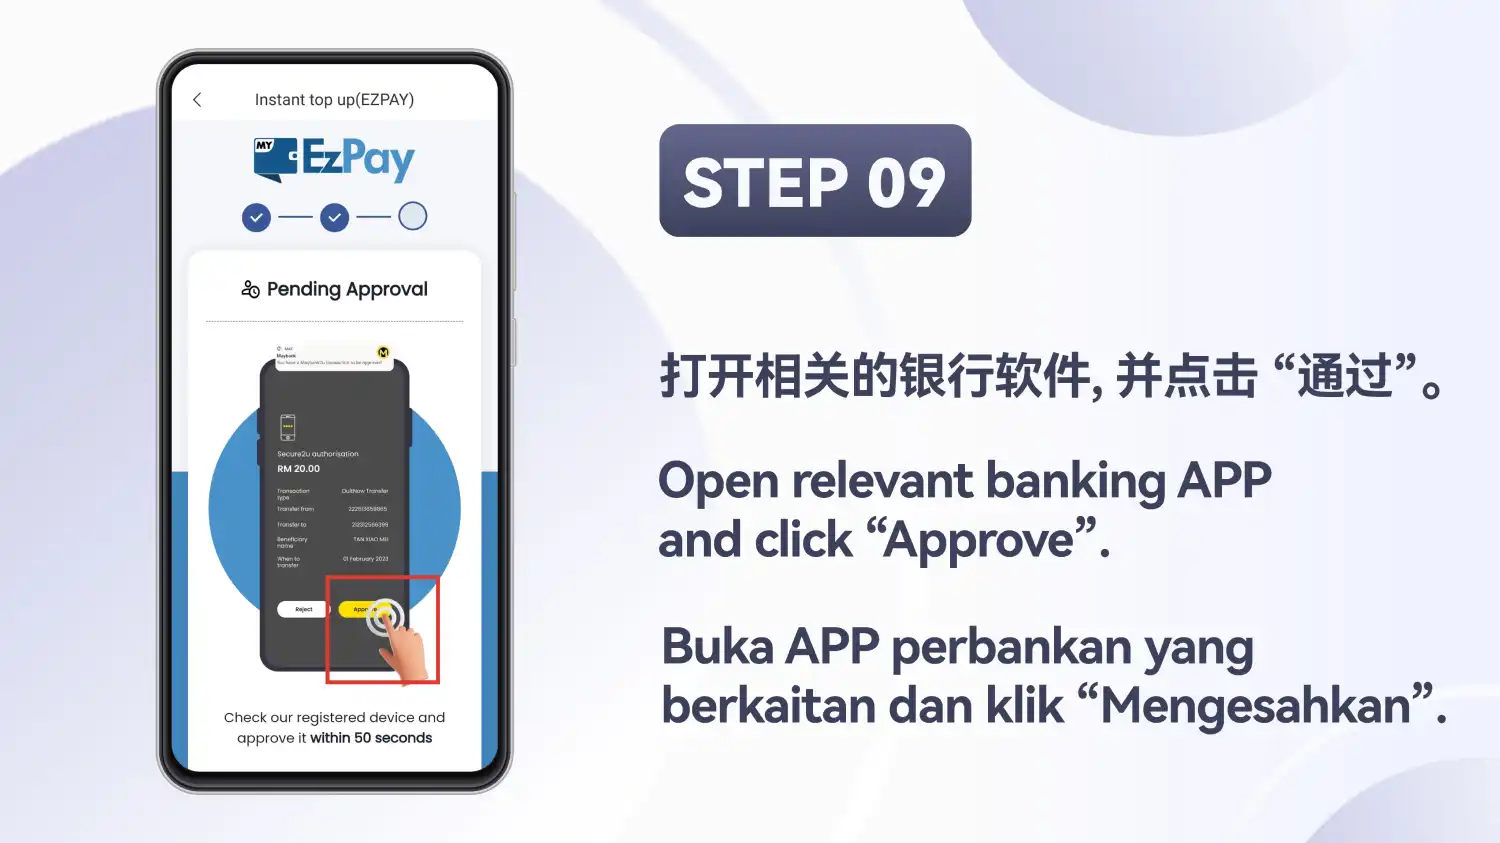
Approve in your banking app
The page shows Pending Approval. Open your banking app and approve the request. The page asked you to check your registered device and approve within 50 seconds.
Read the success message
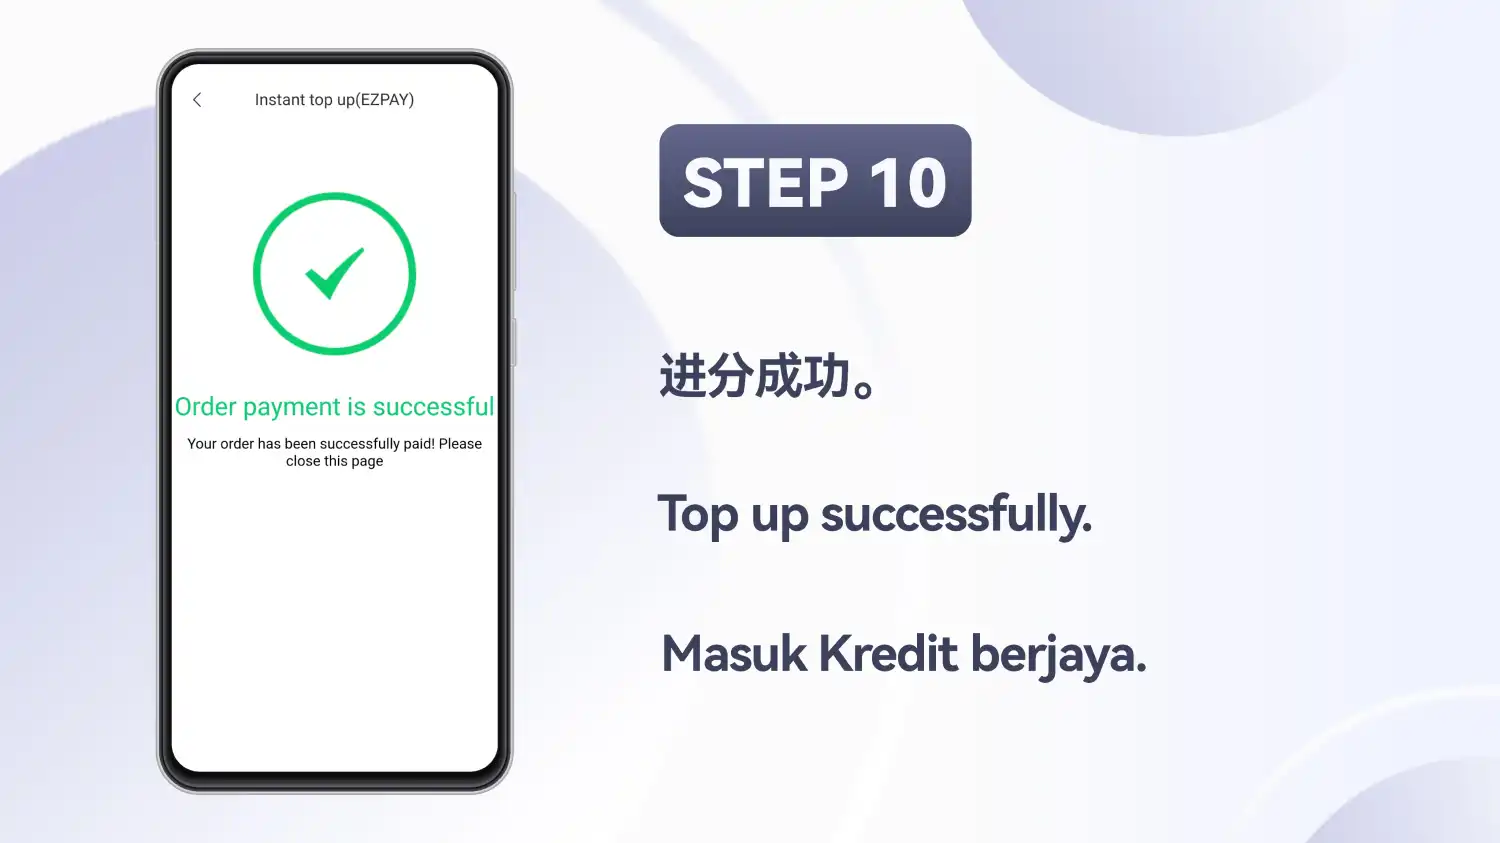
The last screen reads Order payment is successful.
Top up with Instant top up (WINPAY)
On the Top Up screen this option is named Instant top up (WINPAY). In the screenshots it is a bank-login flow: pick a bank, enter an amount, sign in to online banking, then approve. Compared with the EZPay screenshots, the transaction details and the username field share one step. 9 steps.
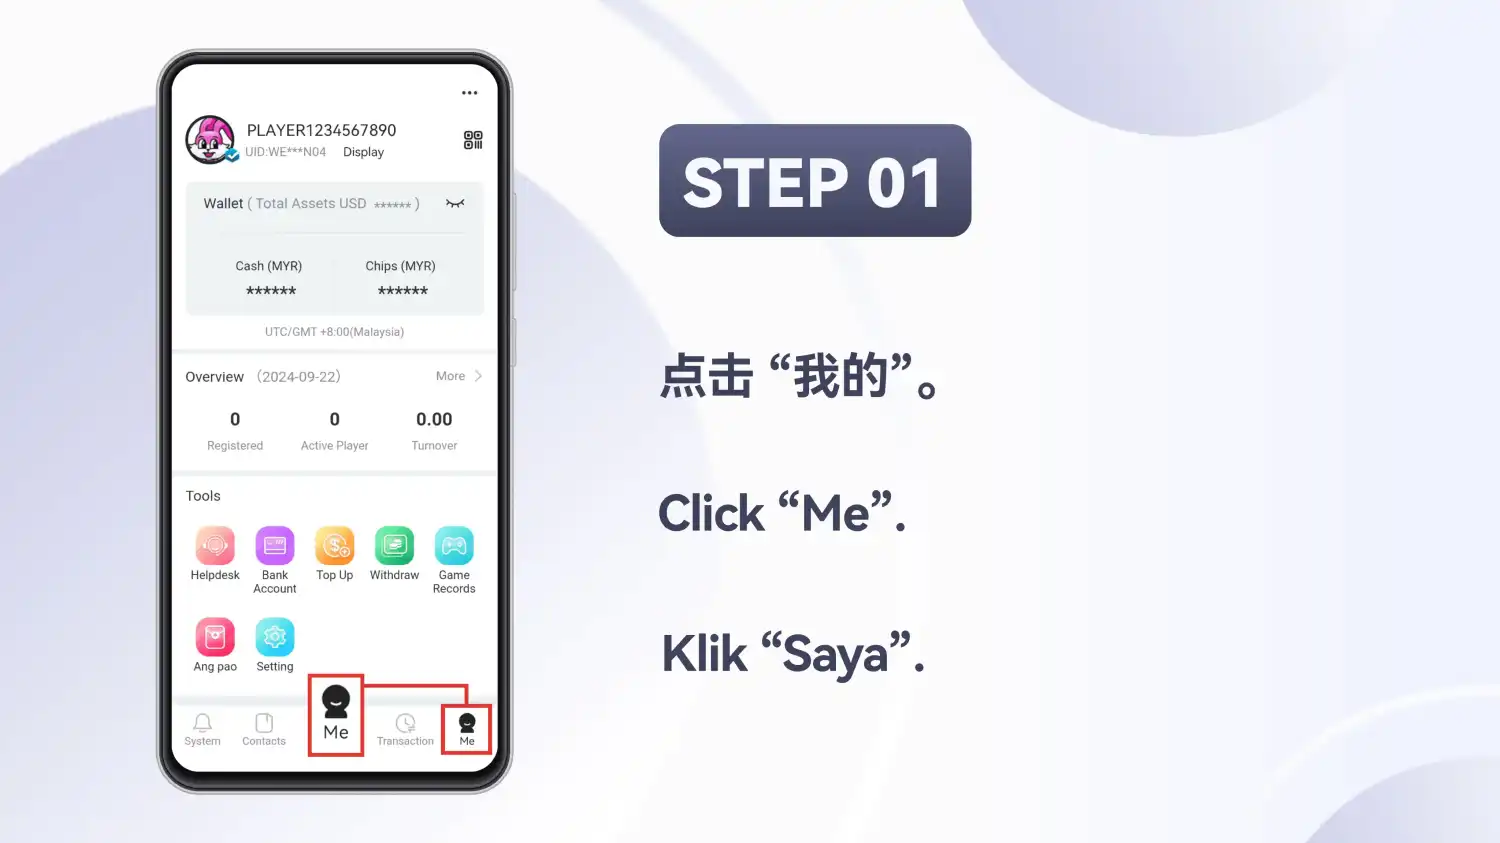
Tap Me
On the Winbox home screen, tap Me in the bottom bar.
Tap Top Up
On the Me screen, open Top Up from the Tools panel.
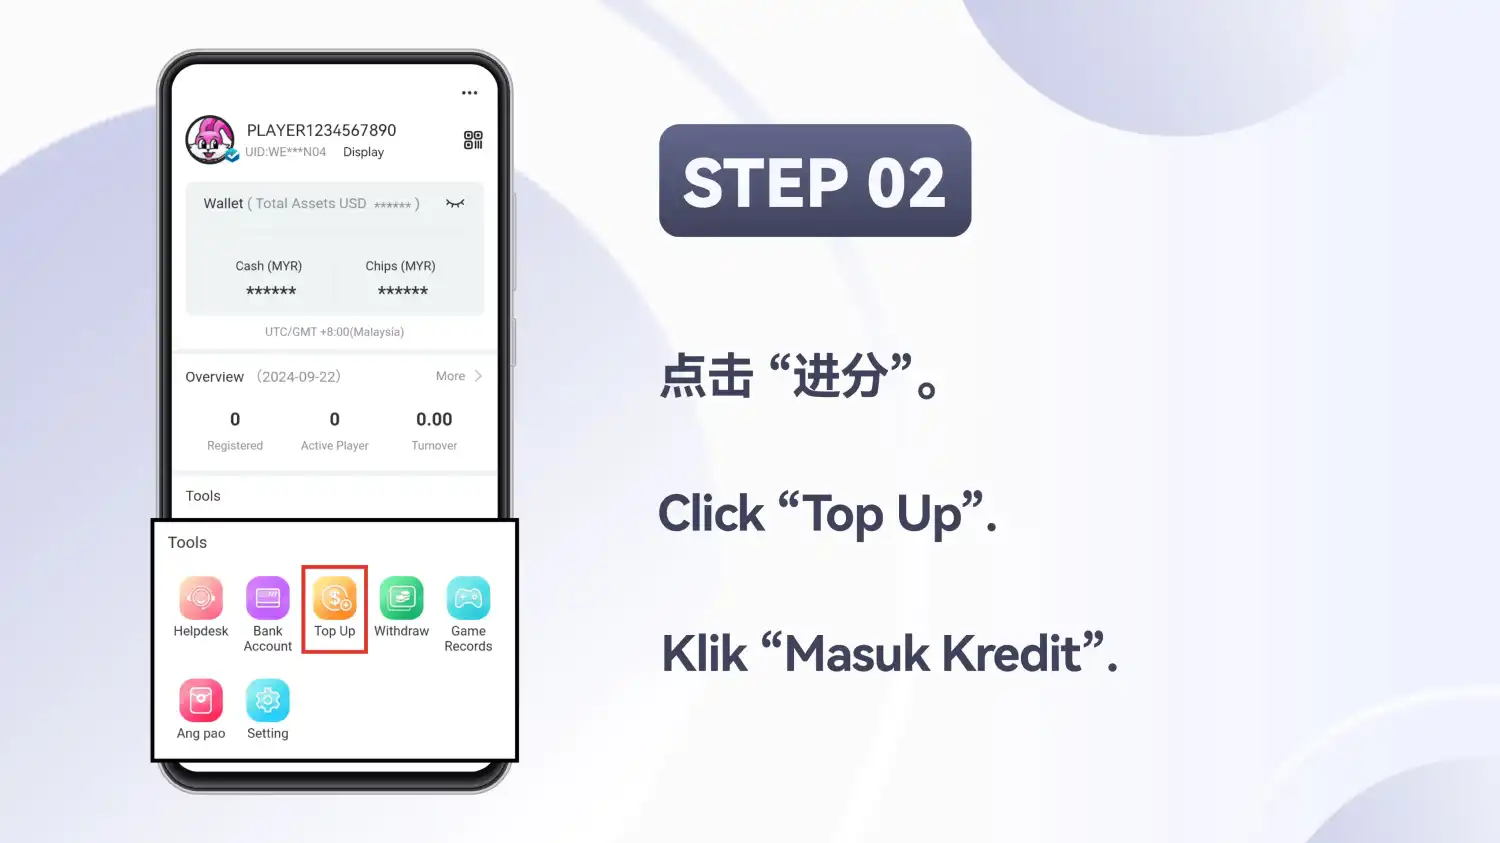
Choose Instant top up (WINPAY)
Pick Instant top up (WINPAY) from the list. The other entries in the screenshot are the same EZPAY, TNG and TNG QR options, with two of them marked for maintenance.
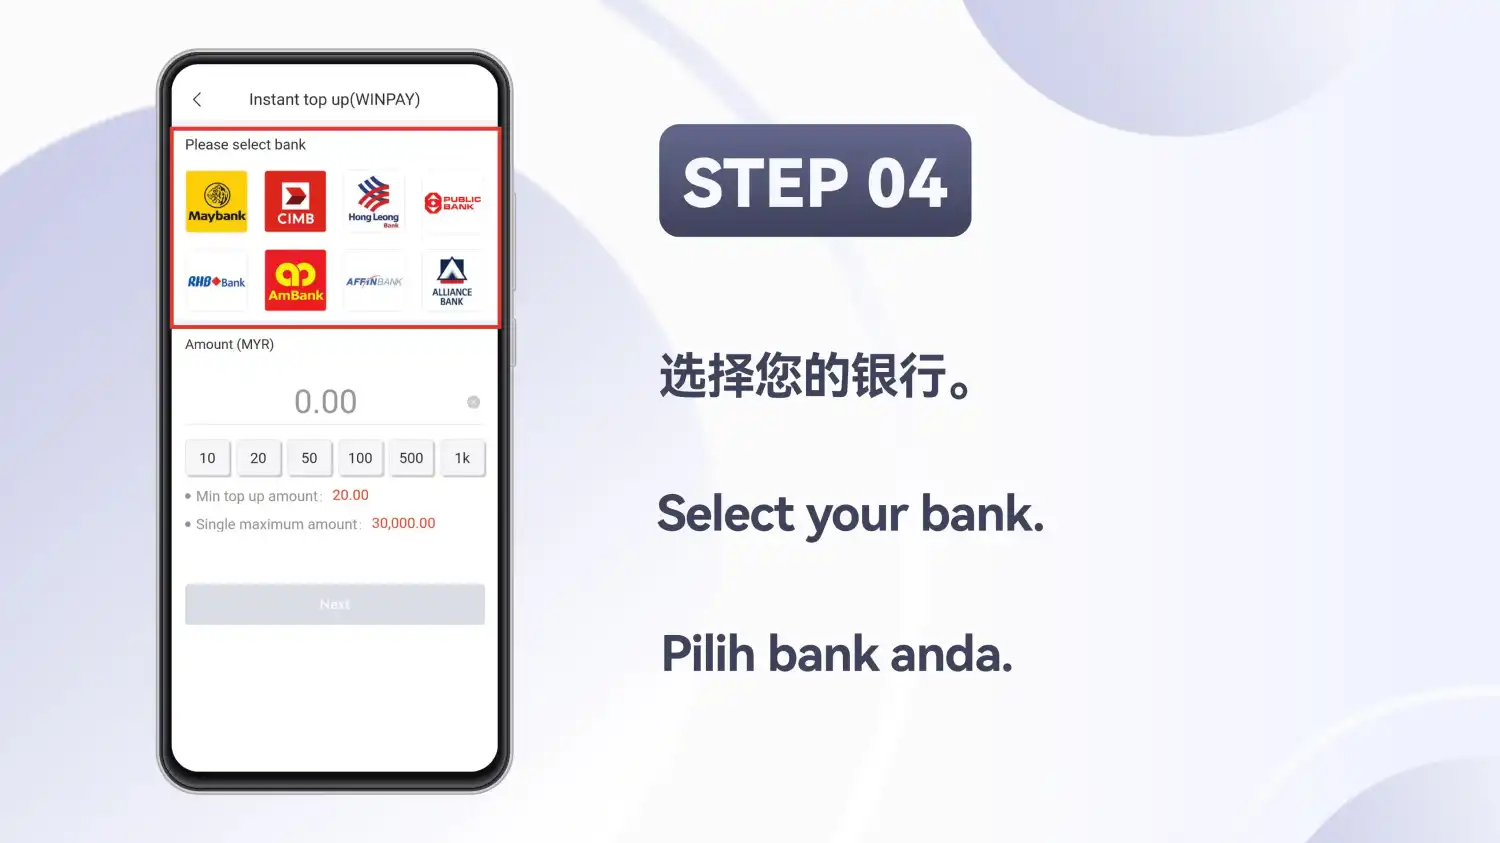
Select your bank
Choose a bank from the grid of eight logos. This screen listed a minimum of 20.00 and a single maximum of 30,000.00, and Next was disabled until an amount was entered.
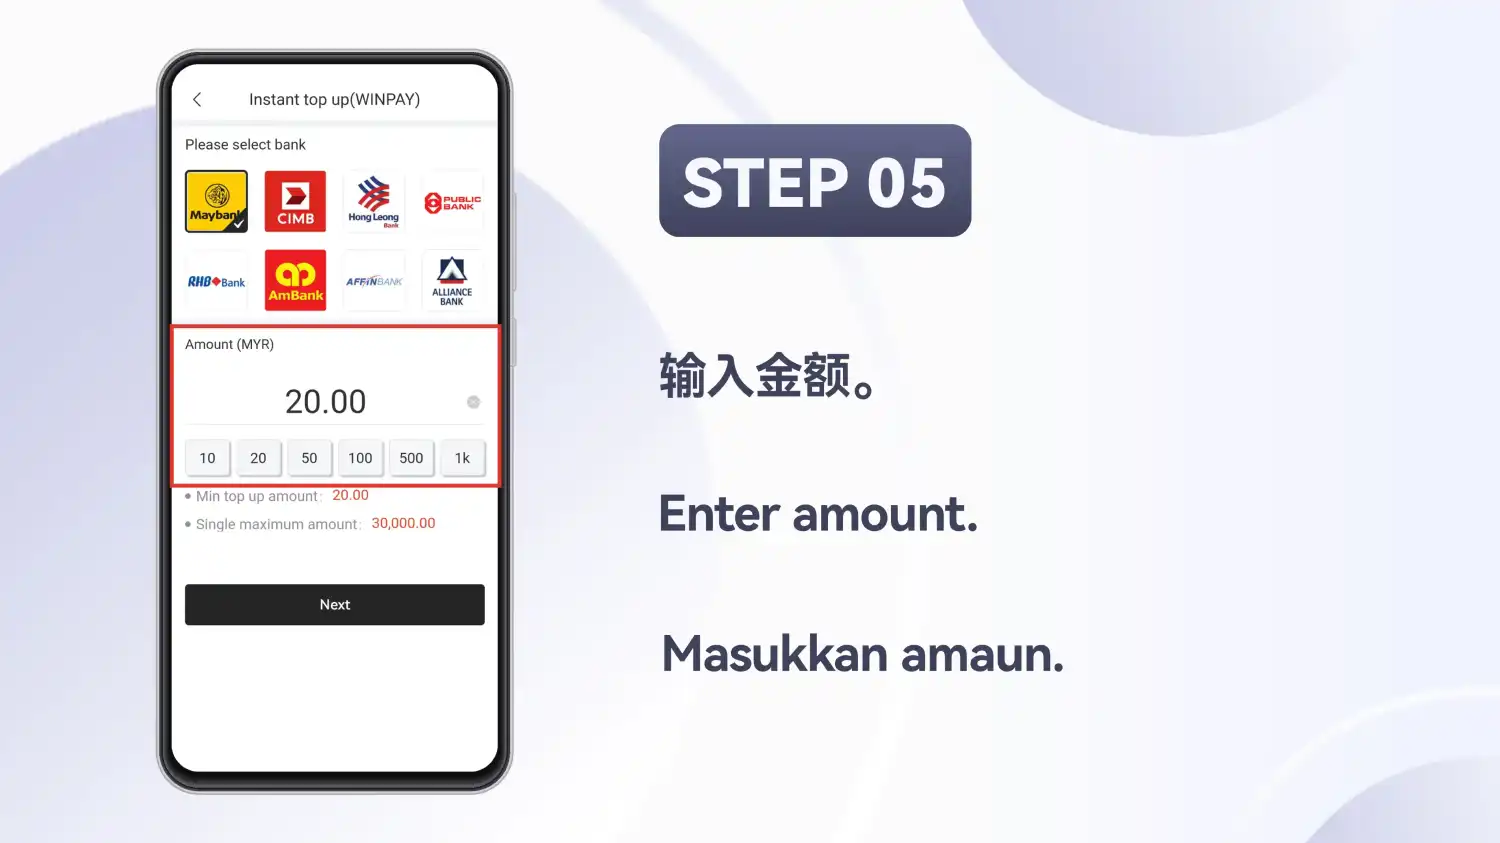
Enter the amount
Type an amount (the example uses 20.00) or use a quick-amount button, then tap Next.
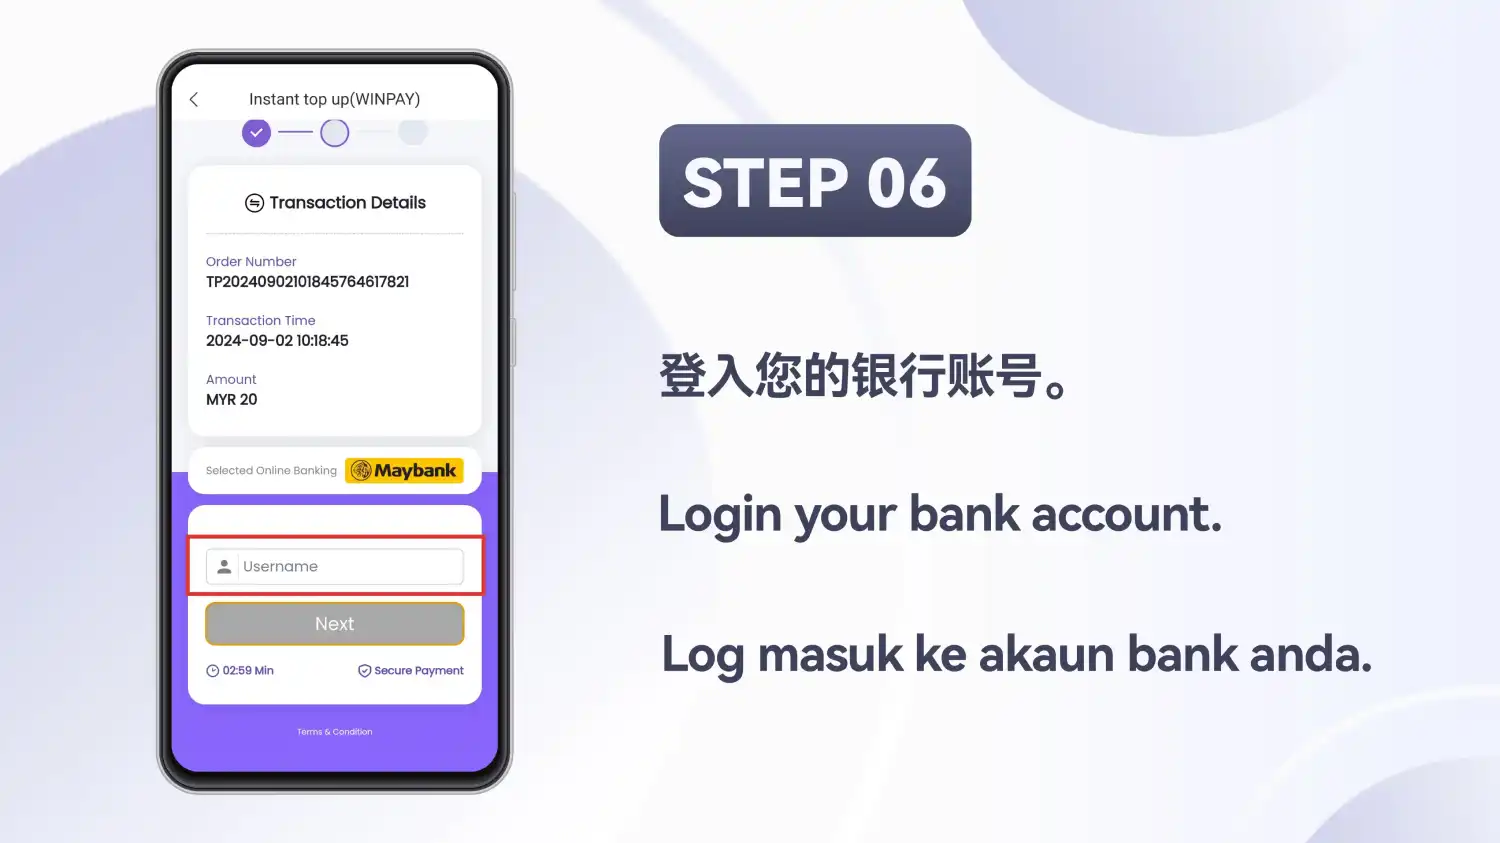
Enter your online-banking username
The payment page repeats the order details, amount and bank at the top. Type your username for that bank below them.
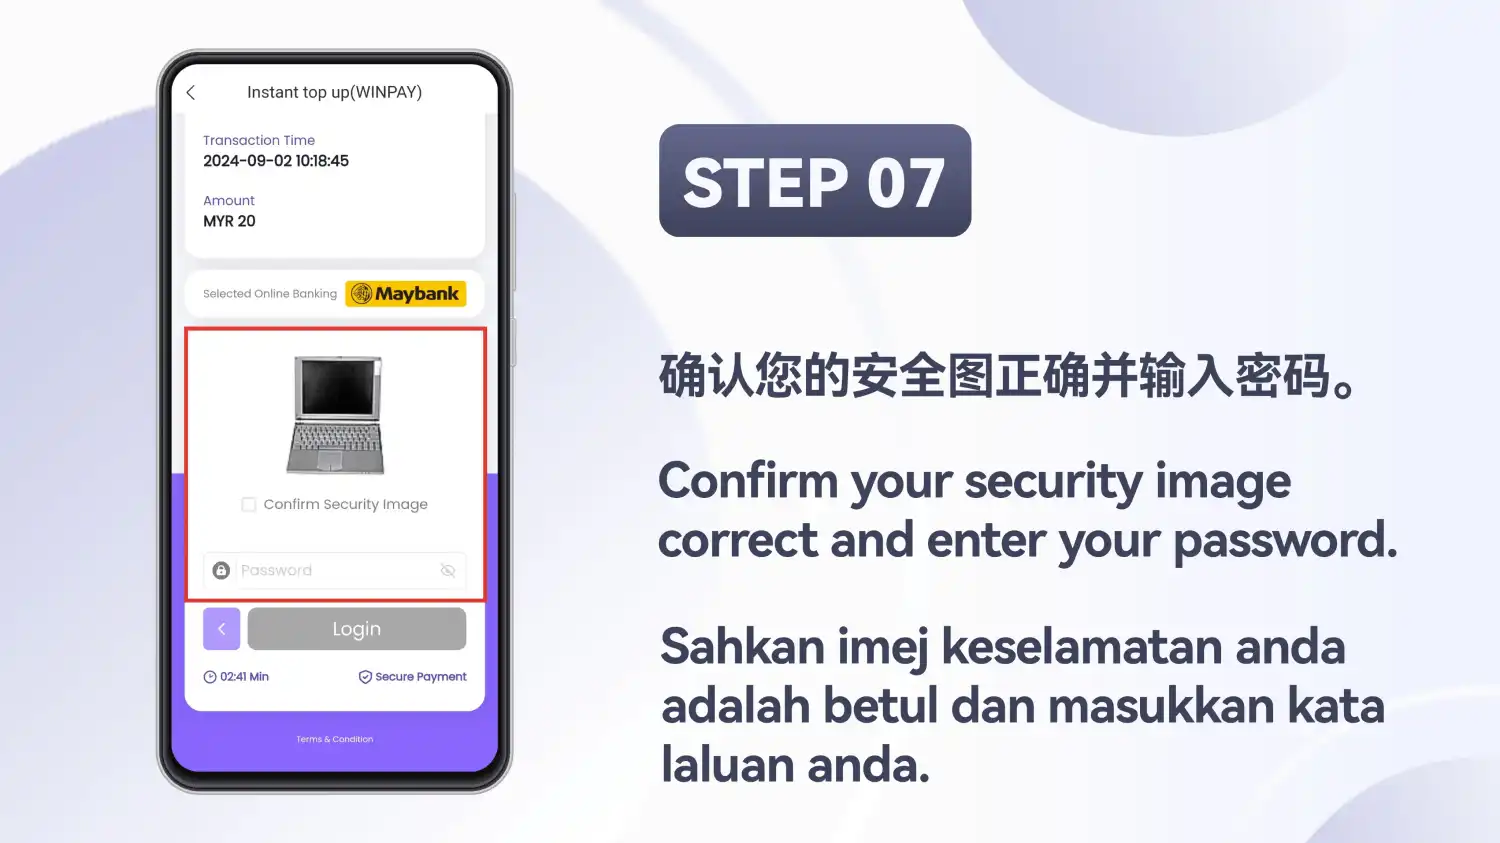
Check the security image and enter your password
Confirm the security image, enter your password and tap Login.
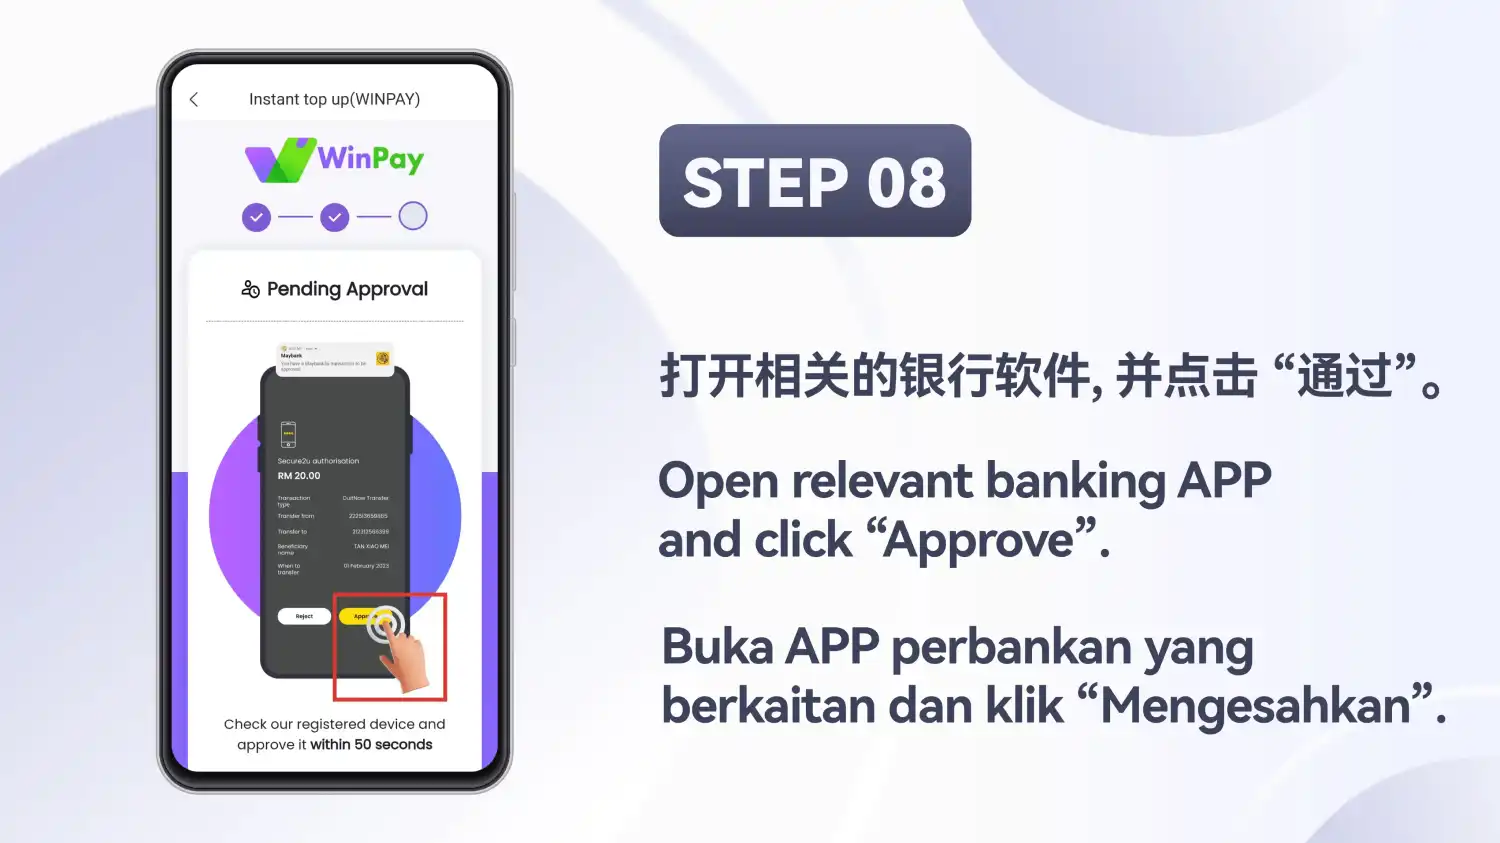
Approve in your banking app
The page shows Pending Approval. Open your banking app and approve the request.
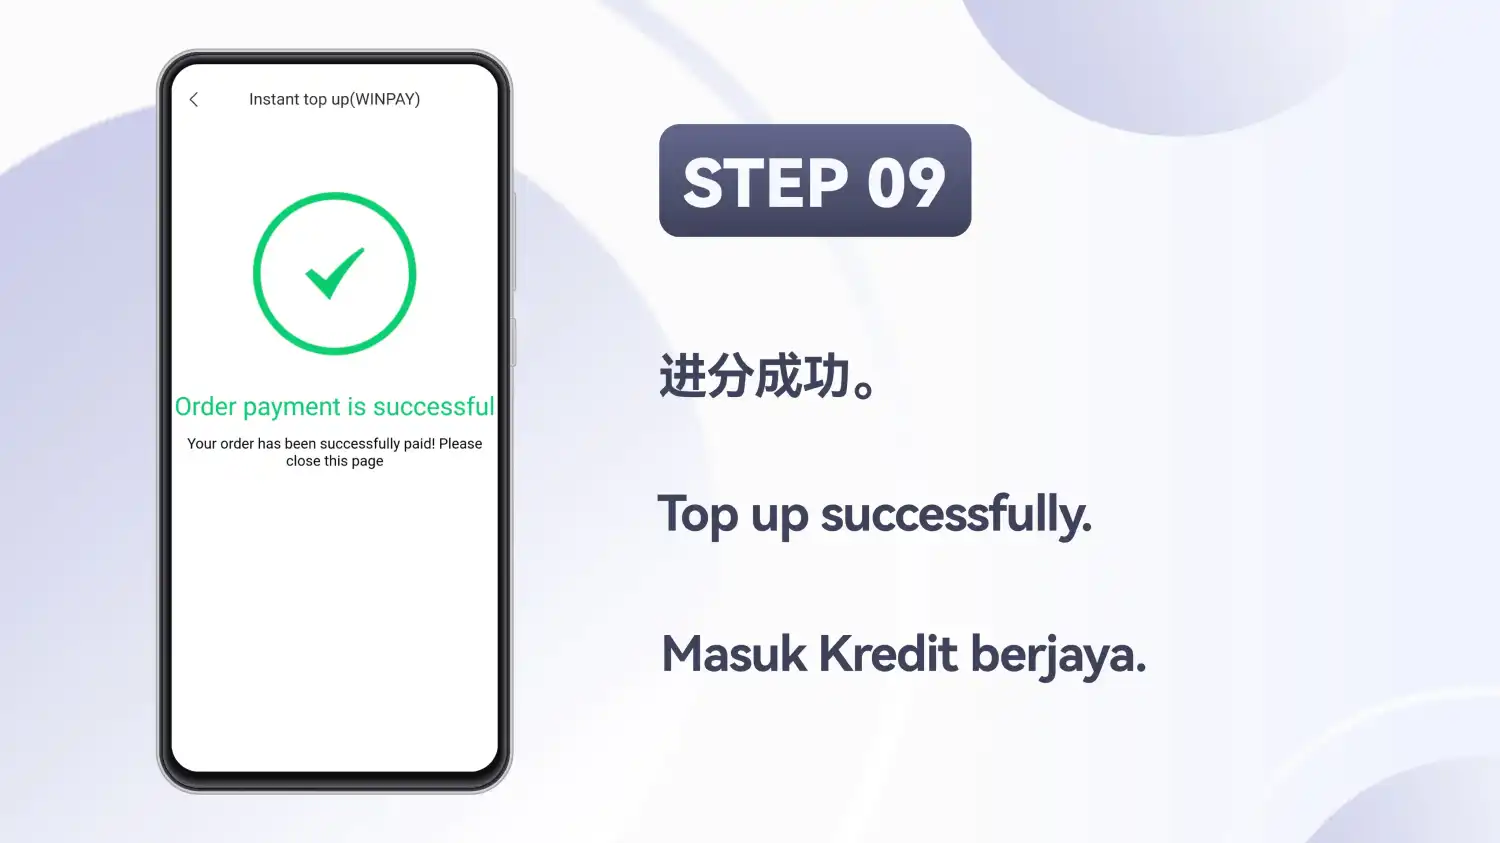
Read the success message
The last screen reads Order payment is successful.
Before you submit
A short check on the screen in front of you:
- The method and the amount are the ones you meant.
- The limits shown on your amount screen. They were not the same for every method in the screenshots.
- The payment details on the payment page match what you expect: amount, bank or wallet.
- Anything on screen that differs from this guide. Follow the screen.
If your screen looks different
Payment options and screens change. Even within these screenshots the list of Top Up options differed between sets, and some entries were marked for maintenance. If a label, a bank list or a payment page doesn't match, follow the labels, payment details and prompts your own screen shows now. Don't try to force an old screenshot's steps onto a changed screen. Whether you reach Winbox through a mobile browser or the installed Android app may also change what you see; installing the app is covered on the Winbox APK download page.
After you submit
The example flows end on a success message, such as Top up successfully or Order payment is successful. This guide doesn't say how long a top-up takes to show in your account. One e-wallet screen says that if a transfer succeeded but your credit hasn't arrived, you should contact customer service, meaning the platform's, since this website can't act on payments. Once a top-up shows in your account, the game categories are laid out on the Winbox MY homepage. Only top up what you had planned to; see responsible gaming for setting limits.