
Winbox Real-Name Authentication: Step-by-Step
In the app this flow is called Identity Verification, and the slides pair that label with the Chinese 实名认证, real-name authentication. This tutorial follows 14 numbered slides through the three stages the screens themselves show.
- Information Submission
- Primary Verification
- Secondary Verification
Before you start
- The slides are the H5 version and begin on the Me page of a signed-in account. For browser access, H5 Winbox access is where that begins.
- They assume an account already exists. If you haven't created one, start with Winbox sign-up.
- You need the bank account the name will be matched to. The notices say the name must be the same as the bank account holder.
- Stage 3 uses a balance and a withdrawal, so steps 6 to 8 cover getting a balance first.
What the form asks for
- Full Name
- A text field. The notice says it should be the same as the bank account holder.
- Currency
- A selector. It reads MYR in the screenshot.
- Bank
- A selector. It reads Ambank in the screenshot.
- Bank Account
- A number field, with a link above the form, “Select an existing bank account”.
- Remarks
- A free-text box with a 0/200 counter. The slides don’t say whether it is needed.
The slides don't show a document or ID upload, or an ID or document number; a selfie or face check; a phone number or OTP field; a date of birth, an address or a nationality. If your screen asks for more than the five fields above, follow your screen.
Step-by-step Real-Name Authentication
Step numbers are the ones printed on each slide. 5a is a note slide. The name, bank account, order number and IDs in the screenshots are sample data.
Stage 1 of 3: Information Submission
Open Identity Verification from Me
On the Me page, tap the “…” icon at the top right. A small menu opens with Edit Profile, Identity Verification and Setting. Choose “Identity Verification”.
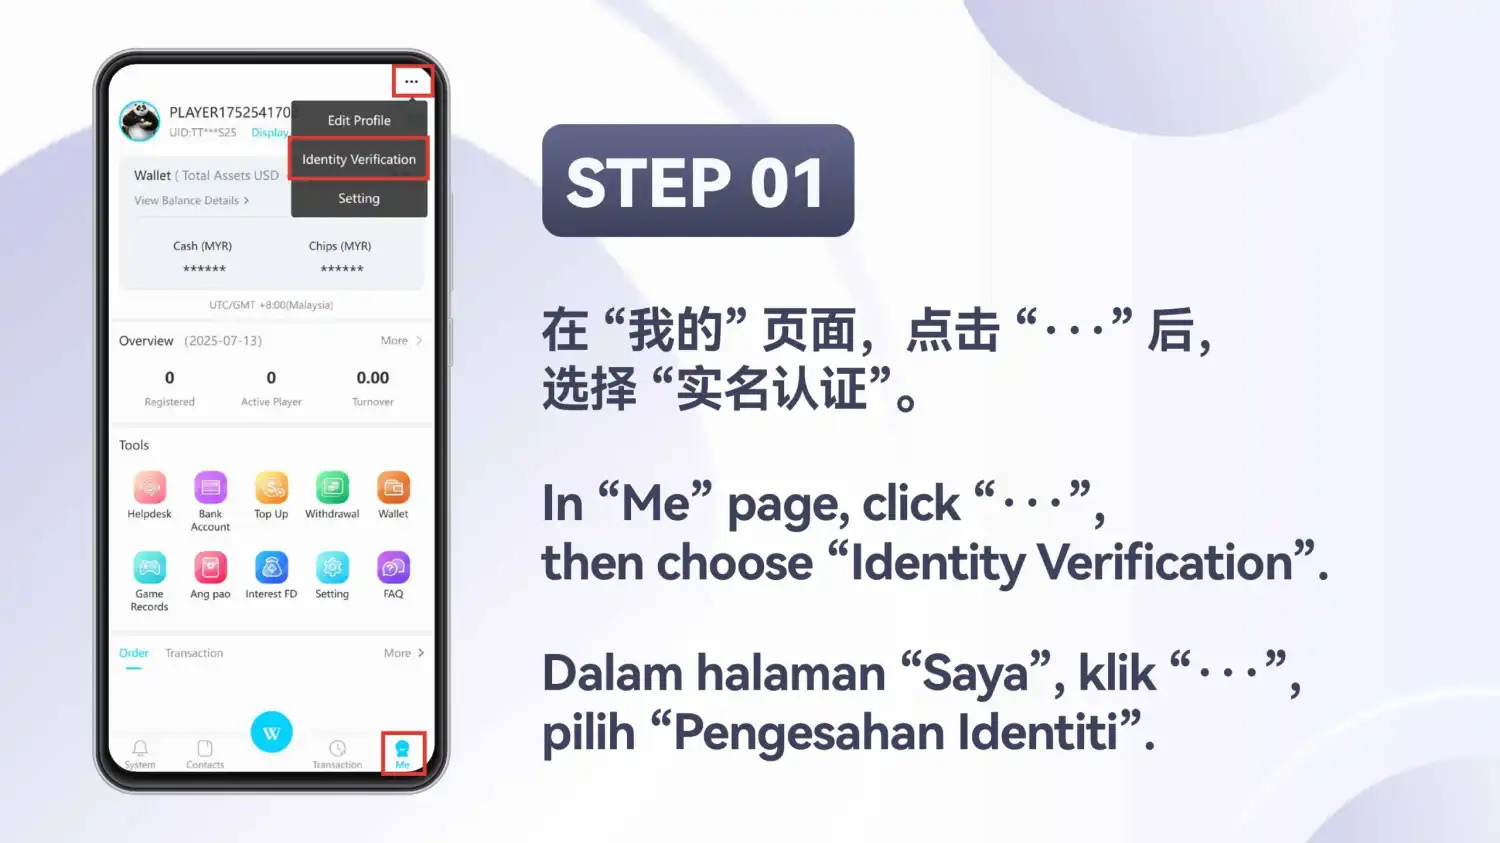
Choose Identity Verification
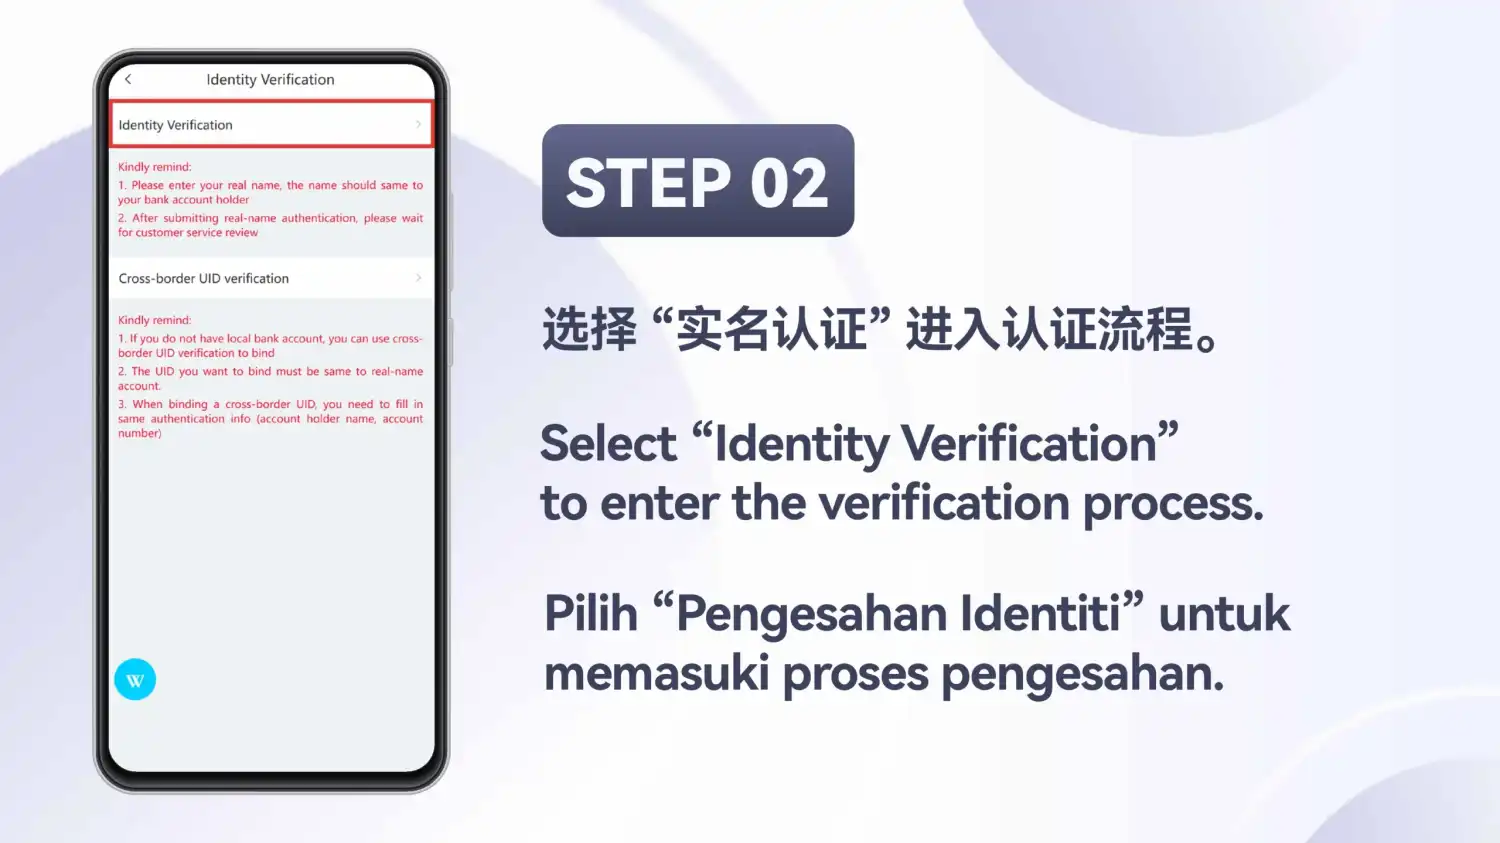
The Identity Verification screen lists two options. Select “Identity Verification”, the outlined one at the top.
The red notice under it says: “Please enter your real name, the name should same to your bank account holder”, and “After submitting real-name authentication, please wait for customer service review”. The second option, Cross-border UID verification, is described further down this page.
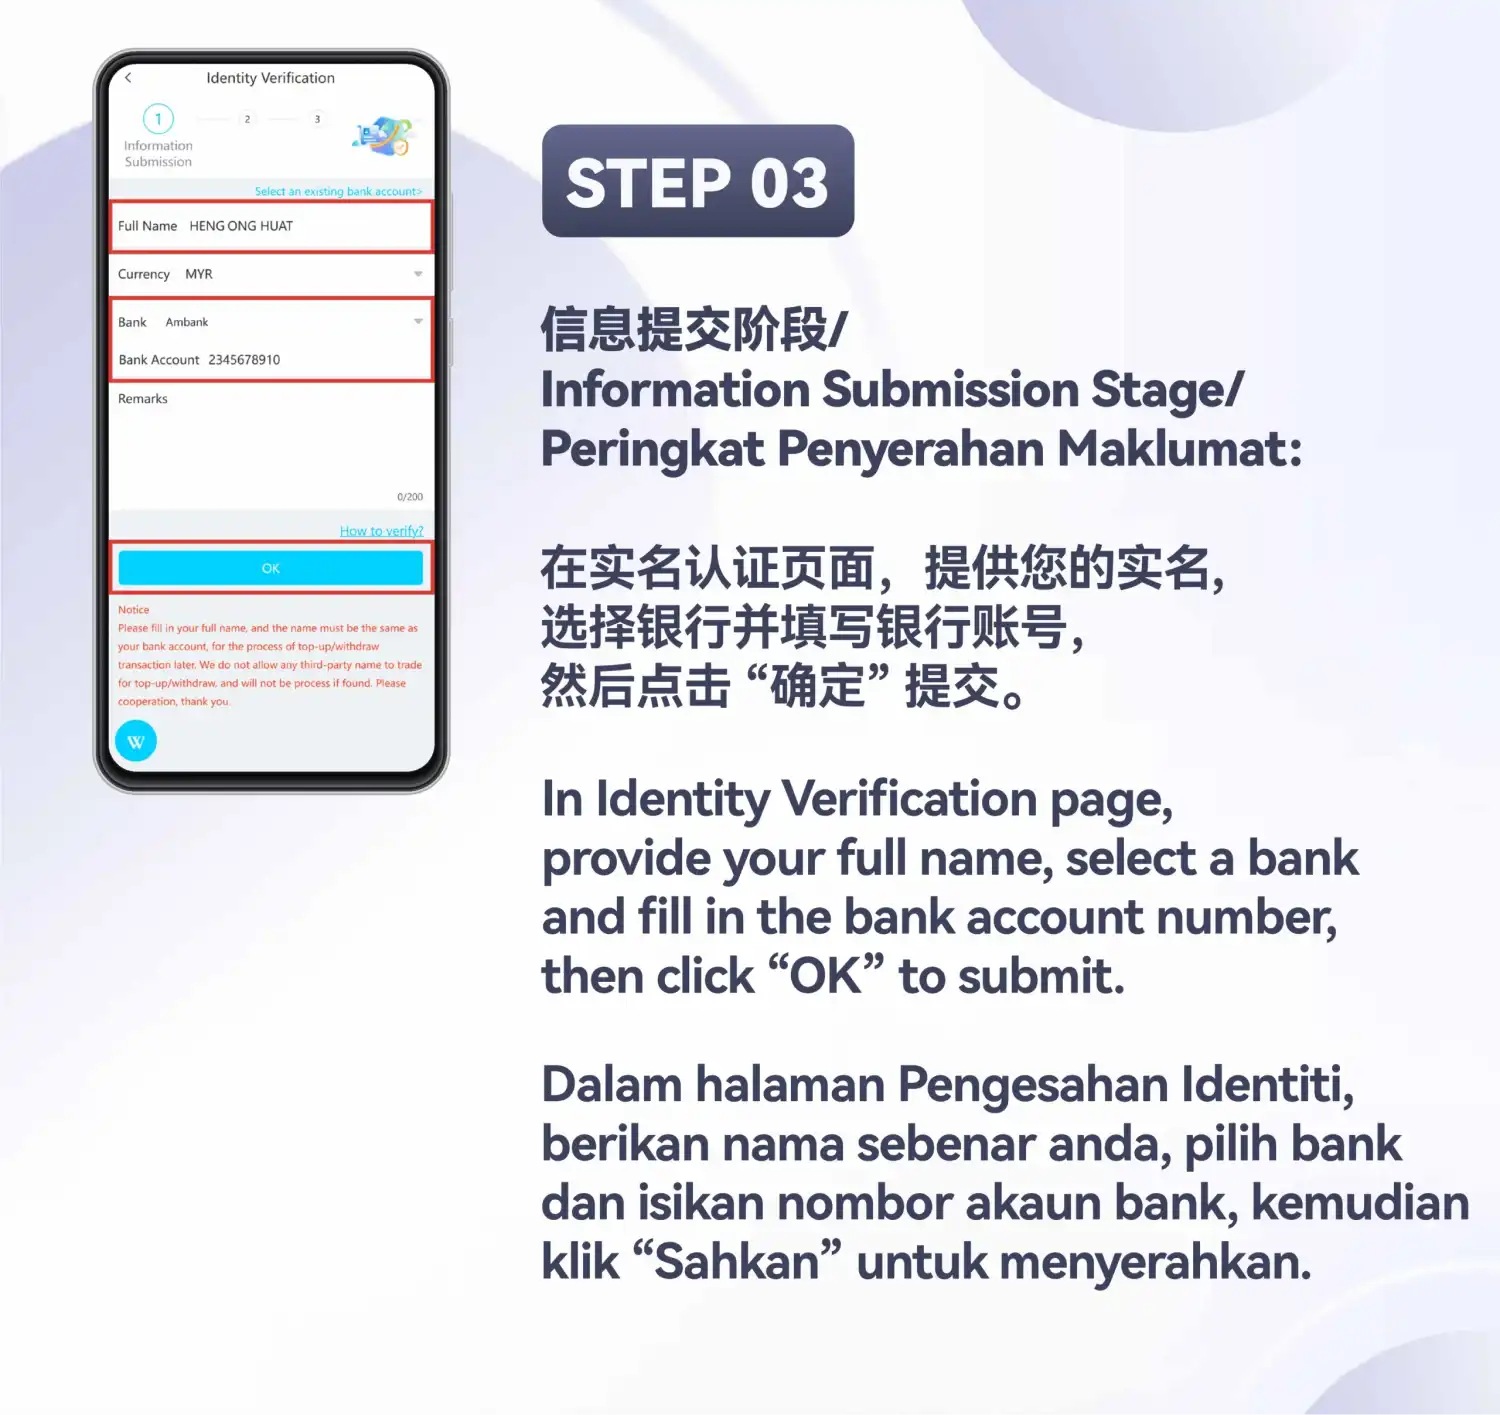
Fill in the information and tap OK
This is stage 1 of 3, Information Submission. The form has a Full Name field, a Currency selector (MYR here), a Bank selector and a Bank Account field. There is also a Remarks box and a link, “Select an existing bank account”. When the fields are filled in, tap “OK”.
The red notice at the bottom says the full name must be the same as the bank account, “for the process of top-up/withdraw later”, and that a third-party name is not allowed for top-up or withdrawal. The name and account number in the screenshot are sample values, not something to copy.
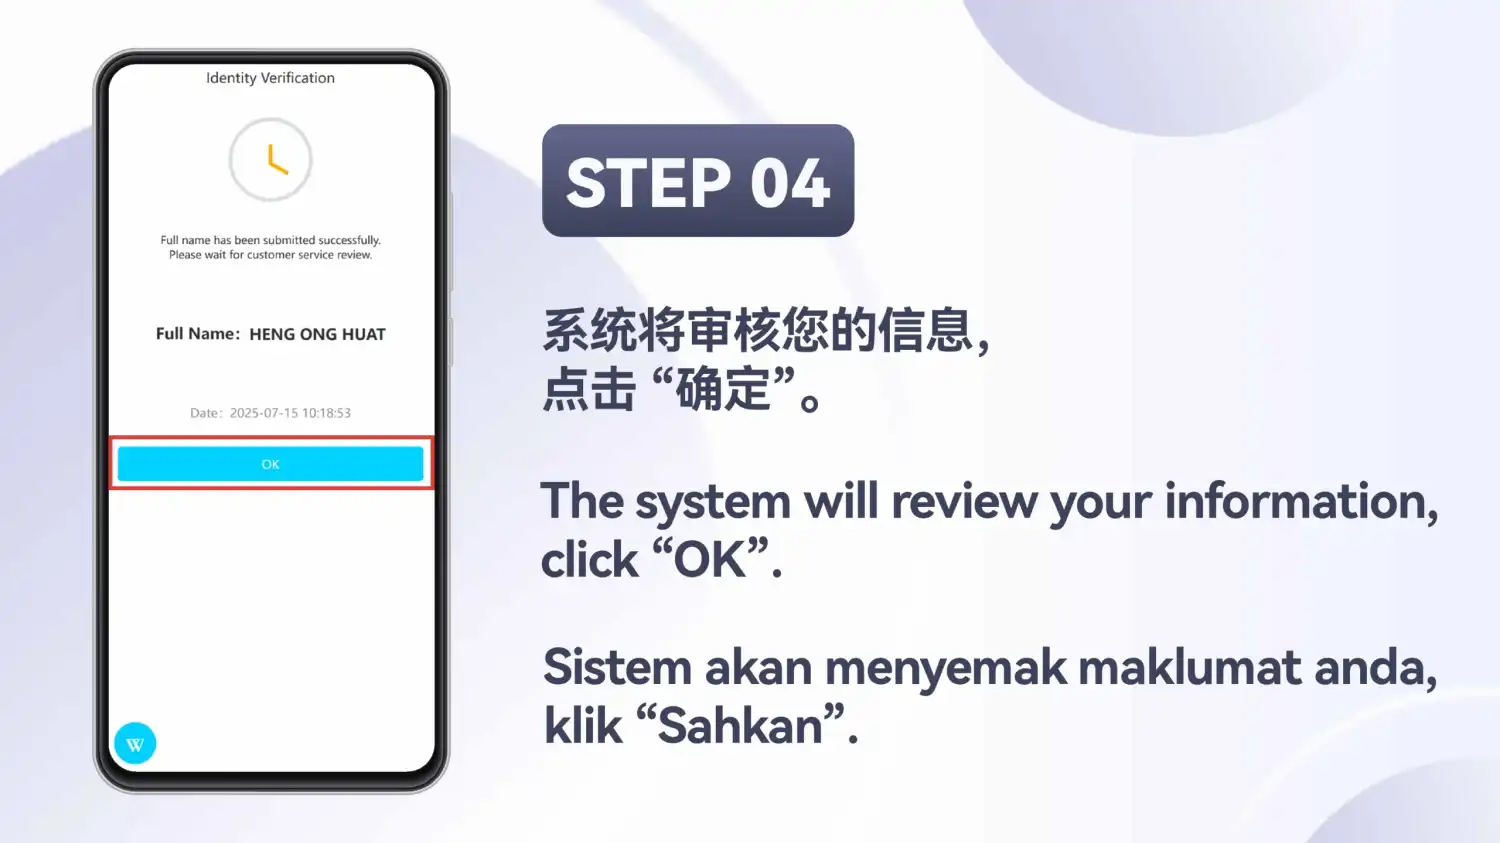
Wait for customer service review
After OK, a clock icon appears with the message “Full name has been submitted successfully. Please wait for customer service review.”, the full name and a date. Tap “OK”.
This is a submitted state. The slide doesn’t say how long the review takes or what happens if it isn’t passed.
Stage 2 of 3: Primary Verification
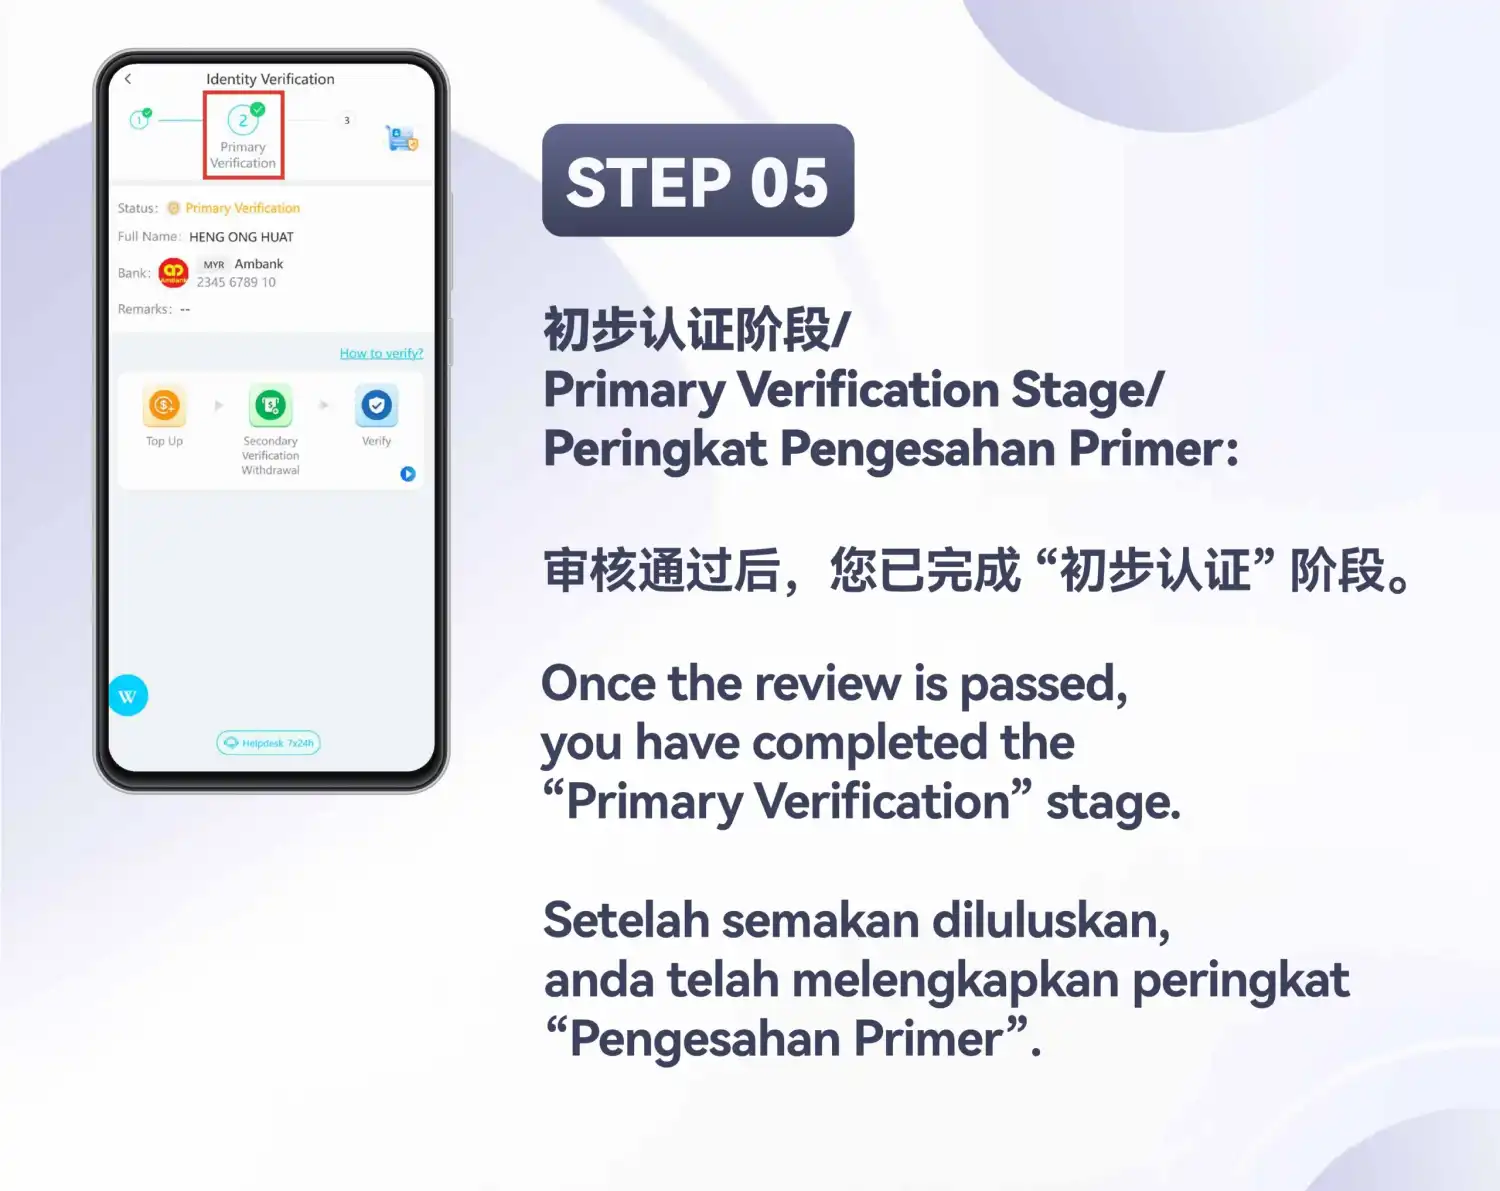
Primary Verification is reached
Once the review is passed, stage 2 is ticked and the Status line reads “Primary Verification”. The screen shows the Full Name, the Bank and Remarks, a “How to verify?” link and a row of three actions: Top Up, Secondary Verification Withdrawal and Verify.
This status is not the last one. Stage 3 is still open.
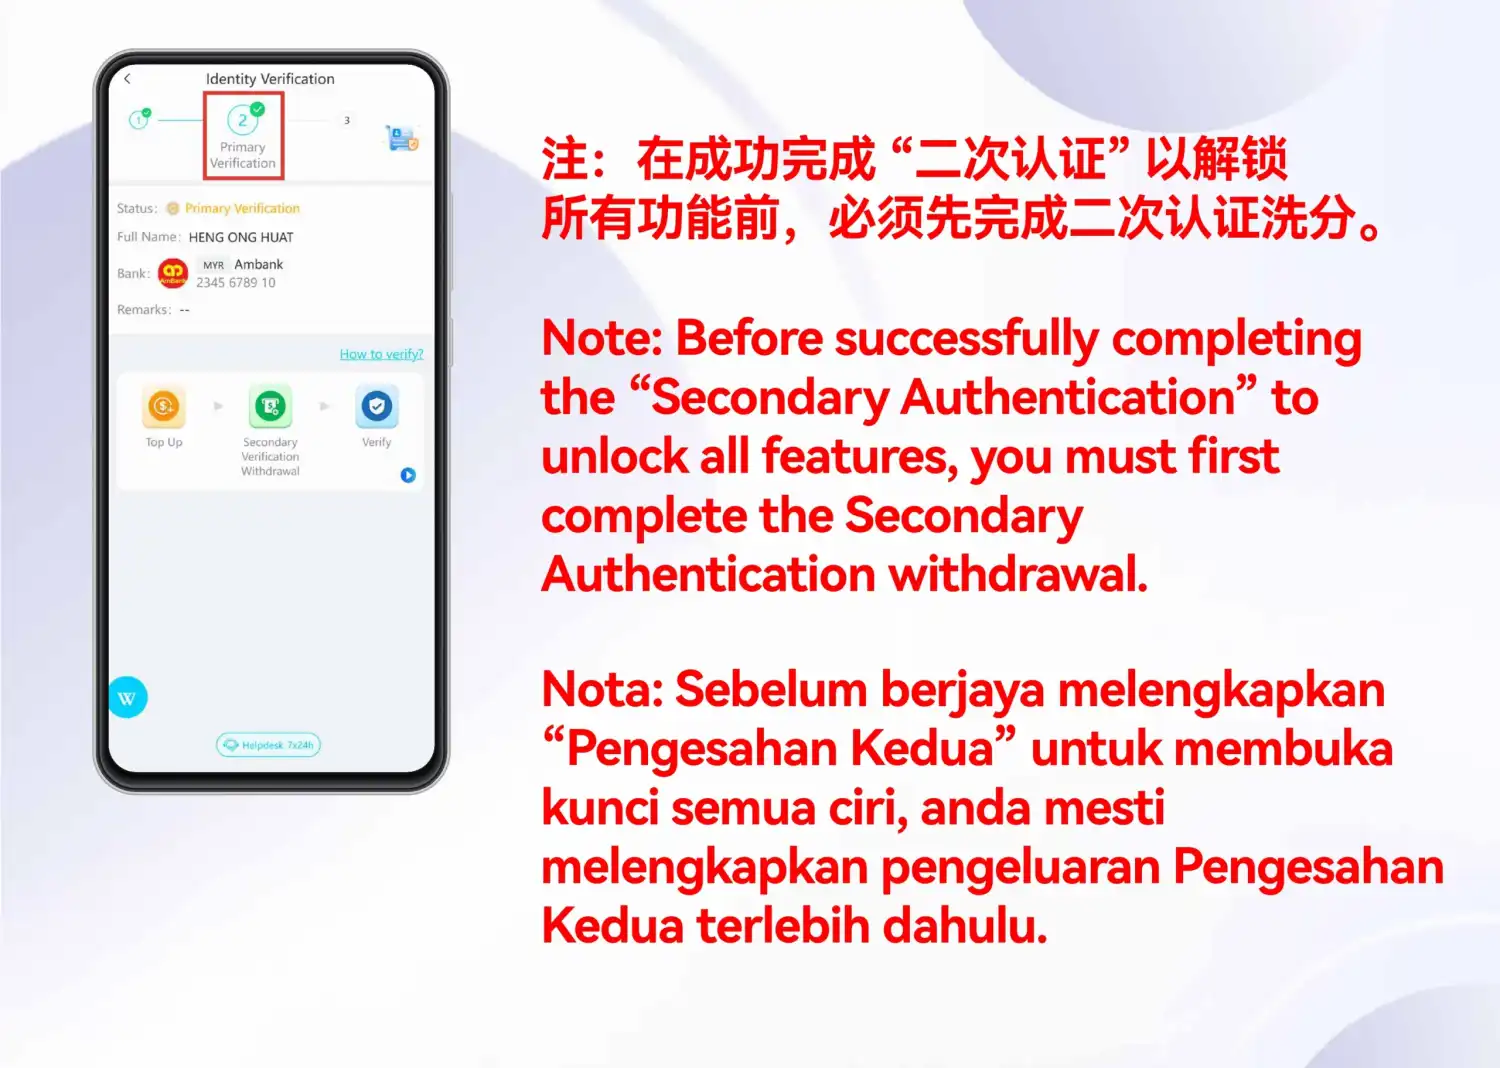
NoteNote on unlocking all features
The slide’s remark reads: “Before successfully completing the ‘Secondary Authentication’ to unlock all features, you must first complete the Secondary Authentication withdrawal.” It doesn’t list which features it means.
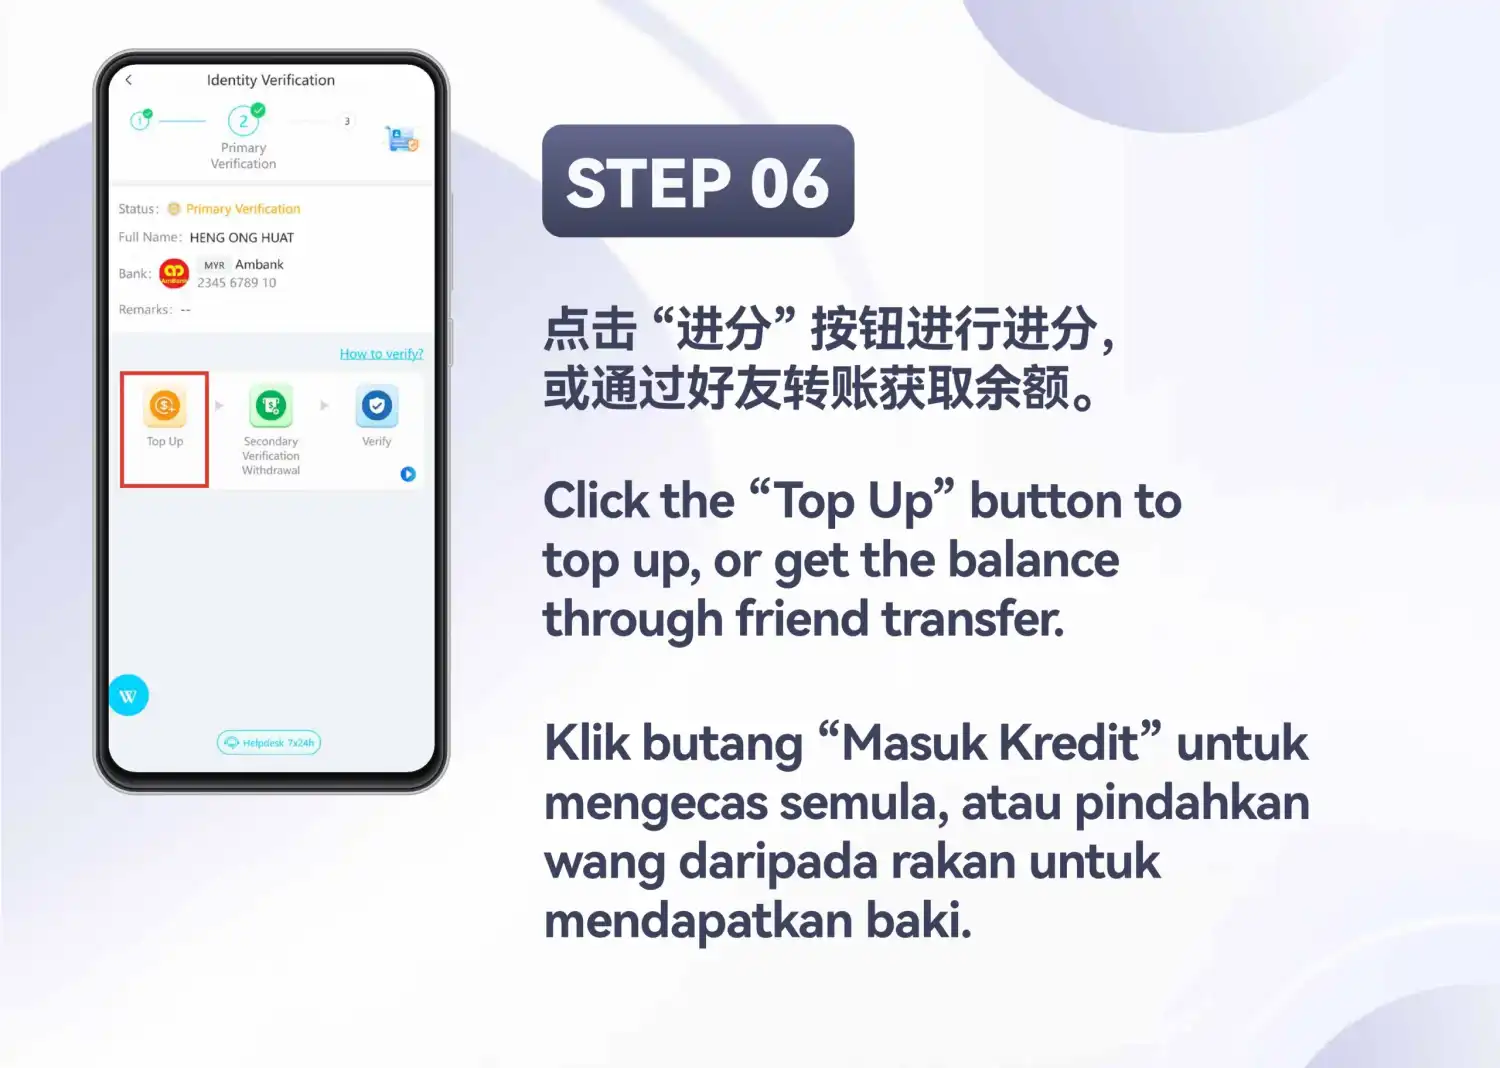
Top Up, or get a balance
Tap “Top Up” to add a balance. The slide adds that the balance can also come through a friend transfer.
The general top up tutorial covers the ordinary Top Up screens.
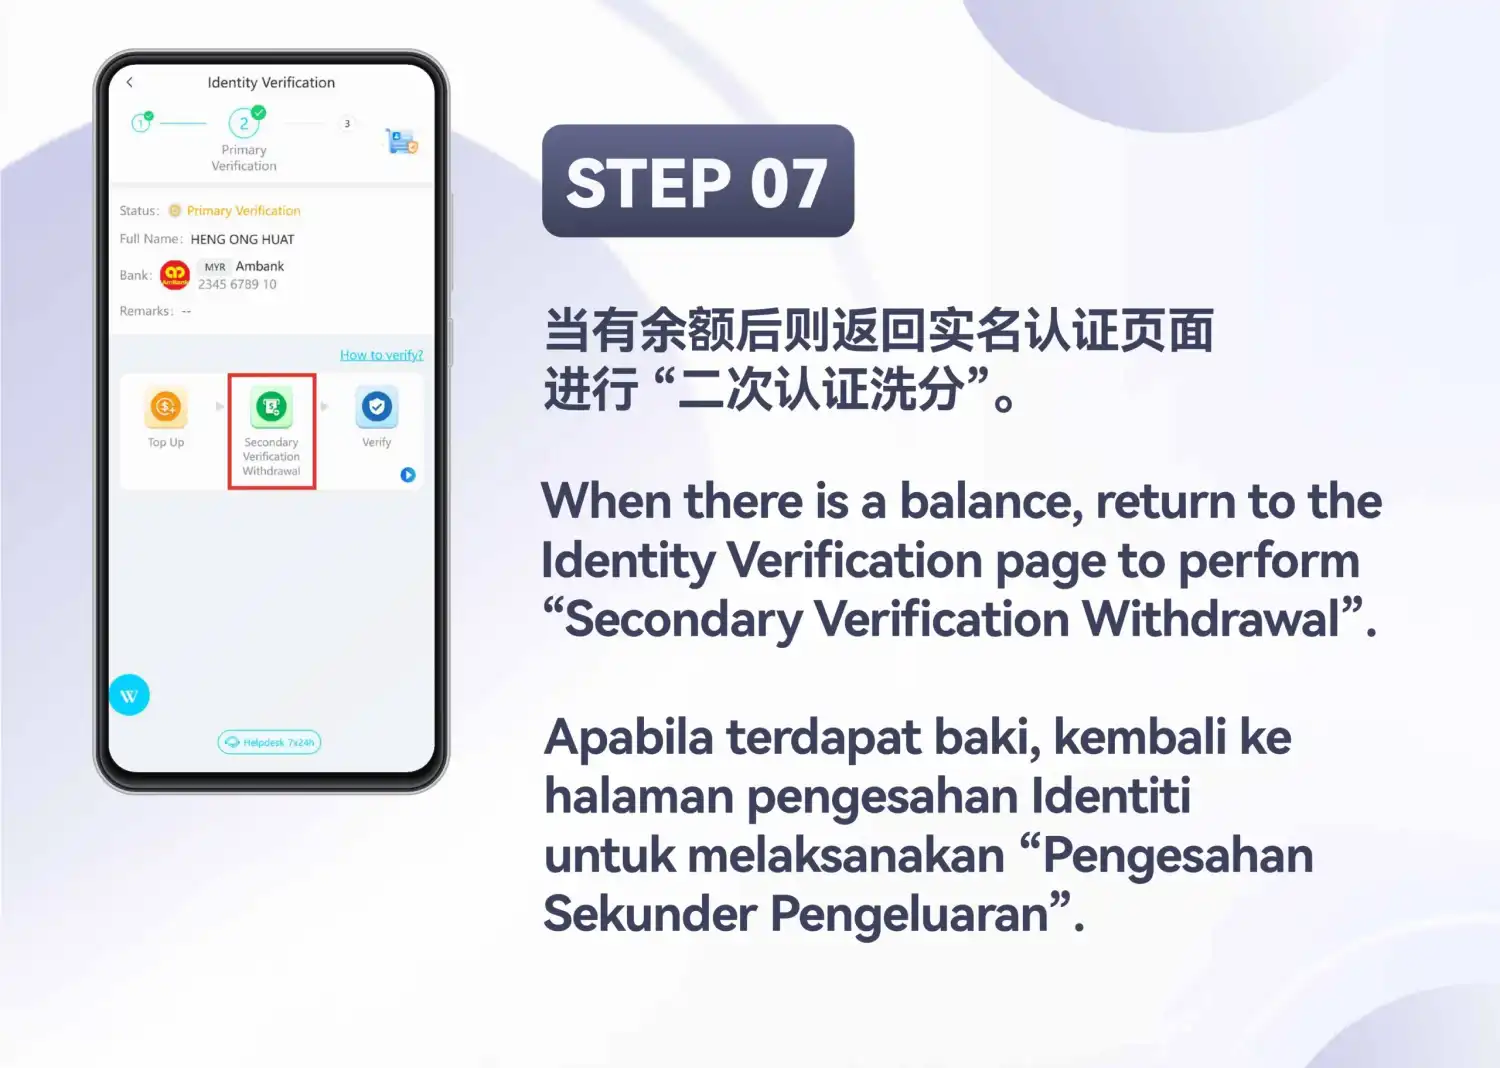
Return for the Secondary Verification Withdrawal
When there is a balance, come back to the Identity Verification page and tap “Secondary Verification Withdrawal”, the middle action in the row.
Stage 3 of 3: Secondary Verification
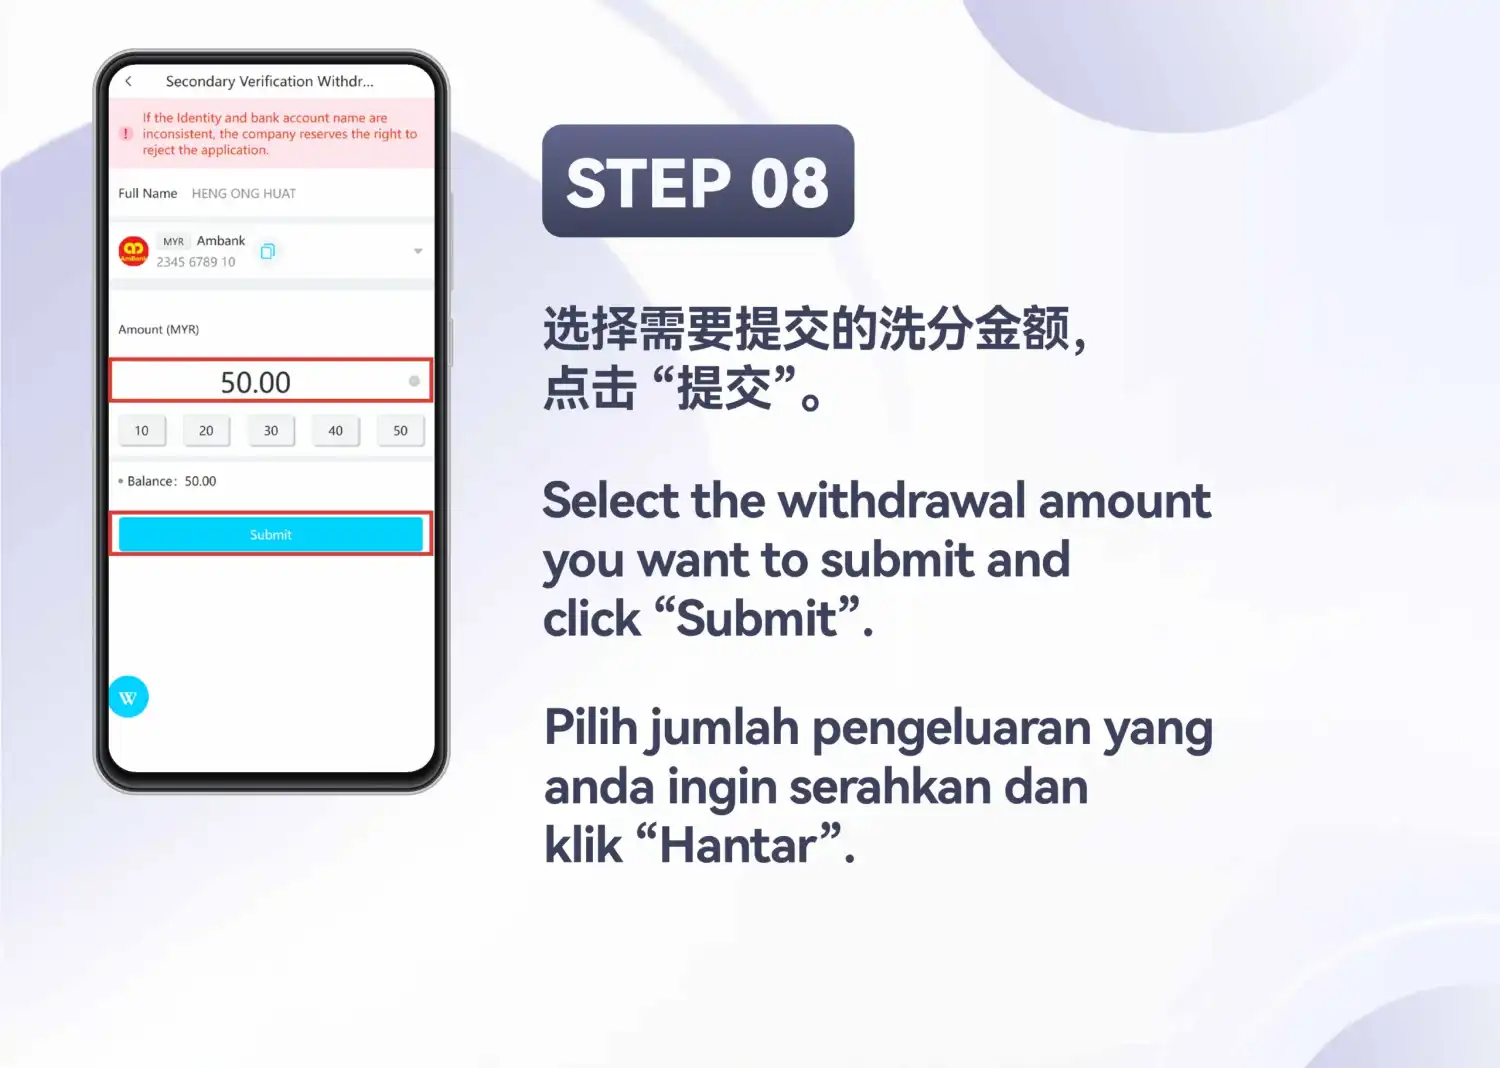
Choose an amount and tap Submit
The Secondary Verification Withdrawal screen opens with a pink warning: “If the Identity and bank account name are inconsistent, the company reserves the right to reject the application.” Below it are the Full Name, the bank and account, an Amount (MYR) field with shortcut buttons for 10, 20, 30, 40 and 50, and a Balance line.
Choose the withdrawal amount and tap “Submit”. The screenshot uses 50.00. This tutorial doesn’t state a required amount.
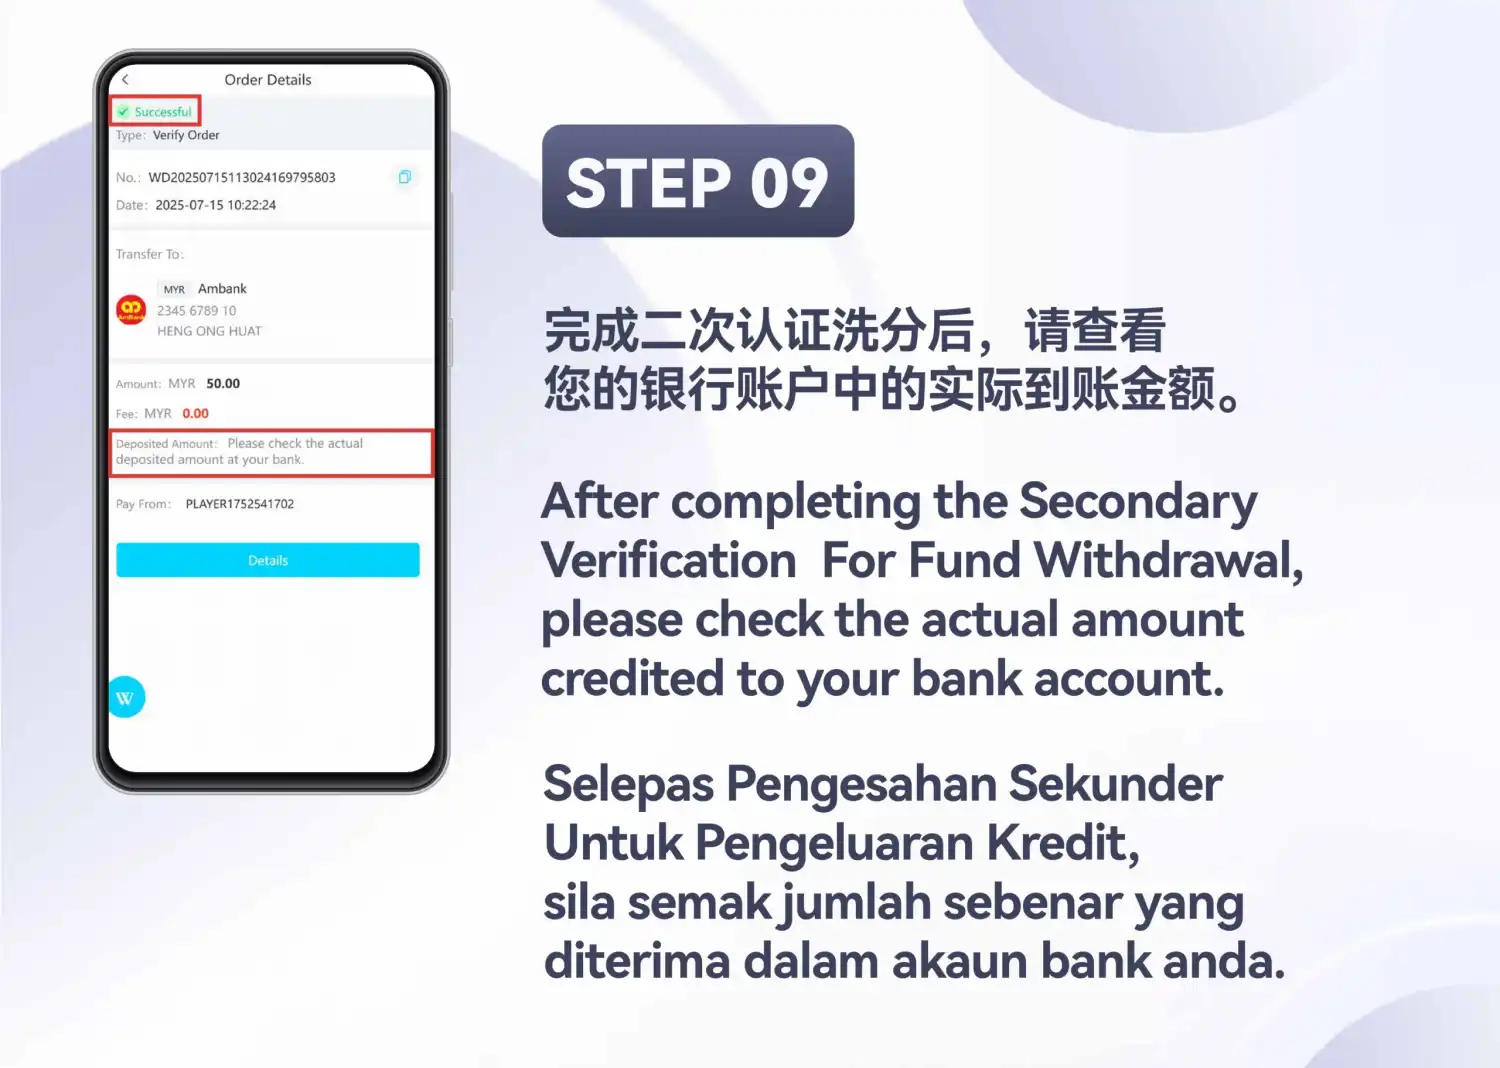
Read the order details
Order Details shows Successful, the type Verify Order, an order number and date, the amount (MYR 50.00 in the example), a fee line of MYR 0.00 and a Deposited Amount line that says: “Please check the actual deposited amount at your bank.”
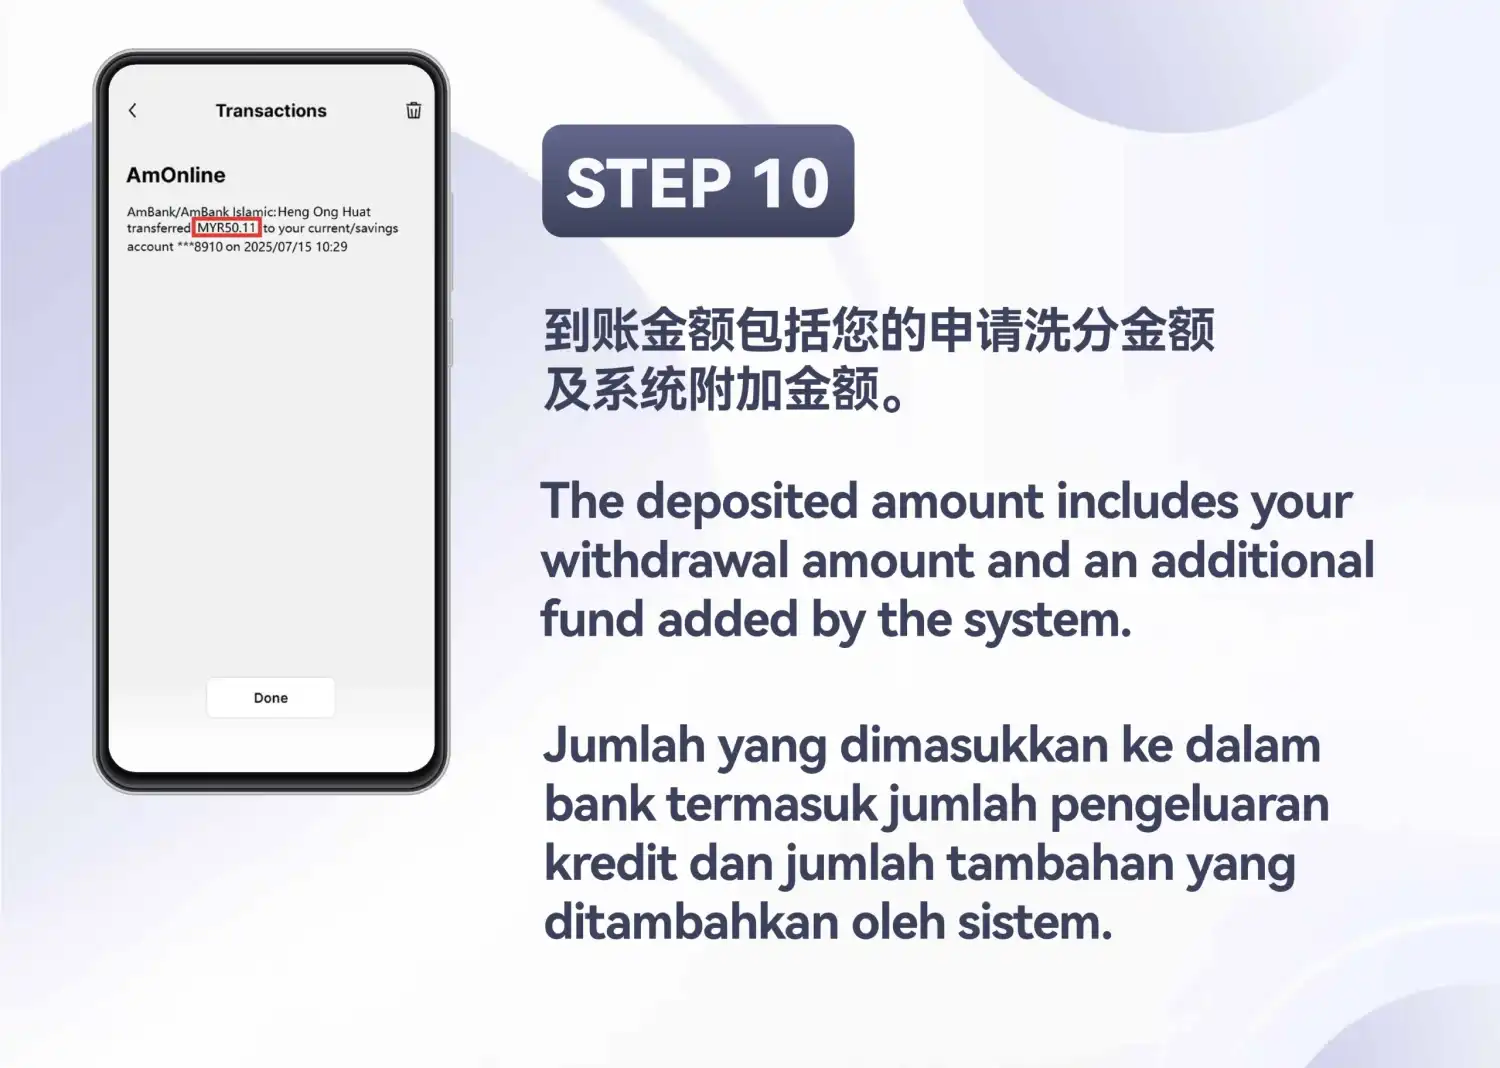
Check the amount in your bank
Open your bank’s own transaction message. The slide highlights MYR50.11 in it and says the deposited amount includes your withdrawal amount and an additional fund added by the system.
Only this example is shown. How large the additional fund is isn’t stated.
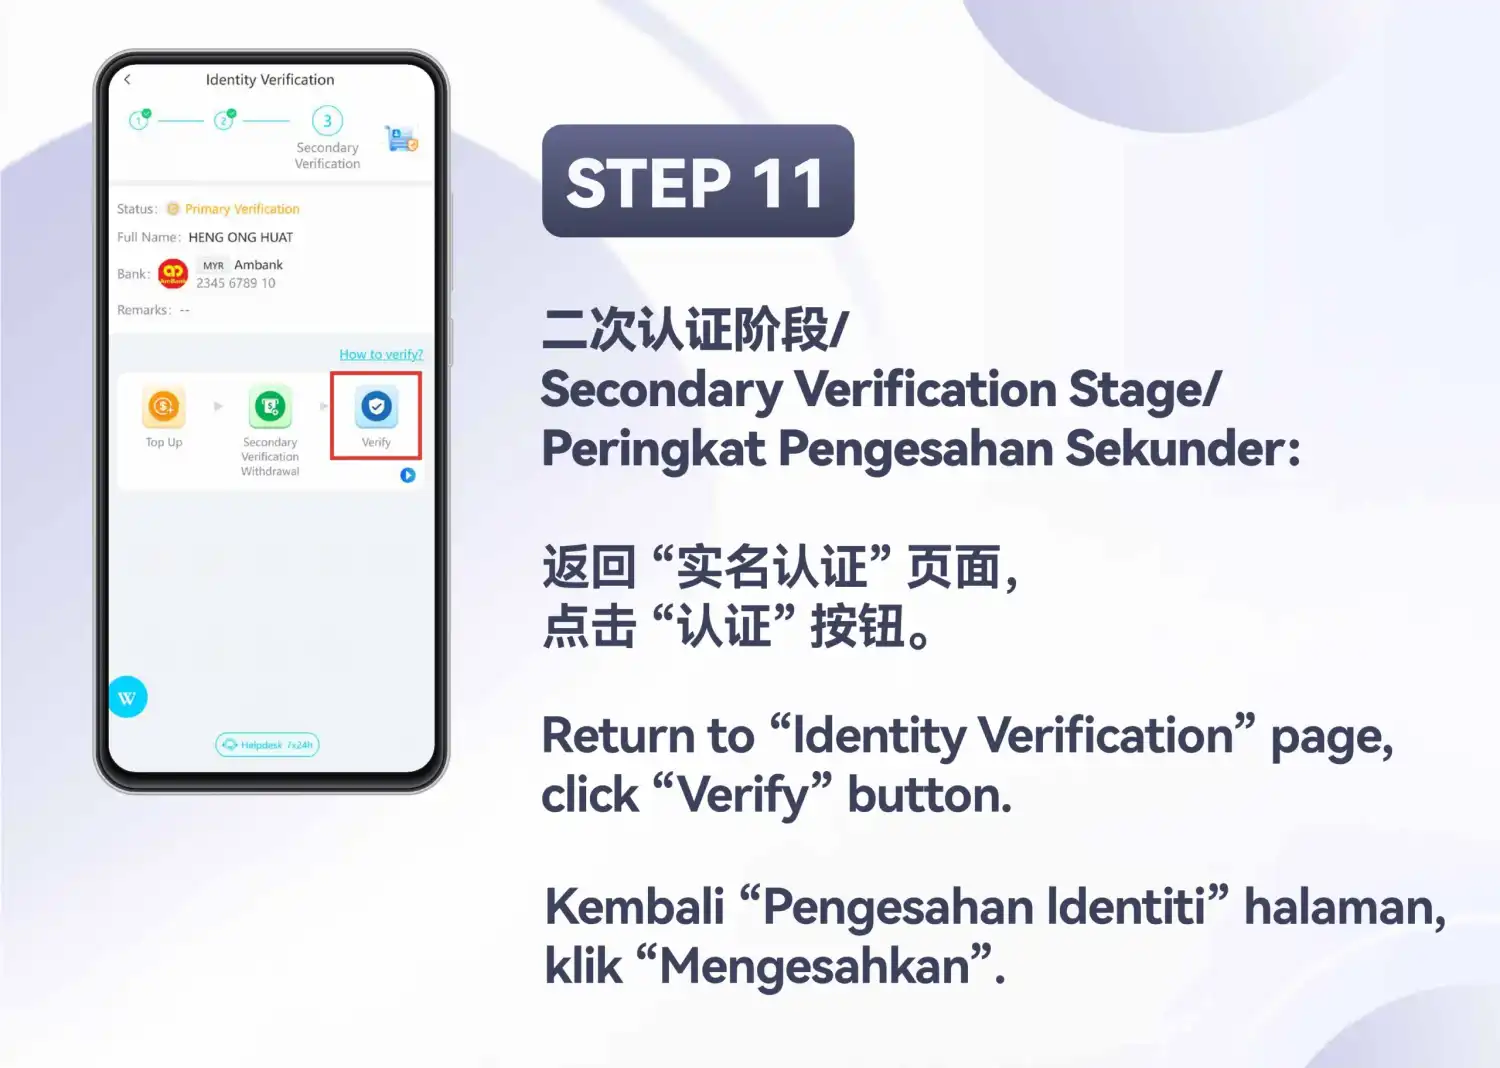
Return and tap Verify
Back on Identity Verification, stage 3, Secondary Verification, is now the active one. Tap “Verify”, the third action in the row.
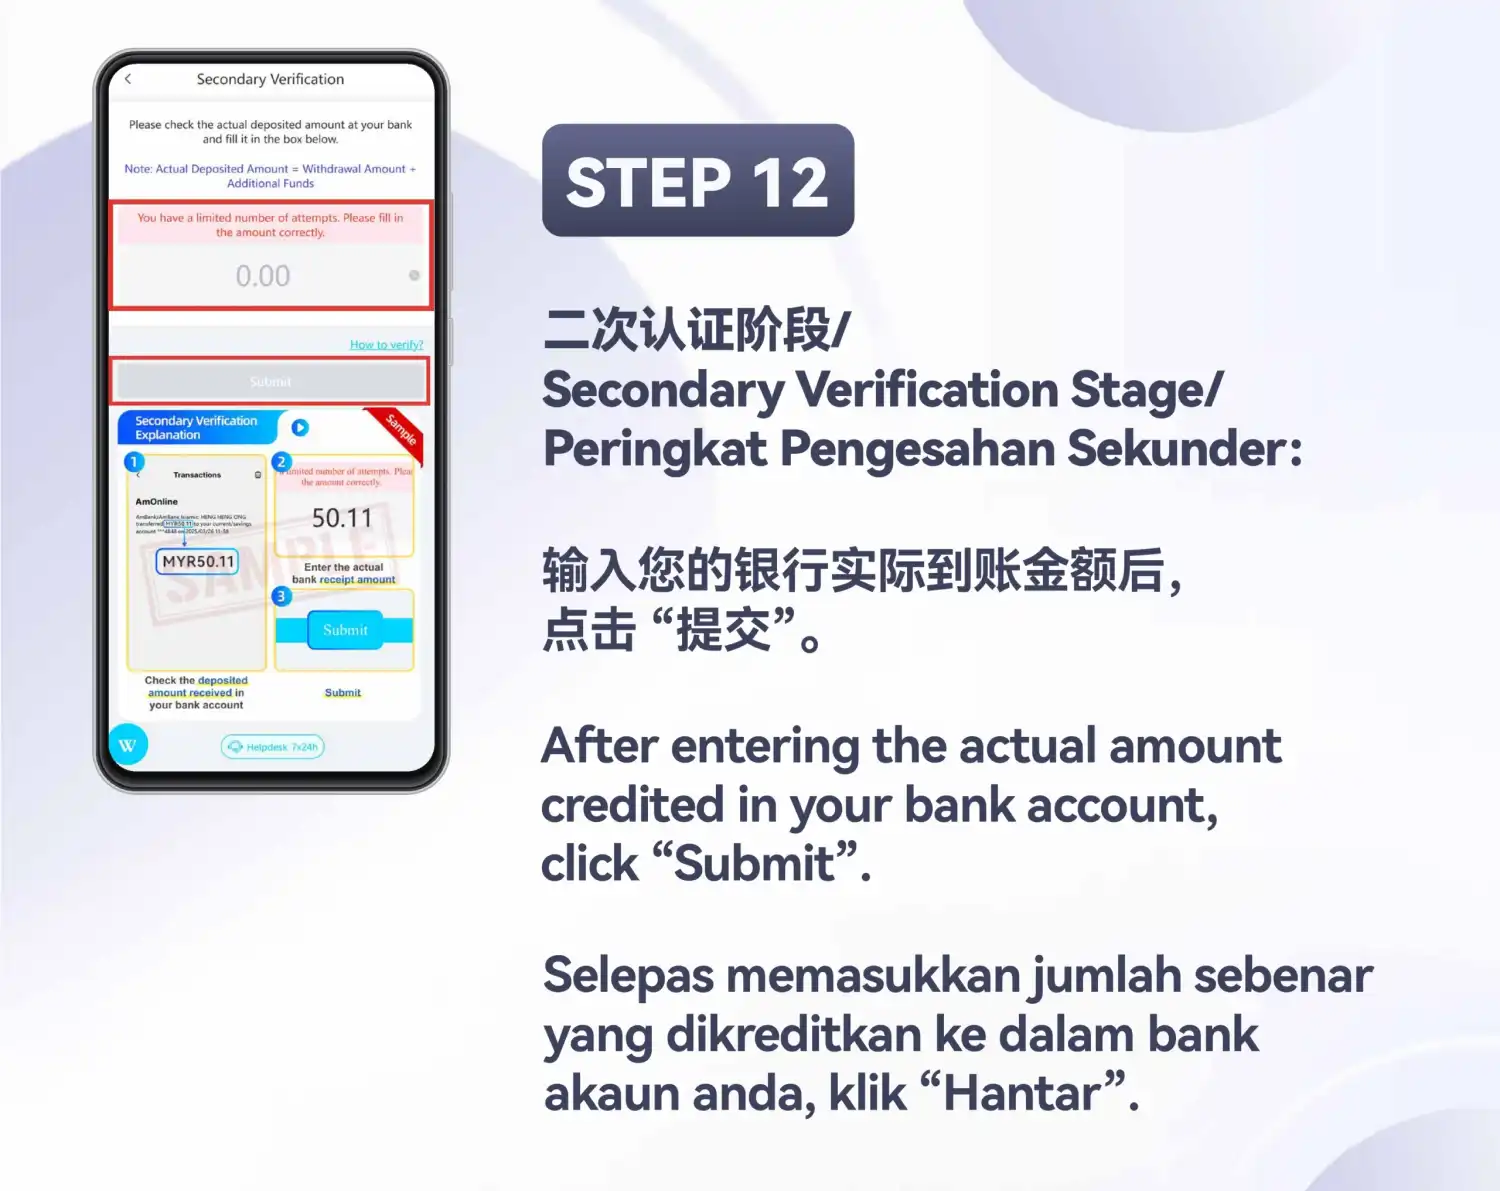
Enter the actual deposited amount
The Secondary Verification screen asks you to check the actual deposited amount at your bank and fill it in. It notes “Actual Deposited Amount = Withdrawal Amount + Additional Funds” and warns “You have a limited number of attempts. Please fill in the amount correctly.” Enter the amount, then tap “Submit”.
The lower half is a card marked Sample that explains the same three steps. The screen doesn’t say how many attempts you have.
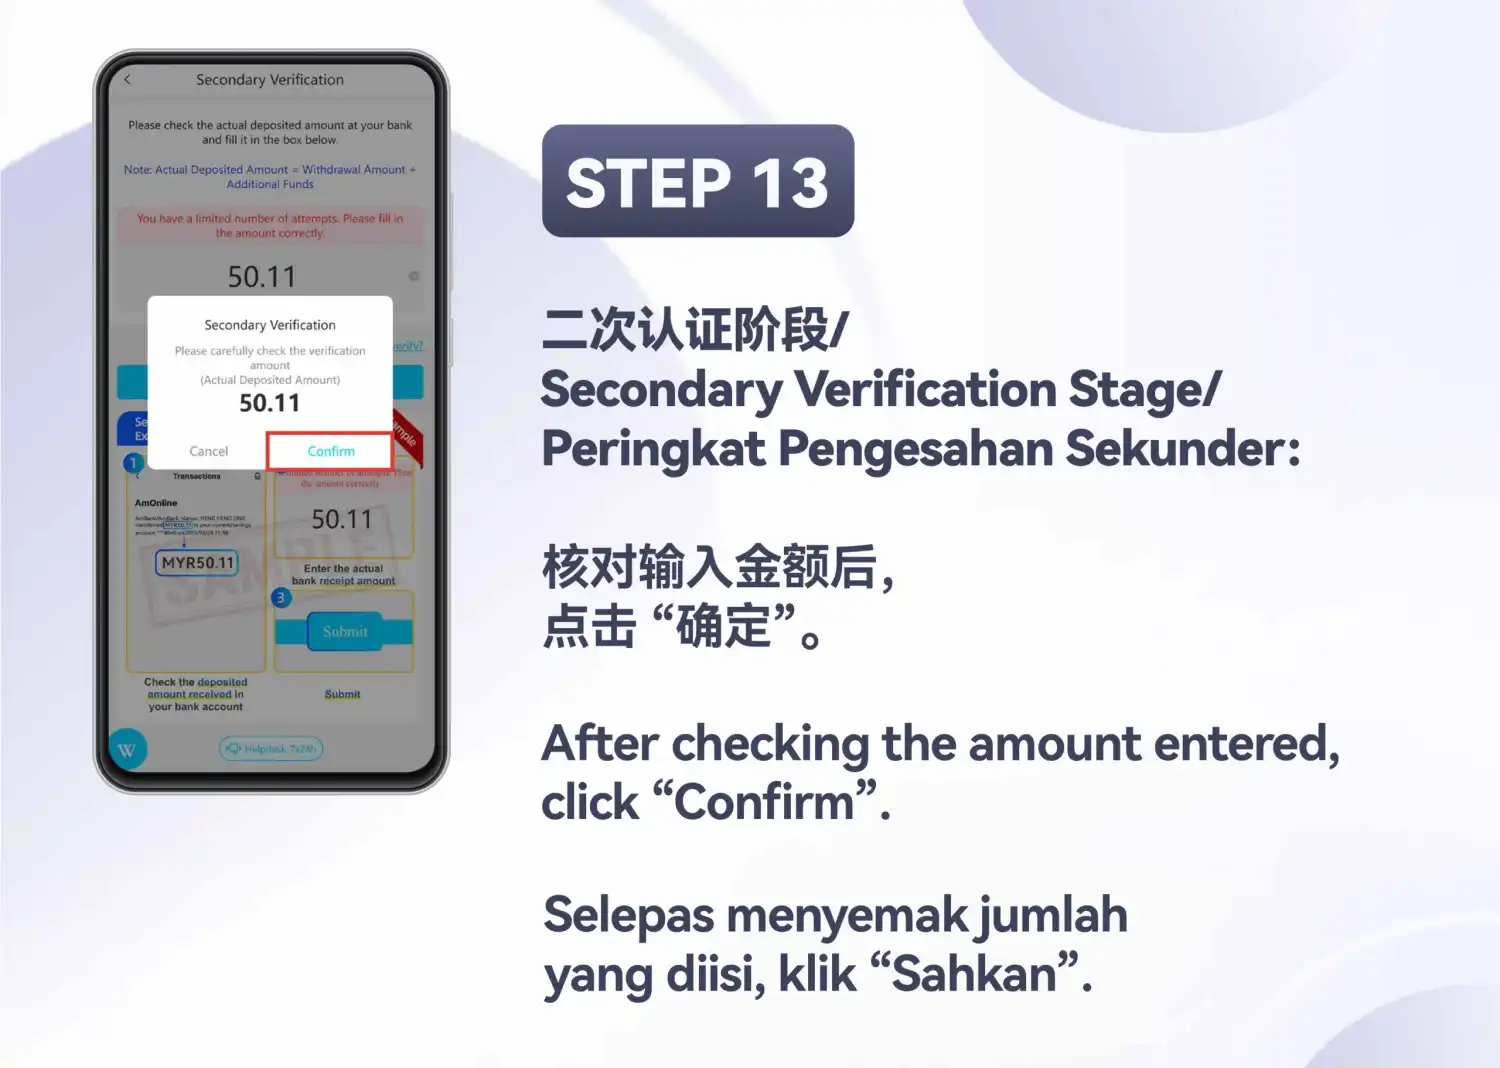
Check the amount and tap Confirm
A dialog asks you to “carefully check the verification amount (Actual Deposited Amount)” and shows the amount you entered, 50.11 in the example, with Cancel and Confirm. Tap “Confirm” once you have checked it.
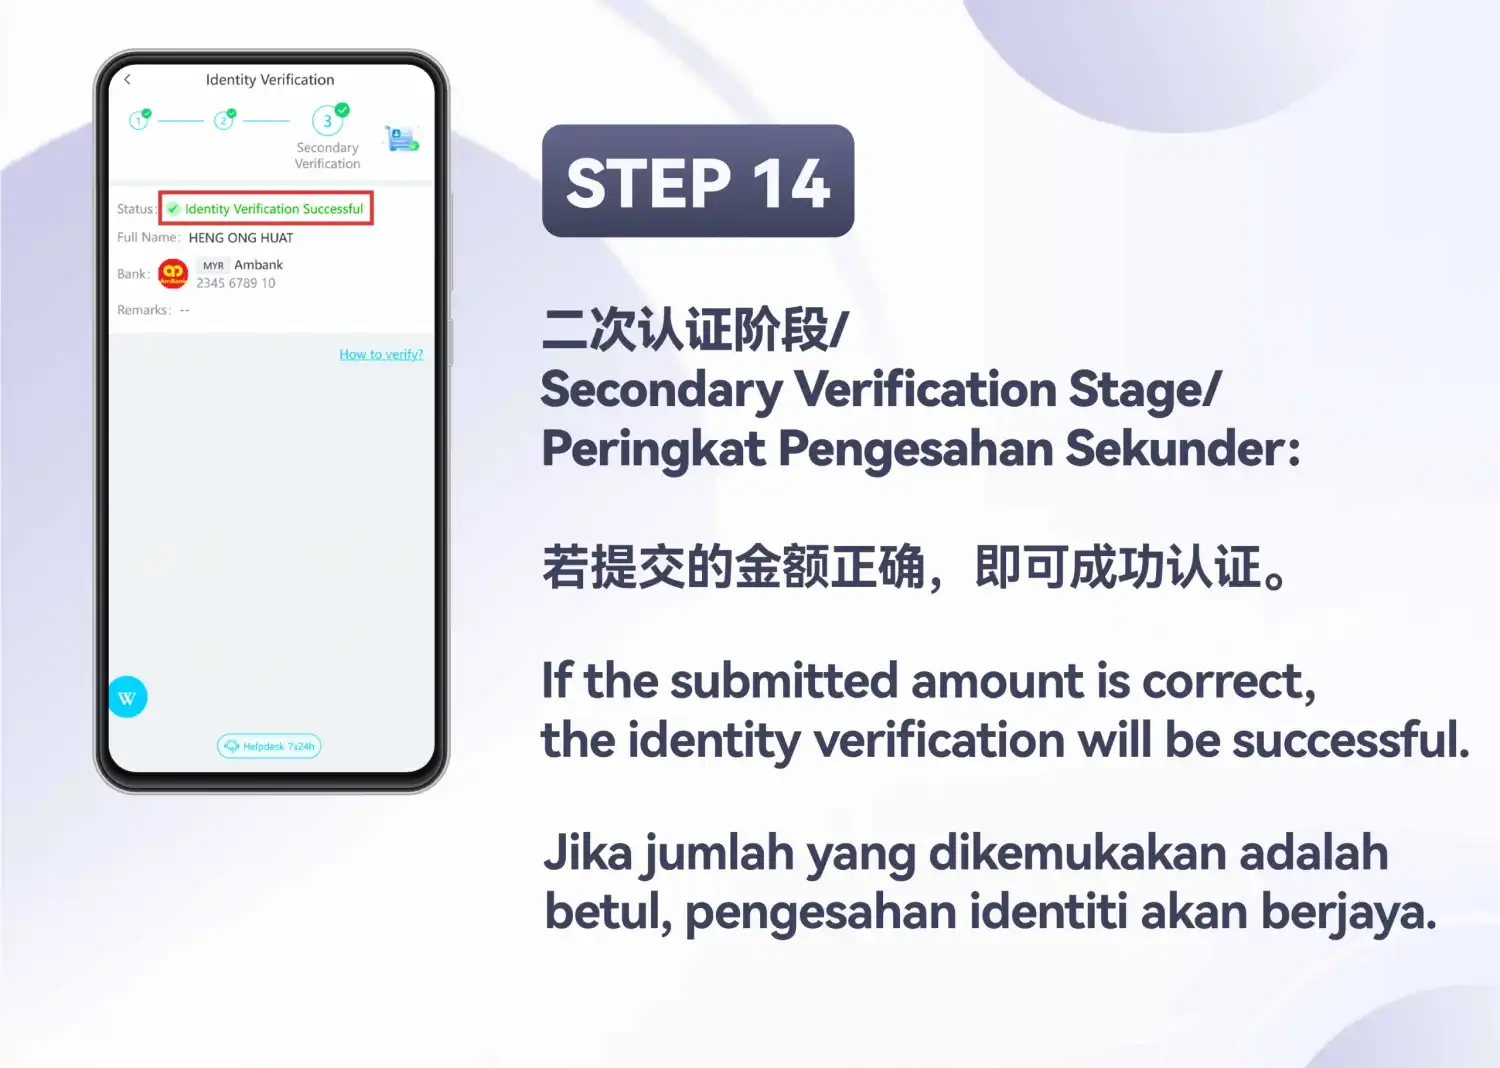
Identity Verification Successful
If the submitted amount is correct, the slide says, the status line reads “Identity Verification Successful” and all three stages are ticked.
Check before you submit
Three points where the screens themselves ask for care:
- Name and bank account (step 3). The full name matches the bank account holder. The notice says a third-party name is not allowed.
- Bank and account number (step 3). They are the ones you mean to use. The same bank account appears again on the later screens.
- The amount you type (steps 12 and 13). It is the actual deposited amount from your own bank message, because the screen warns you have a limited number of attempts.
What each status on the screens means
Four different wordings appear, and only the last one is the end of the flow.
“Full name has been submitted successfully. Please wait for customer service review.”
Step 4
The information was sent and is waiting for customer service review.
Not approved yet, and no review time is given.
“Primary Verification”
Step 5
The review was passed and stage 2 is ticked.
Stage 3 is still open.
“Successful (type: Verify Order)”
Step 9
The secondary verification withdrawal order went through.
Not the verification result. The amount still has to be entered.
“Identity Verification Successful”
Step 14
All three stages are ticked.
The slide ties this to the submitted amount being correct.
The other option on the same screen
Step 2 also lists “Cross-border UID verification”. Its notice reads: if you do not have a local bank account, you can use it to bind; the UID you want to bind must be the same as the real-name account; and when binding you fill in the same authentication information, account holder name and account number. The slides have no screens for this option, so it isn't walked through here.
Information reminder
The form asks for a name and bank details. Enter them only on the Identity Verification screen you opened yourself from the Me menu, and read every field before you tap OK or Submit. This page is a tutorial: it has no form and never receives what you type.
If your screen looks different
These slides are dated July 2025 and show the H5 version, and the sample values (a 50.00 withdrawal, a 50.11 deposit) belong to that example. The app, and the wording on it, can change. If you use the Android app instead of the browser, the Winbox APK download page covers installing it. Follow the fields, notices and status your own screen shows.
What this tutorial doesn't establish
- How long the customer service review takes
- Which features are unlocked, or what stays limited until the last stage
- How large the additional funds in step 10 are
- How many attempts the amount in step 12 allows
- What happens if the review or the amount check fails
Next
Once the status reads Identity Verification Successful, the rest of the site is a click away from the Winbox homepage.